Android Service
Service(服務)是一種在後臺運行,執行長時間運行的操作,無需與用戶交互的組件。例如,一個服務可以在後臺播放音樂,用戶在不同的應用程序或者可能通過網絡獲取數據,而不阻塞用戶交互活動。本質上,一個服務可以採取兩種狀態:
狀態
描述
Started
當一個應用程序組件,如活動,開始通過調用StartService()啓動一個服務。開始以後服務可以無限期地在後臺運行,即使啓動它的組件被破壞。
Bound
當一個應用程序組件綁定調用bindService()方法綁定服務。綁定服務提供客戶端 - 服務器的接口,允許組件進行交互的服務,發送請求,得到結果,這樣可以跨進程進程間通信(IPC)。
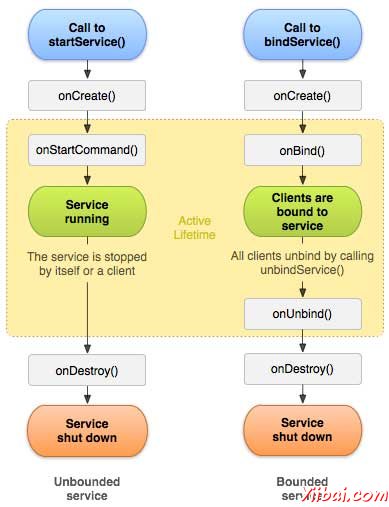
每個服務都具有生命週期回調方法,可以實現監視服務的狀態變化,並在適當的階段執行工作。下圖左側顯示的整個生命週期由StartService()創建提供服務 ,右邊的圖顯示bindService()創建的整個生命週期提供服務:
要創建一個服務,需要創建一個Java類,擴展Service基類或者它的子類。Service基類定義各種回調方法,如下面表格給出。但是也並不需要實現所有的回調方法。重要的是要了解每一個變化以及實現,以確保應用程序能如用戶所期望的行爲方式運行。
回調
描述
onStartCommand()
系統調用此方法當另一組件,如一個活動,通過調用startService()要求該服務啓動。如果要實現方法,它工作完成後停止服務,通過調用stopSelf()或stopService()方法。
onBind()
該系統調用這個方法當其他組件要通過調用bindService()綁定服務。如果實現此方法,必須提供客戶端與服務進行通信,通過返回一個IBinder對象的接口。必須實現此方法,但如果不希望被綁定,那麼應該返回null。
onUnbind()
系統調用此方法,當所有客戶都從服務發佈的特定接口斷開。
onRebind()
該系統調用這個方法時,新的客戶端已連接到服務,它事先未通知,所有已經上解除綁定後(意向)斷開它。
onCreate()
該系統調用時,使用onStartCommand()或onBind()首先創建的服務這個方法。此調用需要執行一次性安裝。
onDestroy()
系統調用這個方法當服務不再使用(被銷燬)。服務應該實現這個用於清理,如線程,註冊的偵聽器,接收器等任何資源
下面的主服務演示每一個方法生命週期:
package com.yiibai; import android.app.Service; import android.os.IBinder; import android.content.Intent; import android.os.Bundle; public class HelloService extends Service { /** indicates how to behave if the service is killed */ int mStartMode; /** interface for clients that bind */ IBinder mBinder; /** indicates whether onRebind should be used */ boolean mAllowRebind; /** Called when the service is being created. */ @Override public void onCreate() { } /** The service is starting, due to a call to startService() */ @Override public int onStartCommand(Intent intent, int flags, int startId) { return mStartMode; } /** A client is binding to the service with bindService() */ @Override public IBinder onBind(Intent intent) { return mBinder; } /** Called when all clients have unbound with unbindService() */ @Override public boolean onUnbind(Intent intent) { return mAllowRebind; } /** Called when a client is binding to the service with bindService()*/ @Override public void onRebind(Intent intent) { } /** Called when The service is no longer used and is being destroyed */ @Override public void onDestroy() { } }
示例
這個例子將通過簡單的步驟顯示瞭如何創建Android服務。按照下面的步驟來修改前面章節創建的Android應用程序 - Hello World示例 :
步驟
描述
1
使用Eclipse IDE創建Android應用程序,並將其命名爲HelloWorld在包com.example.helloworld下,類似Hello World示例章節中一樣。
2
修改主要活動文件MainActivity.java添加startService()和stopService()方法。
3
在包com.example.helloworld下創建一個新的Java文件MyService.java。該文件將有實現Android服務相關的方法。
4
使用 <service.../>標籤定義AndroidManifest.xml文件服務。一個應用可以有一個或多個服務,沒有任何限制。
5
修改res/layout/activity_main.xml文件的默認內容包括線性佈局中的兩個按鈕。
6
定義兩個常量start_service和stop_service在 res/values/strings.xml 文件中
7
運行該應用程序啓動Android模擬器並驗證應用程序所做的修改結果。
以下是改性主要活動文件 src/com.example.helloworld/MainActivity.java 的內容。這個文件包括每個基本的生命週期方法。添加 StartService() 和 stopService() 方法來啓動和停止服務。
package com.example.helloworld; import android.os.Bundle; import android.app.Activity; import android.view.Menu; import android.content.Intent; import android.view.View; public class MainActivity extends Activity { @Override public void onCreate(Bundle savedInstanceState) { super.onCreate(savedInstanceState); setContentView(R.layout.activity_main); } @Override public boolean onCreateOptionsMenu(Menu menu) { getMenuInflater().inflate(R.menu.activity_main, menu); return true; } // Method to start the service public void startService(View view) { startService(new Intent(getBaseContext(), MyService.class)); } // Method to stop the service public void stopService(View view) { stopService(new Intent(getBaseContext(), MyService.class)); } }
以下是src/com.example.helloworld/MyService.java 的內容。這個文件可以有一個或多個方法來使用服務。現在要實現只有兩個方法 onStartCommand() 和 onDestroy() :
package com.example.helloworld; import android.app.Service; import android.content.Intent; import android.os.IBinder; import android.widget.Toast; public class MyService extends Service { @Override public IBinder onBind(Intent arg0) { return null; } @Override public int onStartCommand(Intent intent, int flags, int startId) { // Let it continue running until it is stopped. Toast.makeText(this, "Service Started", Toast.LENGTH_LONG).show(); return START_STICKY; } @Override public void onDestroy() { super.onDestroy(); Toast.makeText(this, "Service Destroyed", Toast.LENGTH_LONG).show(); } }
下面將 AndroidManifest.xml 文件的內容修改。在這裏添加 <service.../> 標籤,包括服務:
<manifest xmlns:android="http://schemas.android.com/apk/res/android" package="com.example.helloworld" android:versionCode="1" android:versionName="1.0" > <uses-sdk android:minSdkVersion="8" android:targetSdkVersion="15" /> <application android:icon="@drawable/ic_launcher" android:label="@string/app_name" android:theme="@style/AppTheme" > <activity android:name=".MainActivity" android:label="@string/title_activity_main" >
將以下是 res/layout/activity_main.xml 文件的內容,包括兩個按鈕:
<LinearLayout xmlns:android="http://schemas.android.com/apk/res/android" android:layout_width="fill_parent" android:layout_height="fill_parent" android:orientation="vertical" > <Button android:id="@+id/btnStartService" android:layout_width="fill_parent" android:layout_height="wrap_content" android:text="@string/start_service" android:onClick="startService"/> <Button android:id="@+id/btnStopService" android:layout_width="fill_parent" android:layout_height="wrap_content" android:text="@string/stop_service" android:onClick="stopService" />
下面將在 res/values/strings.xml 中定義兩個新的常量:
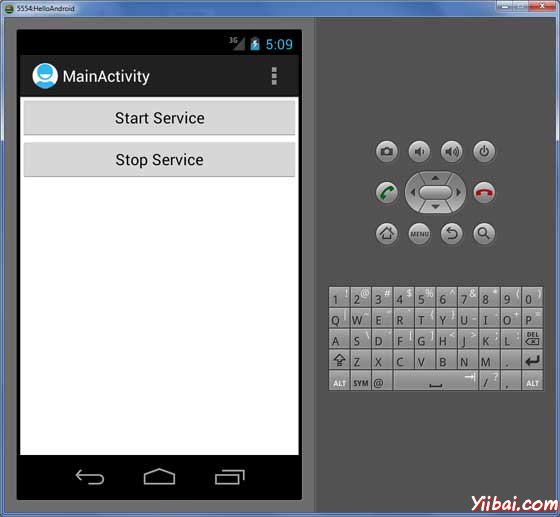
現在運行修改後的 Hello World!應用程序。假設創建了AVD 並同時做了環境設置。要在Eclipse運行的應用程序,打開一個項目的活動文件,從工具欄上找到並單擊 「run」
 圖標。 Eclipse AVD上安裝的應用程序,並啓動它,如果一切設置以及應用都沒有問題,那麼將會顯示以下模擬器窗口:
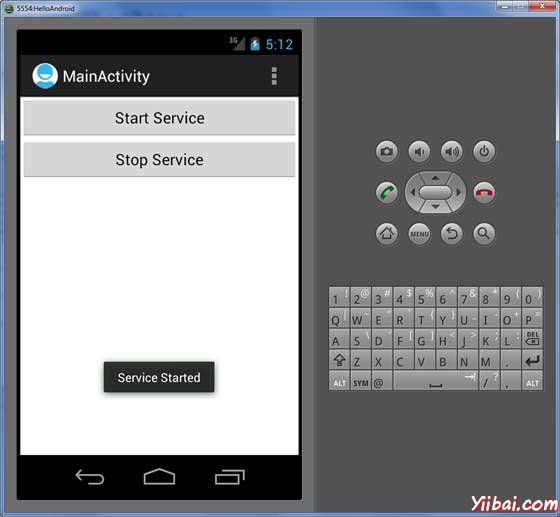
要開始服務,現在就點擊啓動服務按鈕,onStartCommand() 方法在程序中,每一個服務開始後將出現消息在模擬器底部,如下:
要停止該服務,可以點擊停止服務(Stop Service)按鈕。