Android EditText
EditText是覆蓋TextView配置,它本身是可編輯的。這是預定義 TextView 的子類,其中包括豐富的編輯功能。
EditText屬性
以下是有關 EditText 控件的重要屬性。可以查看Android官方文檔屬性和相關方法的完整列表,可以修改這些屬性在運行時。
繼承自 android.widget.TextView 類:
屬性
描述
android:autoText
如果設置,指定該TextView中有一個文本輸入法,並自動糾正一些常見的拼寫錯誤。
android:drawableBottom
這是可拉伸要繪製文本的下面。
android:drawableRight
這是可拉伸要繪製的文本的右側。
android:editable
如果設置,指定TextView 有一個輸入法。
android:text
這是要顯示的文本。
繼承自android.view.View類:
屬性
描述
android:background
這是一個可拉伸爲背景來使用
android:contentDescription
這定義文本簡要描述視圖內容
android:id
對此視圖提供一個標識符名稱
android:onClick
這是在此視圖的上下文視圖被點擊時調用的方法的名稱。
android:visibility
這種控制視圖的初始爲可視性。
例子
這個例子將通過簡單的步驟顯示如何使用線性佈局創建自己的Android應用程序項目:guidemo2。
步驟
描述
1
使用Android Studio創建一個Android應用程序,並將創建一個名爲:guidemo2的項目
2
修改 src/MainActivity.java 文件,添加一個click事件。
2
修改res/layout/activity_main.xml 文件的默認內容包括Android UI控件 - EditText。
3
在res/values/strings.xml中文件定義所需的常量
4
運行該應用程序啓動Android模擬器並驗證應用程序所運行的結果。
以下是主活動文件src/com.yiibai.guidemo2/MainActivity.java 的內容。這個文件可以包括每個生命週期基本的方法。
package com.example.guidemo2; import android.os.Bundle; import android.app.Activity; import android.view.Menu; import android.view.View; import android.view.View.OnClickListener; import android.widget.Button; import android.widget.EditText; import android.widget.Toast; public class MainActivity extends Activity { @Override protected void onCreate(Bundle savedInstanceState) { super.onCreate(savedInstanceState); setContentView(R.layout.activity_main); final EditText eText; final Button btn; eText = (EditText) findViewById(R.id.edittext); btn = (Button) findViewById(R.id.button); btn.setOnClickListener(new OnClickListener() { public void onClick(View v) { String str = eText.getText().toString(); Toast msg = Toast.makeText(getBaseContext(),str, Toast.LENGTH_LONG); msg.show(); msg.show(); } }); } @Override public boolean onCreateOptionsMenu(Menu menu) { // Inflate the menu; this adds items to the action bar if it is present. getMenuInflater().inflate(R.menu.main, menu); return true; } }
下面是 res/layout/activity_main.xml 文件的內容:
<RelativeLayout xmlns:android="http://schemas.android.com/apk/res/android" xmlns:tools="http://schemas.android.com/tools" android:layout_width="match_parent" android:layout_height="match_parent" android:paddingBottom="@dimen/activity_vertical_margin" android:paddingLeft="@dimen/activity_horizontal_margin" android:paddingRight="@dimen/activity_horizontal_margin" android:paddingTop="@dimen/activity_vertical_margin" tools:context=".MainActivity" > <TextView android:id="@+id/textView1" android:layout_width="wrap_content" android:layout_height="wrap_content" android:layout_alignParentLeft="true" android:layout_alignParentTop="true" android:layout_marginLeft="14dp" android:layout_marginTop="18dp" android:text="@string/example_edittext" /> <Button android:id="@+id/button" android:layout_width="wrap_content" android:layout_height="wrap_content" android:layout_alignLeft="@+id/textView1" android:layout_below="@+id/textView1" android:layout_marginTop="130dp" android:text="@string/show_the_text" /> <EditText android:id="@+id/edittext" android:layout_width="fill_parent" android:layout_height="wrap_content" android:layout_alignLeft="@+id/button" android:layout_below="@+id/textView1" android:layout_marginTop="61dp" android:ems="10" android:text="@string/enter_text" android:inputType="text" />
下面文件 res/values/strings.xml 的內容中定義兩個新的常量:
以下是AndroidManifest.xml文件的默認內容:
<manifest xmlns:android="http://schemas.android.com/apk/res/android" package="com.yiibai.guidemo2" android:versionCode="1" android:versionName="1.0" > <uses-sdk android:minSdkVersion="8" android:targetSdkVersion="17" /> <application android:allowBackup="true" android:icon="@drawable/ic_launcher" android:label="@string/app_name" android:theme="@style/AppTheme" > <activity android:name="com.yiibai.guidemo2.MainActivity" android:label="@string/app_name" >
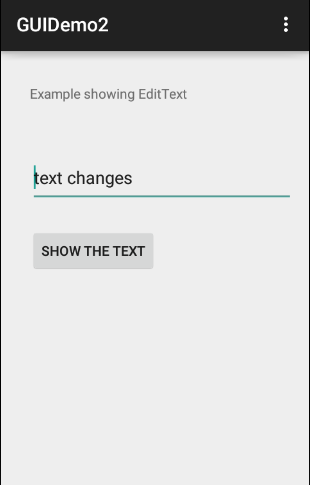
我們嘗試運行GUIDemo2應用程序。Android Studio AVD安裝的應用程序,並啓動它,如果一切設置和應用都沒有問題,它會顯示以下模擬器窗口:
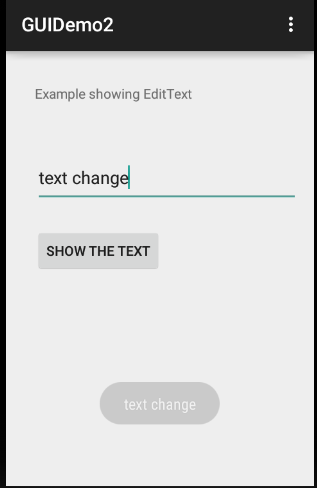
現在,點擊「Show the Text」,它會給下面的屏幕上的按鈕:
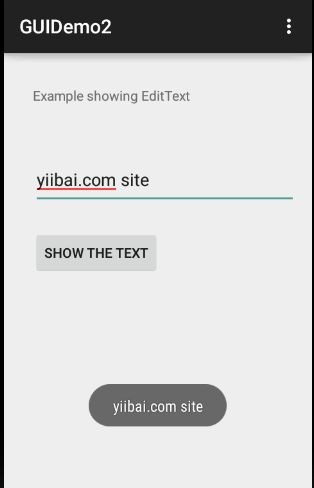
現在,將文本更改爲「yiibai.com」。點擊按鈕「Show the Text」,它會給下面的畫面:
練習:
建議嘗試上面的例子,使用EditText 不同屬性在佈局XML文件,在編程時有不同的外觀 EditText。使其可編輯,更改字體顏色,字體,寬度,textSize 等再看看結果。也可以試試上面的例子多EditText控制在一個activity。