Android通知
Android的Toast 類提供了一個方便的方式來顯示用戶的警告信息,但這些警告不是持久性的,這意味着警告閃爍在屏幕上幾秒鐘後就消失了。
對於特別重要的要提供給用戶的消息,需要有更持久性的方法。 Anotification是一種消息可以顯示在設備的頂部的通知欄或狀態欄中。

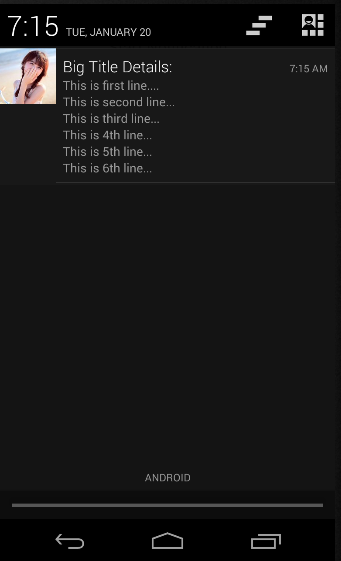
要看到通知的細節,選擇圖標顯示通知抽屜裏有詳細的有關通知。模擬器虛擬設備工作,按一下向下拖動狀態欄將它展開,將顯示詳細信息如下。這將是64 sp高的普通視圖。
上述擴大的形式可以放到一個大的視圖,有關通知的更多細節。可以添加最多六行的通知。下面的截圖顯示了這樣的通知。
創建和發送通知
使用簡單的方法來創建一個通知。按照以下步驟在應用程序創建一個通知:
第1步 - 創建通知生成器
作爲第一步創建一個通知構造器,使用NotificationCompat.Builder.build()。使用通知Builder來設置屬性,如各種通知其小型和大型圖標,標題,優先級等。
NotificationCompat.Builder mBuilder = new NotificationCompat.Builder(this)
第2步 - 設置通知屬性
在創建Builder對象之後,可以按要求使用生成器創建通知對象。這是強制性的,以至少下列設置:
一個小圖標,由 setSmallIcon() 設置
一個標題,由setContentTitle() 設置
詳細內容由 setContentText() 設置
mBuilder.setSmallIcon(R.drawable.notification_icon); mBuilder.setContentTitle("Notification Alert, Click Me!"); mBuilder.setContentText("Hi, This is Android Notification Detail!");
通知有很多可選的屬性,可以設置。要更多地瞭解它們,請參考 NotificationCompat.Builder 文檔。
第3步 - 動作附加
這是一個可選的部分,並要求如果要附加一個動作的通知。動作可以讓用戶直接從通知到應用程序中的活動,在那裏它們可以在一個或多個事件,或做進一步的工作。
動作定義通過PendingIntent 在應用程序中的活動意圖。要關聯PendingIntent 手勢請調用適當NotificationCompat.Builder 方法。例如,如果想開始活動,當用戶點擊通知文本通知抽屜 PendingIntent 調用setContentIntent()。
PendingIntent對象表示應用程序的執行一個動作,在以後的時間裏查看應用程序是否正在運行。
堆棧builder對象將包含一個人工後退堆棧活動。確保向後導航的活動在應用程序的主屏幕。
Intent resultIntent = new Intent(this, ResultActivity.class); TaskStackBuilder stackBuilder = TaskStackBuilder.create(this); stackBuilder.addParentStack(ResultActivity.class); // Adds the Intent that starts the Activity to the top of the stack stackBuilder.addNextIntent(resultIntent); PendingIntent resultPendingIntent = stackBuilder.getPendingIntent( 0, PendingIntent.FLAG_UPDATE_CURRENT ); mBuilder.setContentIntent(resultPendingIntent);
第4步 - 發出通知
最後,調用NotificationManager.notify() 發送通知,通知對象傳遞到系統。通知之前,確保調用NotificationCompat.Builder.build()方法生成器對象。這種方法結合了所有的選擇,設置並返回一個新的Notificationobject。
NotificationManager mNotificationManager = (NotificationManager) getSystemService(Context.NOTIFICATION_SERVICE); // notificationID allows you to update the notification later on. mNotificationManager.notify(notificationID, mBuilder.build());
NotificationCompat.Builder類
NotificationCompat.Builder類可以更容易控制標誌,以及幫助構建典型通知佈局。以下是 NotificationCompat.Builder類的一些重要的和最常用的方法的一部分。
S.N.
常量& 描述
1
Notification build()
結合所有已設置的選項,並返回一個新的 Notification 對象
2
NotificationCompat.Builder setAutoCancel (boolean autoCancel)
設置此標誌將使它以便當用戶點擊它在面板中的通知被自動取消
3
NotificationCompat.Builder setContent (RemoteViews views)
提供定製RemoteViews使用來代替標準之一
4
NotificationCompat.Builder setContentInfo (CharSequence info)
設置大文本的通知的右側
5
NotificationCompat.Builder setContentIntent (PendingIntent intent)
提供一個PendingIntent通知被點擊時發出
6
NotificationCompat.Builder setContentText (CharSequence text)
設置通知的文本(第二行),在一個標準的通知
7
NotificationCompat.Builder setContentTitle (CharSequence title)
設置通知的文本(第一行),在一個標準的通知
8
NotificationCompat.Builder setDefaults (int defaults)
設置將要使用的默認通知選項
9
NotificationCompat.Builder setLargeIcon (Bitmap icon)
設置顯示在自動收報機和通知大圖標
10
NotificationCompat.Builder setNumber (int number)
在通知的右側設置大的數字
11
NotificationCompat.Builder setOngoing (boolean ongoing)
設置這是否是一個持續的通知
12
NotificationCompat.Builder setSmallIcon (int icon)
設置小圖標在通知使用佈局
13
NotificationCompat.Builder setStyle (NotificationCompat.Style style)
在構建時應用添加豐富的通知樣式
14
NotificationCompat.Builder setTicker (CharSequence tickerText)
設置在第一個通知到達時顯示在狀態欄中的文本
15
NotificationCompat.Builder setVibrate (long[] pattern)
設置振動模式的使用
16
NotificationCompat.Builder setWhen (long when)
設置該事件發生的時間。在面板的通知是由這個時間進行排序
示例
以下示例顯示 Android 的通知功能,NotificationCompat.Builder類已在Android4.1中引入。
步驟
描述
1
使用Android Studio創建一個Android應用程序,並將它命名爲:NotificationDemounder。在創建這個項目時確保目標SDK和編譯在Android SDK的最新版本或更高級別的API。
2
修改 src/MainActivity.java 文件,並添加定義三種方法startNotification(),cancelNotification()和updateNotification(),以涵蓋與Android的通知的最大功能的代碼。
3
創建一個新的src/NotificationView.java,這將被用於顯示新的佈局作爲新的活動將被啓動的一部分,當用戶將點擊通知
4
複製圖片woman.png在RES/ drawable-*文件夾,這個圖片將被用作通知圖標。可以使用的情況下,要爲他們提供了不同的設備有不同的分辨率的圖片
5
修改佈局XML文件 res/layout/activity_main.xml 添加三個按鈕的線性佈局
6
創建一個新的佈局XML文件 res/layout/notification.xml。這將被用來作爲佈局文件爲新的活動,將啓動時用戶將點擊任何通知
7
修改 res/values/strings.xml 中定義所需的恆定值
8
運行該應用程序時啓動Android模擬器並驗證應用程序所做的修改結果
以下是修改主要活動文件src/com.yiibai.notificationdemo/MainActivity.java 的內容。這個文件可以包括每個生命週期基本方法。
package com.example.notificationdemo; import android.os.Bundle; import android.app.Activity; import android.app.NotificationManager; import android.app.PendingIntent; import android.app.TaskStackBuilder; import android.content.Context; import android.content.Intent; import android.support.v4.app.NotificationCompat; import android.util.Log; import android.view.View; import android.widget.Button; public class MainActivity extends Activity { private NotificationManager mNotificationManager; private int notificationID = 100; private int numMessages = 0; protected void onCreate(Bundle savedInstanceState) { super.onCreate(savedInstanceState); setContentView(R.layout.activity_main); Button startBtn = (Button) findViewById(R.id.start); startBtn.setOnClickListener(new View.OnClickListener() { public void onClick(View view) { displayNotification(); } }); Button cancelBtn = (Button) findViewById(R.id.cancel); cancelBtn.setOnClickListener(new View.OnClickListener() { public void onClick(View view) { cancelNotification(); } }); Button updateBtn = (Button) findViewById(R.id.update); updateBtn.setOnClickListener(new View.OnClickListener() { public void onClick(View view) { updateNotification(); } }); } protected void displayNotification() { Log.i("Start", "notification"); /* Invoking the default notification service */ NotificationCompat.Builder mBuilder = new NotificationCompat.Builder(this); mBuilder.setContentTitle("New Message"); mBuilder.setContentText("You've received new message."); mBuilder.setTicker("New Message Alert!"); mBuilder.setSmallIcon(R.drawable.woman); /* Increase notification number every time a new notification arrives */ mBuilder.setNumber(++numMessages); /* Creates an explicit intent for an Activity in your app */ Intent resultIntent = new Intent(this, NotificationView.class); TaskStackBuilder stackBuilder = TaskStackBuilder.create(this); stackBuilder.addParentStack(NotificationView.class); /* Adds the Intent that starts the Activity to the top of the stack */ stackBuilder.addNextIntent(resultIntent); PendingIntent resultPendingIntent = stackBuilder.getPendingIntent( 0, PendingIntent.FLAG_UPDATE_CURRENT ); mBuilder.setContentIntent(resultPendingIntent); mNotificationManager = (NotificationManager) getSystemService(Context.NOTIFICATION_SERVICE); /* notificationID allows you to update the notification later on. */ mNotificationManager.notify(notificationID, mBuilder.build()); } protected void cancelNotification() { Log.i("Cancel", "notification"); mNotificationManager.cancel(notificationID); } protected void updateNotification() { Log.i("Update", "notification"); /* Invoking the default notification service */ NotificationCompat.Builder mBuilder = new NotificationCompat.Builder(this); mBuilder.setContentTitle("Updated Message"); mBuilder.setContentText("You've got updated message."); mBuilder.setTicker("Updated Message Alert!"); mBuilder.setSmallIcon(R.drawable.woman); /* Increase notification number every time a new notification arrives */ mBuilder.setNumber(++numMessages); /* Creates an explicit intent for an Activity in your app */ Intent resultIntent = new Intent(this, NotificationView.class); TaskStackBuilder stackBuilder = TaskStackBuilder.create(this); stackBuilder.addParentStack(NotificationView.class); /* Adds the Intent that starts the Activity to the top of the stack */ stackBuilder.addNextIntent(resultIntent); PendingIntent resultPendingIntent = stackBuilder.getPendingIntent( 0, PendingIntent.FLAG_UPDATE_CURRENT ); mBuilder.setContentIntent(resultPendingIntent); mNotificationManager = (NotificationManager) getSystemService(Context.NOTIFICATION_SERVICE); /* Update the existing notification using same notification ID */ mNotificationManager.notify(notificationID, mBuilder.build()); } }
以下是修改的主活動文件的內容 src/com.yiibai.notificationdemo/NotificationView.java.
package com.example.notificationdemo; import android.os.Bundle; import android.app.Activity; public class NotificationView extends Activity{ @Override public void onCreate(Bundle savedInstanceState) { super.onCreate(savedInstanceState); setContentView(R.layout.notification); } }
下面文件 res/layout/activity_main.xml 的內容如下:
<LinearLayout xmlns:android="http://schemas.android.com/apk/res/android" android:layout_width="fill_parent" android:layout_height="fill_parent" android:orientation="vertical" > <Button android:id="@+id/start" android:layout_width="fill_parent" android:layout_height="wrap_content" android:text="@string/start_note"/> <Button android:id="@+id/cancel" android:layout_width="fill_parent" android:layout_height="wrap_content" android:text="@string/cancel_note" /> <Button android:id="@+id/update" android:layout_width="fill_parent" android:layout_height="wrap_content" android:text="@string/update_note" />
下面是 res/layout/notification.xml 文件的內容:
<LinearLayout xmlns:android="http://schemas.android.com/apk/res/android" android:orientation="vertical" android:layout_width="fill_parent" android:layout_height="fill_parent" > <TextView android:layout_width="fill_parent" android:layout_height="400dp" android:text="Hi, Your Detailed notification view goes here...." />
下面文件 res/values/strings.xml 的內容中定義兩個新的常量:
下面是 AndroidManifest.xml 文件的內容:
<manifest xmlns:android="http://schemas.android.com/apk/res/android" package="com.yiibai.notificationdemo" android:versionCode="1" android:versionName="1.0" > <uses-sdk android:minSdkVersion="17" android:targetSdkVersion="17" /> <application android:allowBackup="true" android:icon="@drawable/ic_launcher" android:label="@string/app_name" android:theme="@style/AppTheme" > <activity android:name="com.yiibai.notificationdemo.MainActivity" android:label="@string/app_name" >
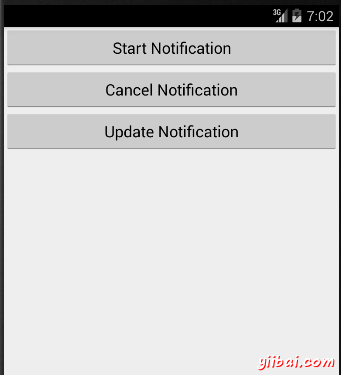
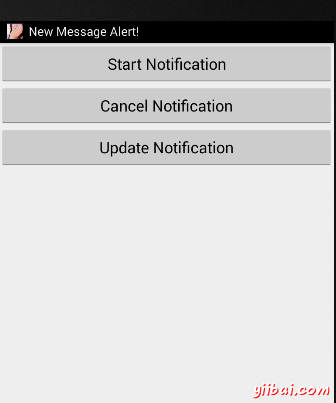
我們嘗試運行NotificationDemo 應用程序。AVD安裝的應用程序,並啓動它,如果一切設置和應用都沒有問題,它會顯示以下模擬器窗口:
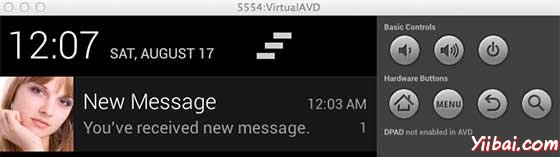
現在單擊「Start Notification」通知按鈕,會看到在上面的一條消息「New Message Alert!」將短暫顯示後,將有下面的屏幕左上角有一個小圖標。
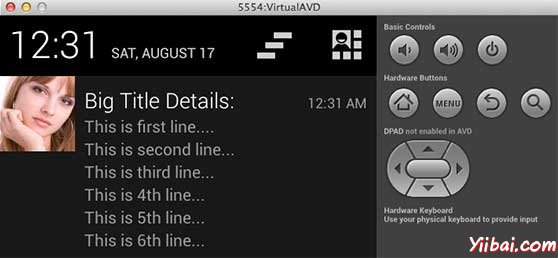
現在,讓我們展開視圖,長按小圖標,一秒鐘後它會顯示日期信息,這是時間的時候,應該釋放鼠標拖動狀態欄的情況下。會看到狀態欄將擴大,會得到以下畫面:

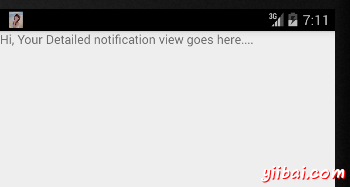
現在,讓我們嘗試在圖像上點擊圖標,這將啓動新的活動,已設置使用的意圖,將有以下屏幕:
接下來,可以點擊「Detail of notification」,將帶回到主屏幕,可以嘗試使用更新通知按鈕,將更新現有的通知和數量將增加1,但如果發送通知,新的通知ID會繼續增加在堆棧中,會看到他們在屏幕上單獨列示。
圖查看大圖通知
下面的代碼片斷演示瞭如何改變的通知,上面代碼中創建使用收件箱大視圖樣式。要更新 displayNotification() 方法來顯示這個功能:
protected void displayNotification() { Log.i("Start", "notification"); /* Invoking the default notification service */ NotificationCompat.Builder mBuilder = new NotificationCompat.Builder(this); mBuilder.setContentTitle("New Message"); mBuilder.setContentText("You've received new message."); mBuilder.setTicker("New Message Alert!"); mBuilder.setSmallIcon(R.drawable.woman); /* Increase notification number every time a new notification arrives */ mBuilder.setNumber(++numMessages); /* Add Big View Specific Configuration */ NotificationCompat.InboxStyle inboxStyle = new NotificationCompat.InboxStyle(); String[] events = new String[6]; events[0] = new String("This is first line...."); events[1] = new String("This is second line..."); events[2] = new String("This is third line..."); events[3] = new String("This is 4th line..."); events[4] = new String("This is 5th line..."); events[5] = new String("This is 6th line..."); // Sets a title for the Inbox style big view inboxStyle.setBigContentTitle("Big Title Details:"); // Moves events into the big view for (int i=0; i < events.length; i++) { inboxStyle.addLine(events[i]); } mBuilder.setStyle(inboxStyle); /* Creates an explicit intent for an Activity in your app */ Intent resultIntent = new Intent(this, NotificationView.class); TaskStackBuilder stackBuilder = TaskStackBuilder.create(this); stackBuilder.addParentStack(NotificationView.class); /* Adds the Intent that starts the Activity to the top of the stack */ stackBuilder.addNextIntent(resultIntent); PendingIntent resultPendingIntent = stackBuilder.getPendingIntent( 0, PendingIntent.FLAG_UPDATE_CURRENT ); mBuilder.setContentIntent(resultPendingIntent); mNotificationManager = (NotificationManager) getSystemService(Context.NOTIFICATION_SERVICE); /* notificationID allows you to update the notification later on. */ mNotificationManager.notify(notificationID, mBuilder.build()); }
現在,如果嘗試運行應用程序,然後會發現下面的結果視圖的擴展形式: