Android發送電子郵件
在前面已經學會了 Android 的意圖(Intent),這是落實意圖,即一個對象。來自一個部件的消息傳遞到另一個組件使用 - 在應用程序或應用程序之外。
因此這裏不需要從頭開始,因爲它們已經可以像 Gmail 和 K9mail 開發電子郵件客戶端。但需要從 Android 應用程序發送的電子郵件,編寫一個活動Activity,使用Android設備發送電子郵件需要啓動電子郵件客戶端併發送電子郵件。爲了這個目的,活動將伴隨着相應的數據負載一個ACTION_SEND發送到 Android 意圖解析器。指定選擇器提供適當的接口供用戶選擇如何發送電子郵件數據。
以下部分說明 Intent 對象發送電子郵件。
Intent 對象 - 動作發送電子郵件
使用ACTION_SEND 的動作啓動 Android 設備上安裝一個電子郵件客戶端。以下是簡單的語法創建一個Intent 用ACTION_SEND動作
Intent emailIntent = new Intent(Intent.ACTION_SEND);
Intent 對象 - 數據/發送電子郵件的類型
要發送電子郵件,需要指定mailto:URI使用 setData() 方法並且數據類型是text/plain使用settype()方法如下:
emailIntent.setData(Uri.parse("mailto:")); emailIntent.setType("text/plain");
Intent 對象- 附加發送電子郵件
Android已經內置支持TO, SUBJECT, CC, TEXT等域,可以在附加 Intent 之前發送到目標的電子郵件客戶端的Intent。可以使用額外的字段後電子郵件:
S.N.
額外數據 & 描述
1
EXTRA_BCC
String[] 持有應密件複製電子郵件地址
2
EXTRA_CC
String[] 持有複製電子郵件地址
3
EXTRA_EMAIL
String[] 持有應遞送到電子郵件地址
4
EXTRA_HTML_TEXT
與該意圖相關聯的常數字符串,使用 ACTION_SEND 替代 EXTRA_TEXT 爲 HTML 格式的文本
5
EXTRA_SUBJECT
常量字符串持有一條消息的所需主題行
6
EXTRA_TEXT
與該意圖相關聯的CharSequence常量,具有ACTION_SEND用來提供文字數據被髮送
7
EXTRA_TITLE
一個CharSequence對話框的標題,提供給用戶在ACTION_CHOOSER使用時
下面是一個例子展示如何分配額外的數據到 intent
emailIntent.putExtra(Intent.EXTRA_EMAIL , new String[]{"recipient@example.com"}); emailIntent.putExtra(Intent.EXTRA_SUBJECT, "subject of email"); emailIntent.putExtra(Intent.EXTRA_TEXT , "body of email");
示例
下面的示例演示如何在實際使用Intent對象啓動電子郵件客戶端發送電子郵件給定的收件人。要測試這個例子,需要實際配備了最新的Android OS的移動設備,否則仿真器可能無法正常工作。其次,需要在您的設備上安裝一個電子郵件客戶端,如 Gmail 或 K9mail
步驟
描述
1
使用Android Studio創建Android應用程序,並將它命名爲SendEmailDemounde。創建這個項目,確保目標SDK並編譯在Android SDK爲最新版本以及使用更高級別的API
2
修改 src/MainActivity.java 文件,並添加所需的代碼,以發送電子郵件
3
修改所需的佈局XML文件res/layout/activity_main.xml 添加GUI組件。這裏添加一個簡單的按鈕,啓動電子郵件客戶端
4
修改res/values/strings.xml定義所需的常量值
5
修改 AndroidManifest.xml 如下所示
6
運行該應用程序啓動 Android模擬器並驗證應用程序所做的修改結果。
以下是修改的主活動文件的內容 src/com.yiibai.sendemaildemo/MainActivity.java.
package com.example.sendemaildemo; import android.net.Uri; import android.os.Bundle; import android.app.Activity; import android.content.Intent; import android.util.Log; import android.view.Menu; import android.view.View; import android.widget.Button; import android.widget.Toast; public class MainActivity extends Activity { @Override protected void onCreate(Bundle savedInstanceState) { super.onCreate(savedInstanceState); setContentView(R.layout.activity_main); Button startBtn = (Button) findViewById(R.id.sendEmail); startBtn.setOnClickListener(new View.OnClickListener() { public void onClick(View view) { sendEmail(); } }); } protected void sendEmail() { Log.i("Send email", ""); String[] TO = {"amrood.admin@gmail.com"}; String[] CC = {"mcmohd@gmail.com"}; Intent emailIntent = new Intent(Intent.ACTION_SEND); emailIntent.setData(Uri.parse("mailto:")); emailIntent.setType("text/plain"); emailIntent.putExtra(Intent.EXTRA_EMAIL, TO); emailIntent.putExtra(Intent.EXTRA_CC, CC); emailIntent.putExtra(Intent.EXTRA_SUBJECT, "Your subject"); emailIntent.putExtra(Intent.EXTRA_TEXT, "Email message goes here"); try { startActivity(Intent.createChooser(emailIntent, "Send mail...")); finish(); Log.i("Finished sending email...", ""); } catch (android.content.ActivityNotFoundException ex) { Toast.makeText(MainActivity.this, "There is no email client installed.", Toast.LENGTH_SHORT).show(); } } @Override public boolean onCreateOptionsMenu(Menu menu) { // Inflate the menu; this adds items to the action bar if it is present. getMenuInflater().inflate(R.menu.main, menu); return true; } }
下面是文件 res/layout/activity_main.xml 的內容:
<LinearLayout xmlns:android="http://schemas.android.com/apk/res/android" android:layout_width="fill_parent" android:layout_height="fill_parent" android:orientation="vertical" > <Button android:id="@+id/sendEmail" android:layout_width="fill_parent" android:layout_height="wrap_content" android:text="@string/compose_email"/>
下面文件 res/values/strings.xml 的內容中定義兩個新的常量:
以下是文件 AndroidManifest.xml 默認的內容:
<manifest xmlns:android="http://schemas.android.com/apk/res/android" package="com.yiibai.sendemaildemo" android:versionCode="1" android:versionName="1.0" > <uses-sdk android:minSdkVersion="8" android:targetSdkVersion="17" /> <application android:allowBackup="true" android:icon="@drawable/ic_launcher" android:label="@string/app_name" android:theme="@style/AppTheme" > <activity android:name="com.yiibai.sendemaildemo.MainActivity" android:label="@string/app_name" >
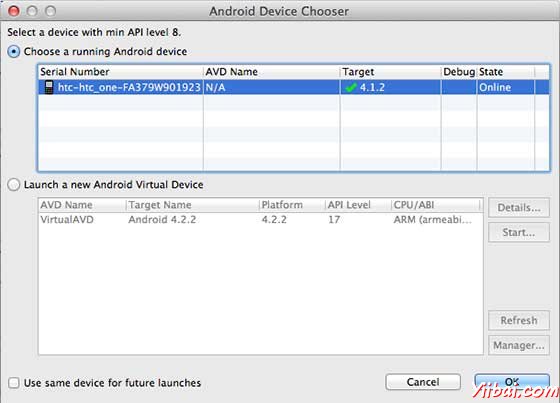
我們嘗試運行SendEmailDemo 應用程序。Eclipse AVD安裝的應用程序,並啓動它,如果一切設置和應用都沒有問題,它會顯示以下模擬器窗口:

選擇移動設備作爲一個選項,然後檢查移動設備,這將顯示以下畫面:

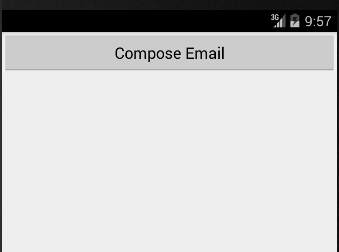
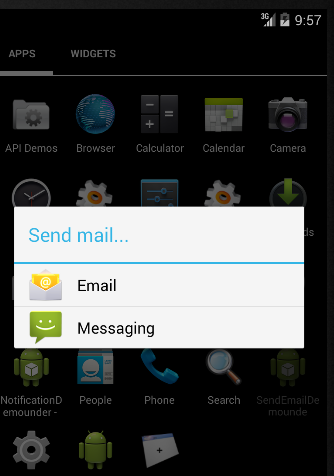
現在使用Compose Email「按鈕,列出了所有已安裝的電子郵件客戶端。從列表中,可以選擇其中的電子郵件客戶端發送電子郵件。要使用Gmail客戶端發送電子郵件,將所有提供的默認值的字段,如下圖所示。在這裏,From:將默認的電子郵件ID,已經爲Android設備註冊。

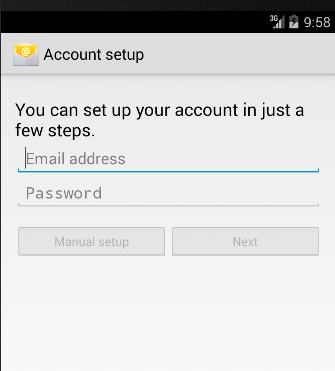
選擇 「email"後,如果沒有配置帳號信息,則提示配置帳號信息:

可以修改默認字段,最後使用「send email 」按鈕(標有紅色矩形)提到的收件人發送電子郵件。
代碼下載地下:http://pan.baidu.com/s/1qW2X0hm