Selenium網格
Selenium網格
Selenium網格是分佈在多個物理或虛擬機測試,使我們能夠並行(同時)執行腳本,導致執行所需的運行測試時間的工具。這給予我們快速而準確的反饋大大加快了跨瀏覽器和跨平臺的測試。
Selenium網格使我們能夠執行並行的webdriver或Selenium的遠程控制的測試,它使用相同的代碼的基礎上,因此,代碼不必存在它們執行系統上的多個實例。Selenium服務器的獨立軟件包包括集線器,webdriver,和Selenium RC網格執行腳本。
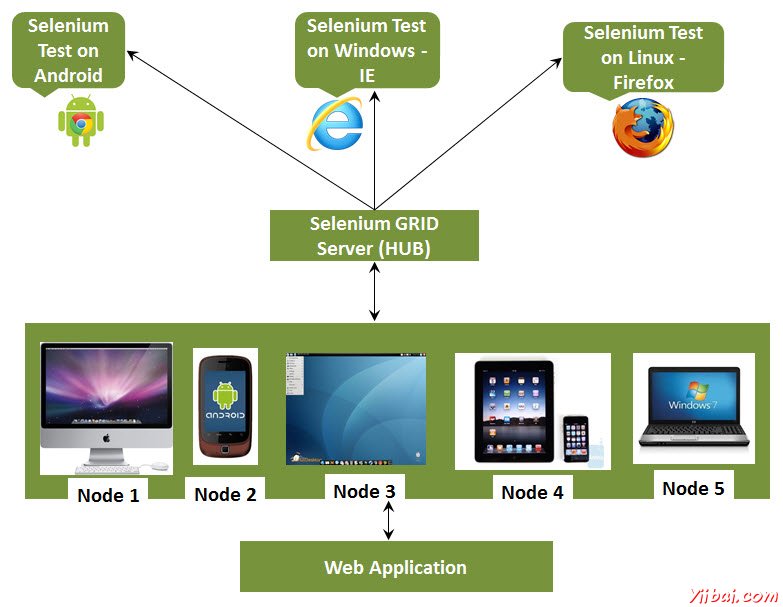
Selenium 網格具有樞紐和節點
Hub - 集線器也可以理解爲服務器充當中心點所在的測試將被觸發。Selenium網格只有一個集線器,它是一臺機器上啓動一次。
Node - 節點是Selenium實例附連到將執行測試的集線器。可以存在在其中可以是任何操作系統,並且可以包含任何所支持的瀏覽器Selenium網格的一個或多個節點。
體系結構
Selenium 網格的體系結構是用簡單的流程圖來解釋。
使用網格工作
爲了與網格工作,我們需要確保遵循一定的協議。下面是所涉及的主要步驟,瞭解他們的每一個細節。
Configuring Hub
Configuring Nodes
Develop Script
XML Preperation
Test Execution
Result Analysis
配置Hub
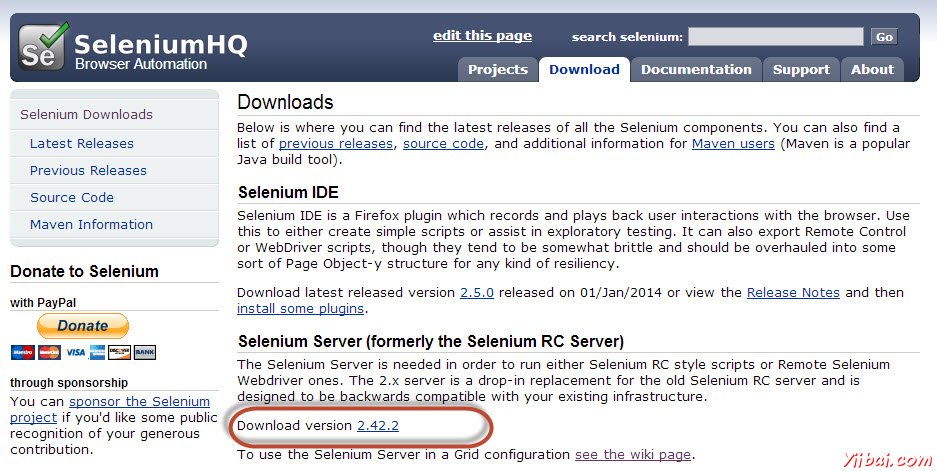
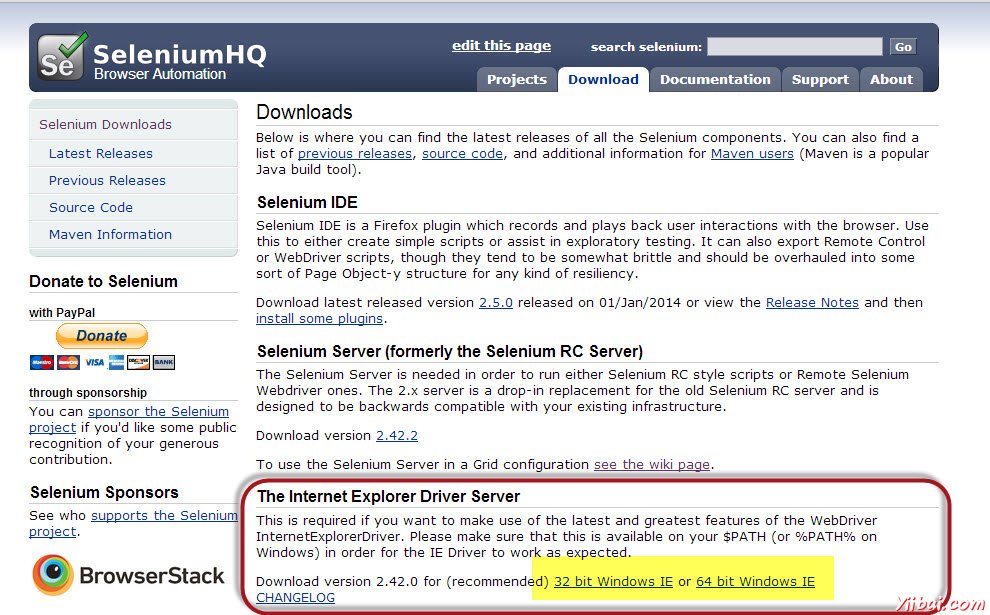
步驟1:從http://docs.seleniumhq.org/download/下載最新的Selenium服務器獨立JAR文件。通過點擊版本如下所示下載。
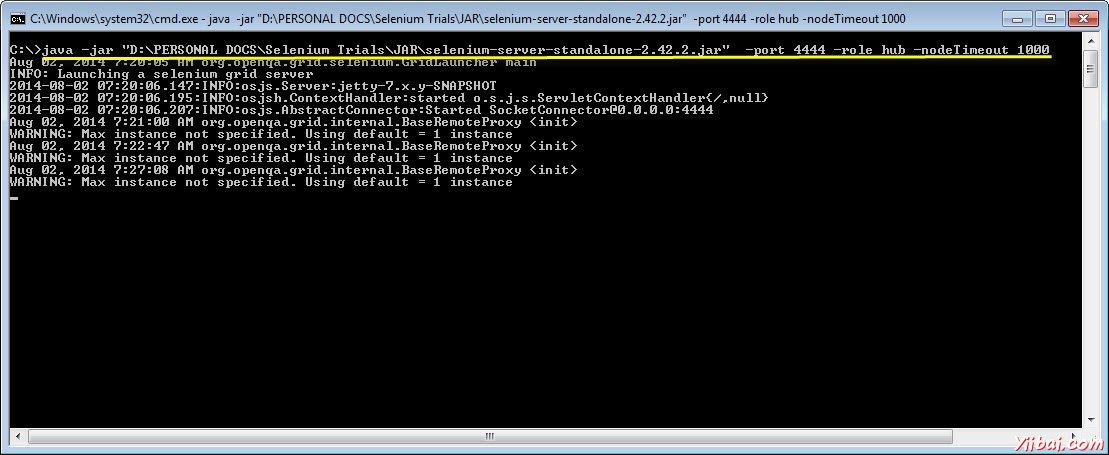
第2步:使用以下命令啓動Selenium服務器啓動的集線器。現在,我們將使用端口「4444」啓動集線器。
注:請確保端口#4444運行沒有被其他應用程序佔用。
java -jar selenium-server-standalone-2.25.0.jar -port 4444 -role hub -nodeTimeout 1000
第3步:現在打開瀏覽器,然後從集線器導航到http//localhost:4444 (其中已執行的系統步驟#2)。
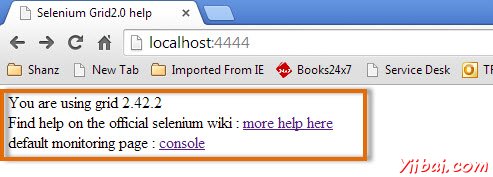
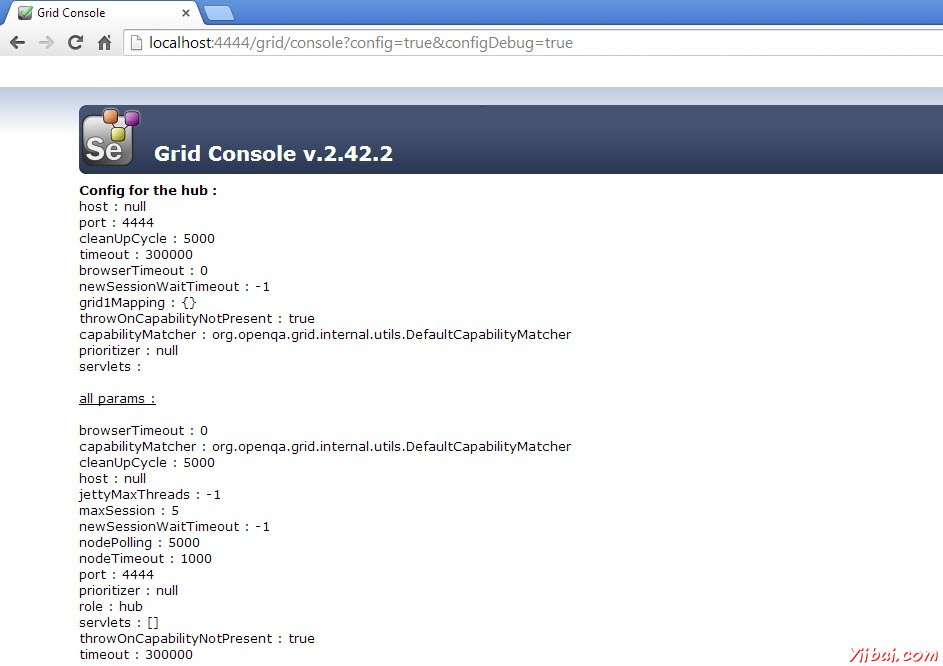
第4步:現在點擊「console」鏈接,然後單擊「view config」。將顯示hub的配置。截至目前,我們還沒有得到任何節點,因此我們將無法看到細節。
配置節點
第1步:登錄到節點(想執行腳本),然後替換文件夾中的「selenium-server-standalone-2.42.2」。我們需要發起節點時指向selenium-server-standalone 的JAR。
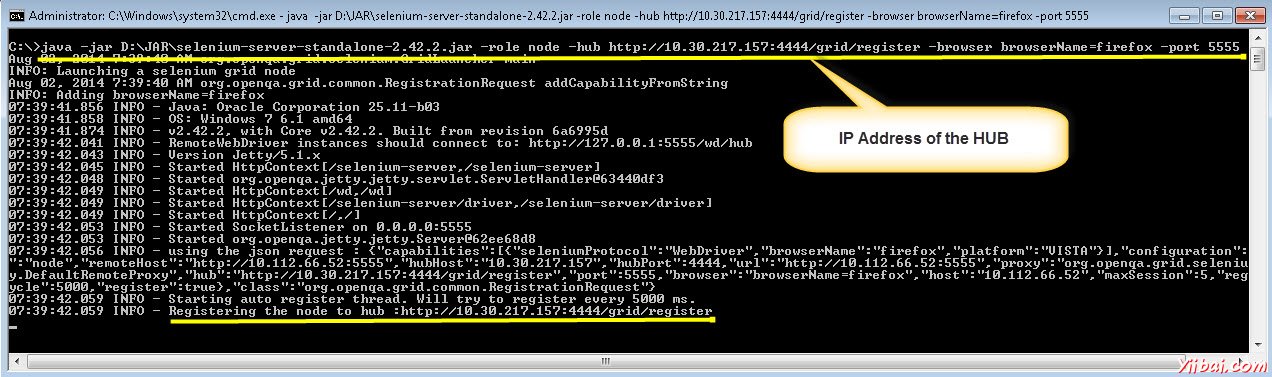
第2步:使用以下命令啓動Firefox節點。
java -jar D:JARselenium-server-standalone-2.42.2.jar -role node -hub http://10.30.217.157:4444/grid/register -browser browserName=firefox -port 5555 Where, D:JARselenium-server-standalone-2.42.2.jar = Location of the Selenium Server Standalone Jar File(on the Node Machine) http://10.30.217.157:4444 = IP Address of the Hub and 4444 is the port of the Hub browserName = firefox (Parameter to specify the Browser name on Nodes) 5555 = Port on which Firefox Node would be up and running.
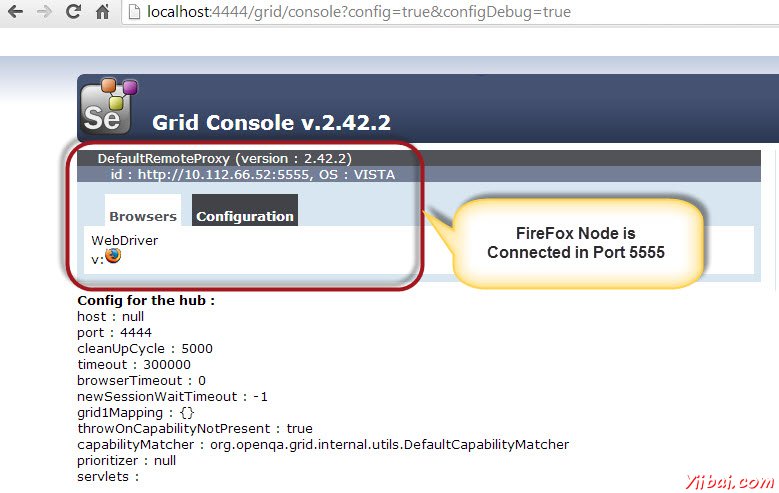
第3步:執行該命令後,現在回過頭來集線器。導航到URL - http://10.30.217.157:4444和集線器現在會顯示在所連接的節點。
第4步:現在,讓我們啓動Internet Explorer節點。用於啓動IE瀏覽器節點,我們需要確保我們有下載的節點機上的Internet Explorer驅動程序。
第5步:要下載Internet Explorer的驅動程序,根據您的操作系統的架構導航到http://docs.seleniumhq.org/download/並下載。下載後解壓縮exe文件,並將其放置其中有被稱爲同時推出IE瀏覽器節點上的一個文件夾。
第6步:使用以下命令啓動IE瀏覽器。
C:>java -Dwebdriver.ie.driver=D:IEDriverServer.exe -jar D:JARselenium-server-standalone-2.42.2.jar -role webdriver -hub http://10.30.217.157:4444/grid/register -browser browserName=ie,platform=WINDOWS -port 5558 Where, D:IEDriverServer.exe = The location of the downloaded the IE Driver(on the Node Machine) D:JARselenium-server-standalone-2.42.2.jar = Location of the Selenium Server Standalone Jar File(on the Node Machine) http://10.30.217.157:4444 = IP Address of the Hub and 4444 is the port of the Hub browserName = ie (Parameter to specify the Browser name on Nodes) 5558 = Port on which IE Node would be up and running.
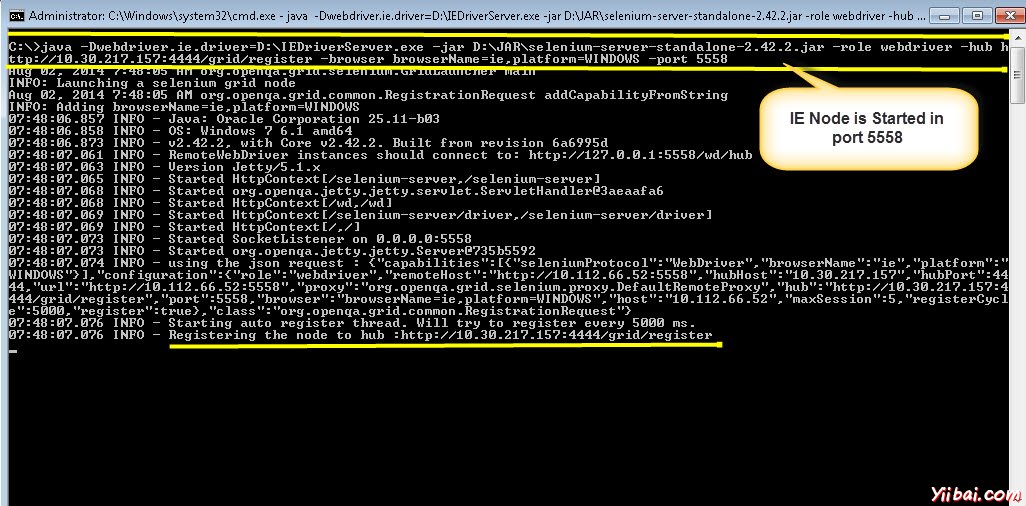
第7步:執行該命令後,現在再回到集線器。導航到URL- http://10.30.217.157:4444 集線器現在會顯示所連接的IE瀏覽器節點。

第8步:現在我們啓動Chrome節點。用於啓動瀏覽器節點,我們需要確保我們有下載的節點機上瀏覽器的驅動程序。
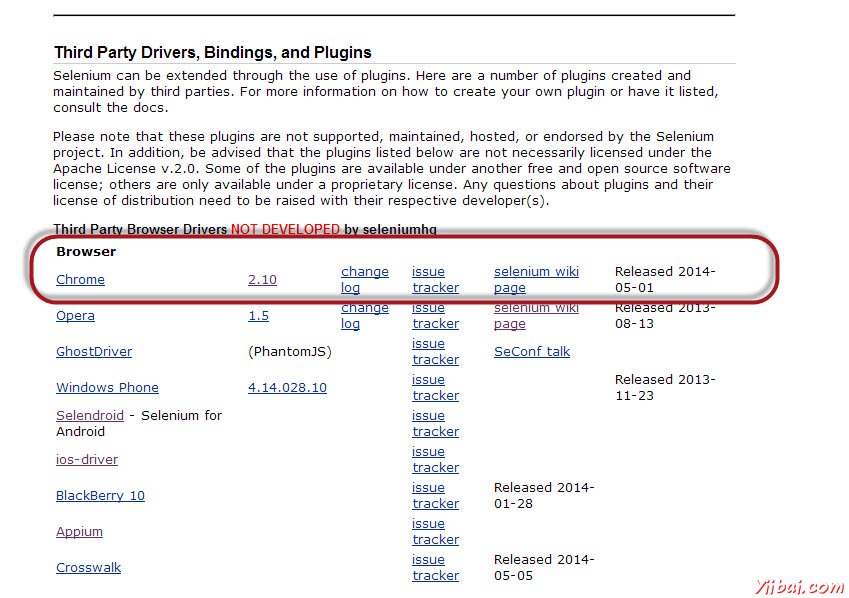
第9步:下載Chrome瀏覽器驅動程序,導航到http://docs.seleniumhq.org/download/並導航到第三方瀏覽器驅動區域,然後單擊版本號「2.10」,如下圖所示。
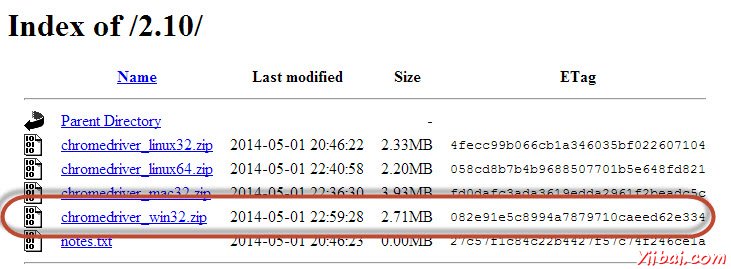
第10步:下載基於操作系統的類型的驅動程序。我們會執行它在Windows環境,因此我們將下載的Chrome瀏覽器的Windows驅動程序。下載後解壓縮exe文件,並將它具有同時啓動Chrome節點被稱爲一個文件夾。
第11步:使用以下命令啓動chrome 。
C:>java -Dwebdriver.chrome.driver=D:chromedriver.exe -jar D:JARselenium-server-standalone-2.42.2.jar -role webdriver -hub http://10.30.217.157:4444/grid/register -browser browserName=chrome,platform=WINDOWS -port 5557 Where, D:chromedriver.exe = The location of the downloaded the chrome Driver(on the Node Machine) D:JARselenium-server-standalone-2.42.2.jar = Location of the Selenium Server Standalone Jar File(on the Node Machine) http://10.30.217.157:4444 = IP Address of the Hub and 4444 is the port of the Hub browserName = chrome (Parameter to specify the Browser name on Nodes) 5557 = Port on which chrome Node would be up and running.

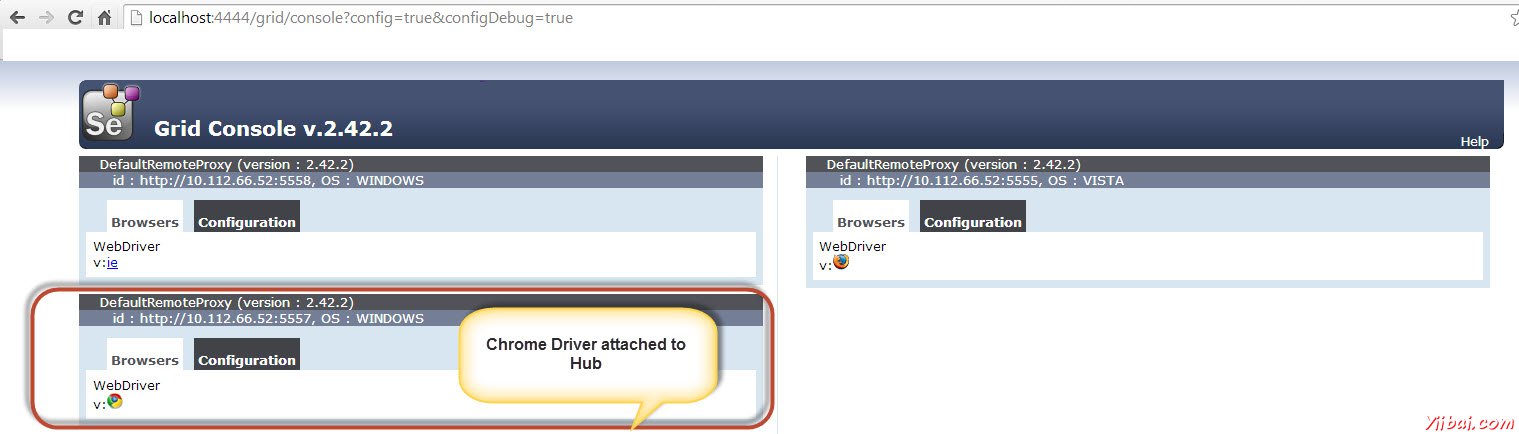
第7步:執行該命令後,現在再回集線器。導航到URL- http://10.30.217.157:4444 集線器現在會顯示連接到chrome 節點。
開發腳本
第1步:我們將開發使用TestNG測試。在下面的例子中,我們將推出使用遠程webdriver可以在自己的能力傳遞給驅動器,這些瀏覽器驅動器所有信息節點上執行。
瀏覽器參數會從「XML」文件傳遞。
package TestNG; import org.openqa.selenium.remote.DesiredCapabilities; import java.util.concurrent.TimeUnit; import org.openqa.selenium.*; import org.testng.annotations.AfterTest; import org.testng.annotations.BeforeTest; import org.testng.annotations.Parameters; import org.testng.annotations.Test; import java.net.URL; import java.net.MalformedURLException; import org.openqa.selenium.remote.RemoteWebDriver; public class TestNGClass { public WebDriver driver; public String URL, Node; protected ThreadLocal<RemoteWebDriver> threadDriver = null; @Parameters("browser") @BeforeTest public void launchapp(String browser) throws MalformedURLException { String URL = "http://www.calculator.net"; if (browser.equalsIgnoreCase("firefox")) { System.out.println(" Executing on FireFox"); String Node = "http://10.112.66.52:5555/wd/hub"; DesiredCapabilities cap = DesiredCapabilities.firefox(); cap.setBrowserName("firefox"); driver = new RemoteWebDriver(new URL(Node), cap); //Puts a Implicit wait, Will wait for 10 seconds before throwing exception driver.manage().timeouts().implicitlyWait(10, TimeUnit.SECONDS); //Launch website driver.navigate().to(URL); driver.manage().window().maximize(); } else if (browser.equalsIgnoreCase("chrome")) { System.out.println(" Executing on CHROME"); DesiredCapabilities cap = DesiredCapabilities.chrome(); cap.setBrowserName("chrome"); String Node = "http://10.112.66.52:5557/wd/hub"; driver = new RemoteWebDriver(new URL(Node), cap); driver.manage().timeouts().implicitlyWait(10, TimeUnit.SECONDS); //Launch website driver.navigate().to(URL); driver.manage().window().maximize(); } else if (browser.equalsIgnoreCase("ie")) { System.out.println(" Executing on IE"); DesiredCapabilities cap = DesiredCapabilities.chrome(); cap.setBrowserName("ie"); String Node = "http://10.112.66.52:5558/wd/hub"; driver = new RemoteWebDriver(new URL(Node), cap); driver.manage().timeouts().implicitlyWait(10, TimeUnit.SECONDS); //Launch website driver.navigate().to(URL); driver.manage().window().maximize(); } else { throw new IllegalArgumentException("The Browser Type is Undefined"); } } @Test public void calculatepercent() { driver.findElement(By.xpath(".//*[@id='menu']/div[3]/a")).click(); // Click on Math Calculators
driver.findElement(By.xpath(".//*[@id='menu']/div[4]/div[3]/a")).click(); // Click on Percent Calculators driver.findElement(By.id("cpar1")).sendKeys("10"); // Enter value 10 in the first number of the percent Calculator driver.findElement(By.id("cpar2")).sendKeys("50"); // Enter value 50 in the second number of the percent Calculator
driver.findElement(By.xpath(".//*[@id='content']/table/tbody/tr/td[2]/input")).click(); // Click Calculate Button String result = driver.findElement(By.xpath(".//*[@id='content']/p[2]/span/font/b")).getText(); // Get the Result Text based on its xpath System.out.println(" The Result is " + result); //Print a Log In message to the screen if(result.equals("5")) { System.out.println(" The Result is Pass"); } else { System.out.println(" The Result is Fail"); } } @AfterTest public void closeBrowser() { driver.quit(); } }
步驟2:在瀏覽器中的參數將使用XML來傳遞。我們需要在項目文件夾創建相同的XML。

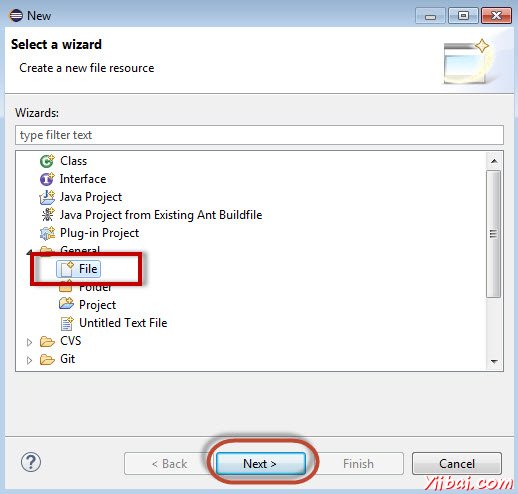
步驟3:從「General」中選擇「File」,然後點擊「Next」。
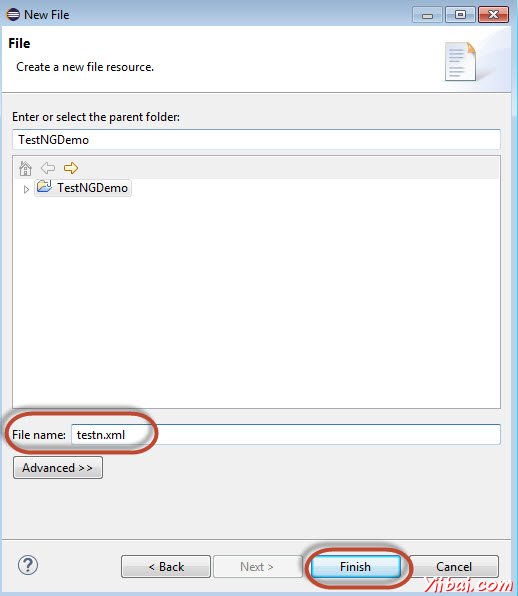
第4步:輸入文件的名稱,然後單擊「Finish」。
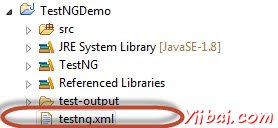
第5步:testng.xml文件是根據項目文件夾中創建如下圖所示。
步驟6:XML的內容如下所示。我們創建3個測試,把它放在套件中parallel="tests",讓所有的測試並行執行。
<suite name="Suite" parallel="tests"> <test name="FirefoxTest"> <parameter name="browser" value="firefox" />
測試執行
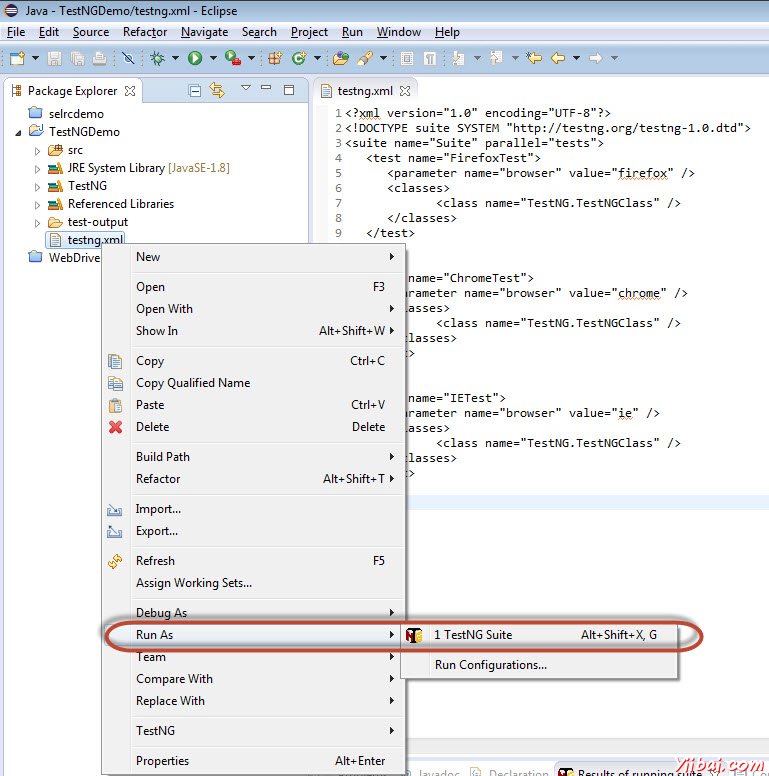
第1步:選擇創建的XML並執行右鍵單擊並選擇 'Run As' >> 'TestNG Suite'
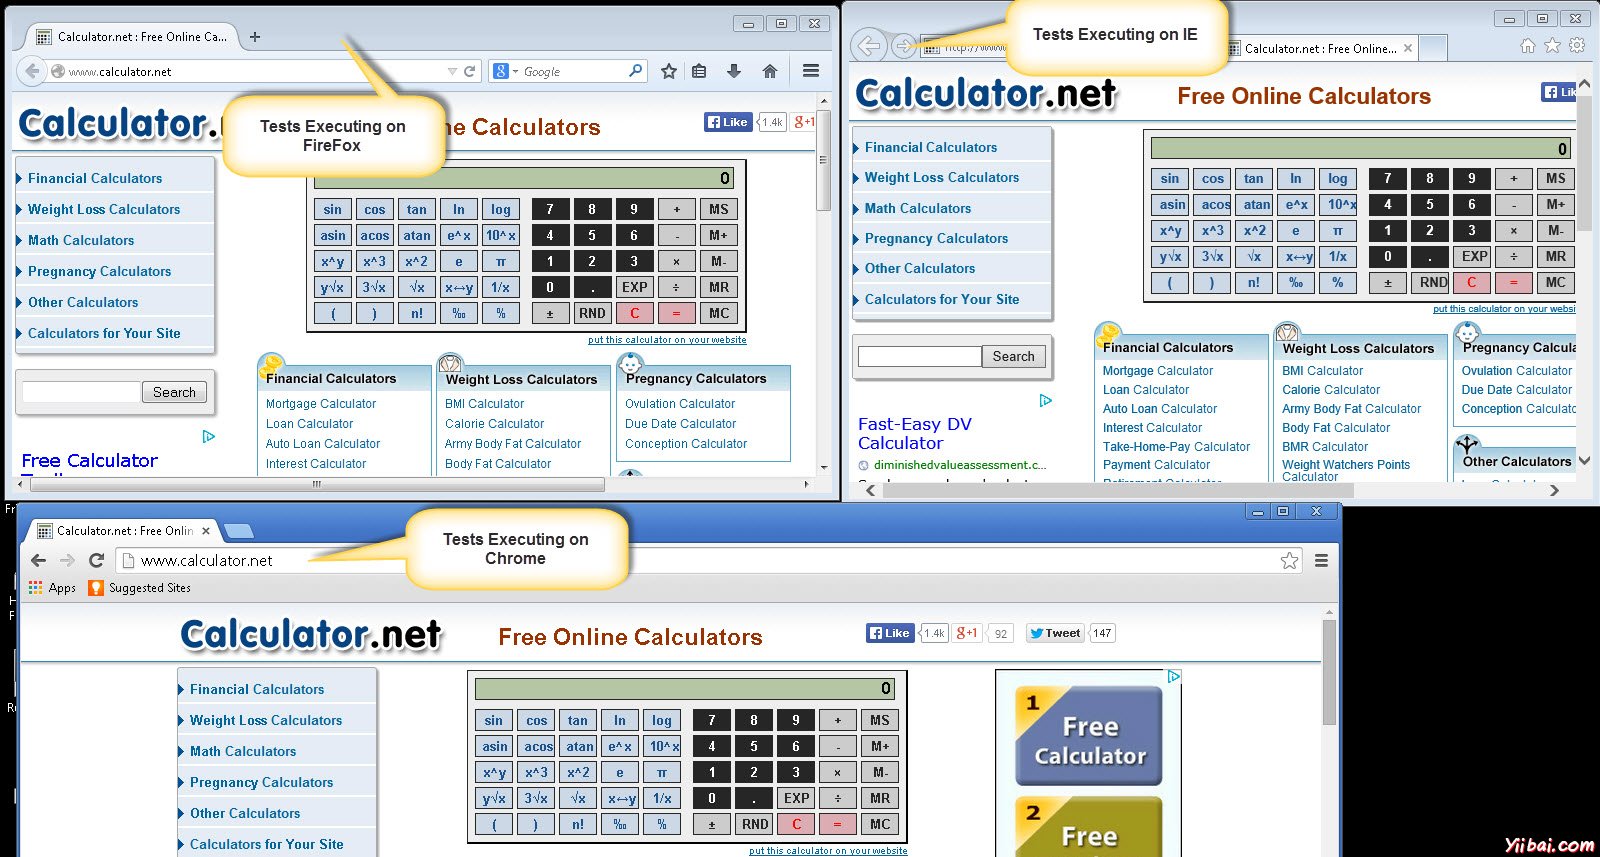
第2步:現在打開的節點,在這裏我們推出的所有瀏覽器節點。我們將能夠同時看到所有三種瀏覽器中執行。
結果分析
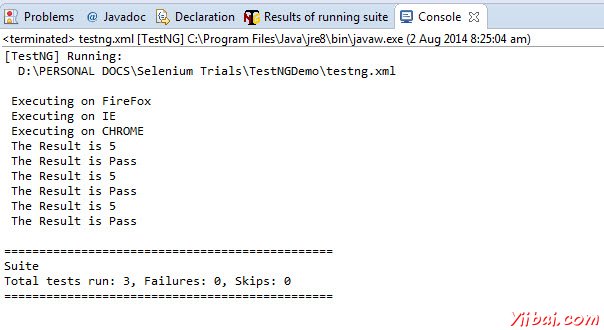
步驟1:在完成執行時,我們將能夠分析的結果及任何其他執行。結果彙總打印在控制檯。以下是相同的快照。
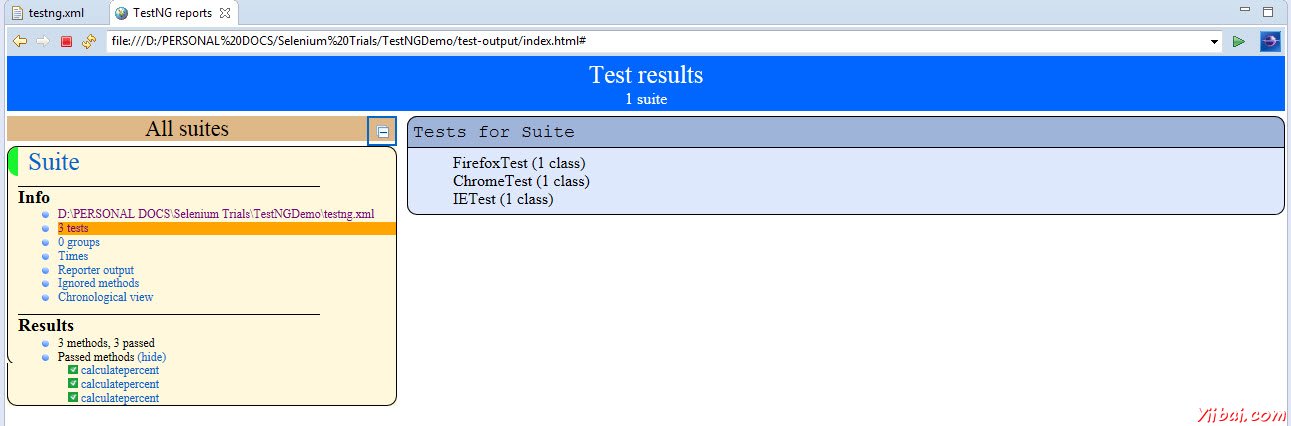
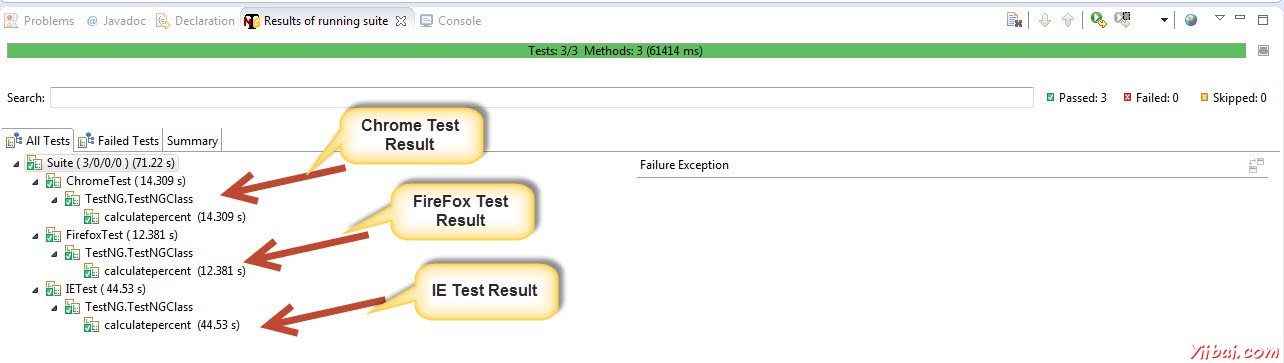
第2步:導航到選項卡和TestNG將顯示結果摘要如下圖所示「Results of Running Suite」。
步驟3:當生成的HTML中,我們將能夠看到HTML格式的測試結果。