Spring Boot國際化
國際化是一個使應用程序適應不同語言和區域而無需對源代碼進行工程更改的過程。 用它來說,國際化是對本地化的準備。
在本章中,將詳細瞭解如何在Spring Boot中實現國際化。
依賴
需要Spring Boot Starter Web和Spring Boot Starter Thymeleaf依賴來在Spring Boot中開發Web應用程序。
Maven
<dependency>
   <groupId>org.springframework.boot</groupId>
   <artifactId>spring-boot-starter-web</artifactId>
</dependency>

<dependency>
   <groupId>org.springframework.boot</groupId>
   <artifactId>spring-boot-starter-thymeleaf</artifactId>
</dependency>
Gradle
compile('org.springframework.boot:spring-boot-starter-web')
compile group: 'org.springframework.boot', name: 'spring-boot-starter-thymeleaf'
LocaleResolver
需要確定應用程序的默認Locale。在Spring Boot應用程序中添加LocaleResolver bean。
@Bean
public LocaleResolver localeResolver() {
   SessionLocaleResolver sessionLocaleResolver = new SessionLocaleResolver();
   sessionLocaleResolver.setDefaultLocale(Locale.US);
   return sessionLocaleResolver;
}
LocaleChangeInterceptor
LocaleChangeInterceptor用於根據添加到請求的語言參數的值更改新的Locale。
@Bean
public LocaleChangeInterceptor localeChangeInterceptor() {
   LocaleChangeInterceptor localeChangeInterceptor = new LocaleChangeInterceptor();
   localeChangeInterceptor.setParamName("language");
   return localeChangeInterceptor;
}爲了起到這種作用,需要將LocaleChangeInterceptor添加到應用程序的註冊表攔截器中。 配置類應擴展WebMvcConfigurerAdapter類並覆蓋addInterceptors()方法。
@Override
public void addInterceptors(InterceptorRegistry registry) {
   registry.addInterceptor(localeChangeInterceptor());
}
消息源
默認情況下,Spring Boot應用程序從類路徑下的src/main/resources文件夾中獲取消息源。 缺省語言環境消息文件名應爲message.properties,每個語言環境的文件應命名爲messages_XX.properties。 「XX」表示區域代碼。
應將所有消息屬性設置爲鍵值對。 如果在語言環境中找不到任何屬性,則應用程序將使用messages.properties 文件中的默認屬性。
默認的messages.properties 如下所示 -
welcome.text=Hi Welcome to Everyone中文對應的屬性文件:message_zh.properties 如下所示 -
welcome.text=大家好HTML文件
在HTML文件中,使用語法#{welcome.text}顯示屬性文件中的消息。
<h1 th:text = "#{welcome.text}"></h1>完整的代碼如下
Maven構建文件 - pom.xml -
<?xml version = "1.0" encoding = "UTF-8"?>
<project xmlns="http://maven.apache.org/POM/4.0.0"
    xmlns:xsi="http://www.w3.org/2001/XMLSchema-instance"
    xsi:schemaLocation="http://maven.apache.org/POM/4.0.0
   http://maven.apache.org/xsd/maven-4.0.0.xsd">

    <modelVersion>4.0.0</modelVersion>
    <groupId>com.yiibai</groupId>
    <artifactId>springboot_international</artifactId>
    <version>0.0.1-SNAPSHOT</version>
    <packaging>jar</packaging>
    <name>demo</name>
    <description>Demo project for Spring Boot</description>

    <parent>
        <groupId>org.springframework.boot</groupId>
        <artifactId>spring-boot-starter-parent</artifactId>
        <version>1.5.8.RELEASE</version>
        <relativePath />
    </parent>

    <properties>
        <project.build.sourceEncoding>UTF-8</project.build.sourceEncoding>
        <project.reporting.outputEncoding>UTF-8</project.reporting.outputEncoding>
        <java.version>1.8</java.version>
    </properties>

    <dependencies>
        <dependency>
            <groupId>org.springframework.boot</groupId>
            <artifactId>spring-boot-starter-web</artifactId>
        </dependency>

        <dependency>
            <groupId>org.springframework.boot</groupId>
            <artifactId>spring-boot-starter-test</artifactId>
            <scope>test</scope>
        </dependency>

        <dependency>
            <groupId>org.springframework.boot</groupId>
            <artifactId>spring-boot-starter-thymeleaf</artifactId>
        </dependency>
    </dependencies>

    <build>
        <plugins>
            <plugin>
                <groupId>org.springframework.boot</groupId>
                <artifactId>spring-boot-maven-plugin</artifactId>
            </plugin>

            <plugin>
                <groupId>org.apache.maven.plugins</groupId>
                <artifactId>maven-compiler-plugin</artifactId>
                <configuration>
                    <source>1.8</source>
                    <target>1.8</target>
                </configuration>
            </plugin>
        </plugins>
    </build>
</project>
Gradle構建文件 – build.gradle -
buildscript {
   ext {
      springBootVersion = '1.5.8.RELEASE'
   }
   repositories {
      mavenCentral()
   }
   dependencies {
      classpath("org.springframework.boot:spring-boot-gradle-plugin:${springBootVersion}")
   }
}
apply plugin: 'java'
apply plugin: 'eclipse'
apply plugin: 'org.springframework.boot'

group = 'com.yiibai'
version = '0.0.1-SNAPSHOT'
sourceCompatibility = 1.8

repositories {
   mavenCentral()
}
dependencies {
   compile('org.springframework.boot:spring-boot-starter-web')
   compile group: 'org.springframework.boot', name: 'spring-boot-starter-thymeleaf'
   testCompile('org.springframework.boot:spring-boot-starter-test')
}
Spring Boot應用程序主類文件如下 -
package com.yiibai.demo;

import org.springframework.boot.SpringApplication;
import org.springframework.boot.autoconfigure.SpringBootApplication;

@SpringBootApplication
public class DemoApplication {
   public static void main(String[] args) {
      SpringApplication.run(DemoApplication.class, args);
   }
}
控制器- ViewController 類文件如下 -
package com.yiibai.demo.controller;

import org.springframework.stereotype.Controller;
import org.springframework.web.bind.annotation.RequestMapping;

@Controller
public class ViewController {
   @RequestMapping("/locale")
   public String locale() {
      return "locale";
   }
}
配置類支持國際化
package com.yiibai.demo;

import java.util.Locale;

import org.springframework.context.annotation.Bean;
import org.springframework.context.annotation.Configuration;
import org.springframework.web.servlet.LocaleResolver;
import org.springframework.web.servlet.config.annotation.InterceptorRegistry;
import org.springframework.web.servlet.config.annotation.WebMvcConfigurerAdapter;
import org.springframework.web.servlet.i18n.LocaleChangeInterceptor;
import org.springframework.web.servlet.i18n.SessionLocaleResolver;

@Configuration
public class Internationalization extends WebMvcConfigurerAdapter {
   @Bean
   public LocaleResolver localeResolver() {
      SessionLocaleResolver sessionLocaleResolver = new SessionLocaleResolver();
      sessionLocaleResolver.setDefaultLocale(Locale.US);
      return sessionLocaleResolver;
   }
   @Bean
   public LocaleChangeInterceptor localeChangeInterceptor() {
      LocaleChangeInterceptor localeChangeInterceptor = new LocaleChangeInterceptor();
      localeChangeInterceptor.setParamName("language");
      return localeChangeInterceptor;
   }
   @Override
   public void addInterceptors(InterceptorRegistry registry) {
      registry.addInterceptor(localeChangeInterceptor());
   }
}
消息源 - messages.properties 如下所示 -
welcome.text = Hi Welcome to Everyone消息源 - messages_cn.properties 如下所示 -
welcome.text = 大家好HTML文件locale.html 放在類路徑的 templates 目錄下,如圖所示 -
<!DOCTYPE html>
<html>
   <head>
      <meta charset = "UTF-8"/>
      <title>SpringBoot國際化</title>
   </head>
   <body>
      <h1 th:text = "#{welcome.text}"></h1>
   </body>
</html>
創建可執行的JAR文件,並使用以下Maven或Gradle命令運行Spring Boot應用程序
對於Maven,請使用以下命令 -
mvn clean install在「BUILD SUCCESS」 之後,在target目錄下找到JAR文件。
對於Gradle,請使用以下命令 -
gradle clean build在「BUILD SUCCESSFUL」之後,在build/libs 目錄下找到JAR文件。
現在,使用如下所示的命令運行JAR文件 -
java -jar target\springboot_international-0.0.1-SNAPSHOT.jar應用程序已在Tomcat端口8080上啓動。
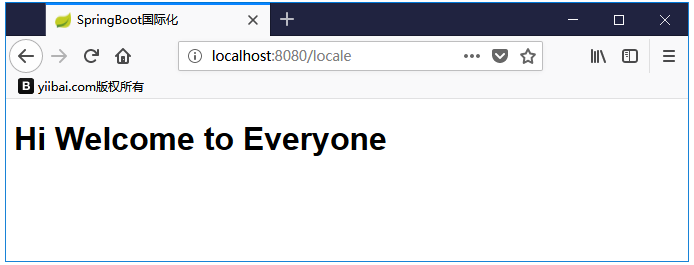
現在在Web瀏覽器中訪問URL => http://localhost:8080/locale ,可以看到以下輸出 -
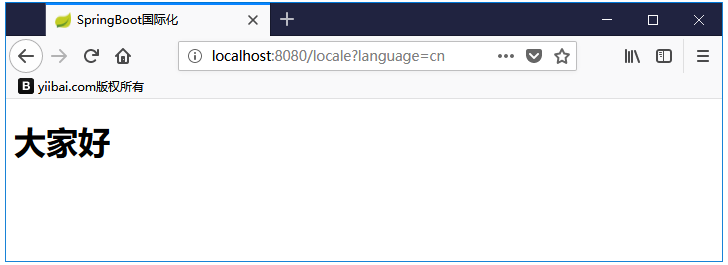
訪問URL => http://localhost:8080/locale?language=cn 將看到如下所示結果 -