Nginx安裝
根據操作系統的不同,nginx可以安裝也不太相同,安裝nginx有以下幾種不同的方式。
在Linux上安裝
對於Linux,可以使用來自nginx.org的nginx軟件包。參考網址:
在FreeBSD上安裝
在FreeBSD上,可以從包或通過ports系統安裝nginx。 端口系統提供更大的靈活性,允許在各種選項之間進行選擇。 端口將使用指定的選項編譯nginx並進行安裝。
在Window上安裝
先省略了,不要問爲什麼!
從源代碼構建[推薦]
如果需要一些特殊的功能,在包和端口不可用的情況下,也可以從源代碼編譯來安裝nginx。雖然源代碼編譯安裝更靈活,但這種方法對於初學者來說可能很複雜(建議初學者自己使用源代碼編譯安裝來安裝nginx)。有關更多信息,請參閱從源構建nginx。
在本文中,主要介紹從源代碼安裝nginx,這篇教程是基於CentOS7 64bit系統來安裝的,非Centos系統不適用。現在我們就開始吧!
Nginx編譯安裝
1. 安裝前工作
首先更新系統軟件源,使用以下命令更新系統 -
[root@localhost ~]# yum update有關兩個命令的一點解釋:
yum -y update- 升級所有包,改變軟件設置和系統設置,系統版本內核都升級yum -y upgrade- 升級所有包,不改變軟件設置和系統設置,系統版本升級,內核不改變
依賴包安裝
[root@localhost src]# yum -y install gcc gcc-c++ autoconf automake libtool make cmake
[root@localhost src]# yum -y install zlib zlib-devel openssl openssl-devel pcre-devel
2. 下載Nginx安裝源文件
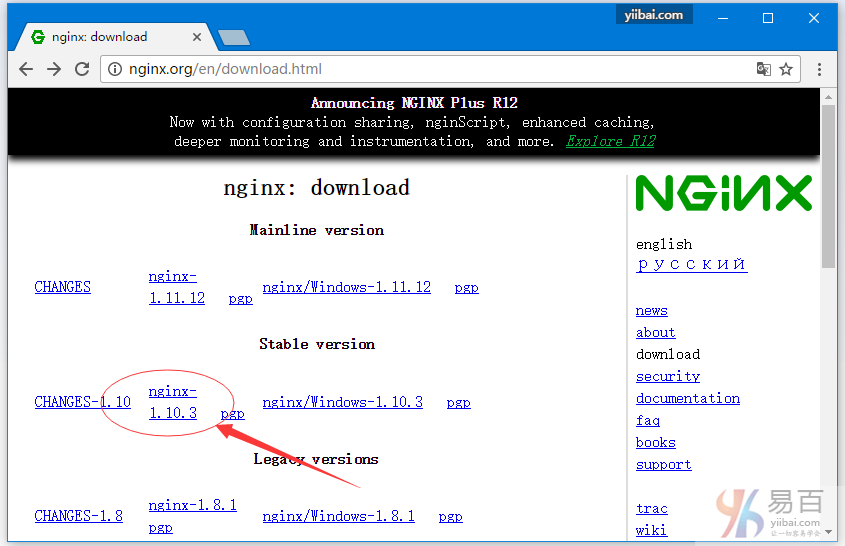
源碼下載,可官網下載地址:http://nginx.org/en/download.html 下載並上傳到服務器(這裏選擇最新穩定版本:nginx-1.10.3),如下圖所示 -
或直接在服務上執行以下命令下載 -
[root@localhost ~]# cd /usr/local/src
[root@localhost src]# wget -c http://nginx.org/download/nginx-1.10.3.tar.gz
解壓上面下載的文件 -
[root@localhost src]# tar zxvf nginx-1.10.3.tar.gz在編譯之前還要做一些前期的準備工作,如:依懶包安裝,Nginx用戶和用戶組等。
3. 新建nginx用戶及用戶組
使用 root 用戶身份登錄系統,執行以下命令創建新的用戶。
[root@localhost src]# groupadd nginx
[root@localhost src]# useradd -g nginx -M nginxuseradd命令的-M參數用於不爲nginx建立home目錄
修改/etc/passwd,使得nginx用戶無法bash登陸(nginx用戶後面由/bin/bash改爲/sbin/nologin),
[root@localhost src]# vi /etc/passwd然後找到有 nginx 那一行,把它修改爲(後面由/bin/bash改爲/sbin/nologin):
nginx:x:1002:1003::/home/nginx:/sbin/nologin4. 編譯配置、編譯、安裝
下面我們進入解壓的nginx源碼目錄:/usr/local/src/ 執行以下命令 -
[root@localhost ~]# cd /usr/local/src/nginx*
[root@localhost nginx-1.10.3]# pwd
/usr/local/src/nginx-1.10.3
[root@localhost nginx-1.10.3]#
[root@localhost nginx-1.10.3]# ./configure --prefix=/usr/local/nginx \
--pid-path=/usr/local/nginx/run/nginx.pid \
--with-http_ssl_module \
--user=nginx \
 --group=nginx \
--with-pcre \
--without-mail_pop3_module \
--without-mail_imap_module \
--without-mail_smtp_module
注意:上面的反斜槓
\表示換行繼續。
--prefix=/usr/local/nginx 指定安裝到 /usr/local/nginx 目錄下。
上面配置完成後,接下來執行編譯 -
[root@localhost nginx-1.10.3]# make
[root@localhost nginx-1.10.3]# make install
... ...
cp conf/nginx.conf '/usr/local/nginx/conf/nginx.conf.default'
test -d '/usr/local/nginx/run' \
        || mkdir -p '/usr/local/nginx/run'
test -d '/usr/local/nginx/logs' \
        || mkdir -p '/usr/local/nginx/logs'
test -d '/usr/local/nginx/html' \
        || cp -R html '/usr/local/nginx'
test -d '/usr/local/nginx/logs' \
        || mkdir -p '/usr/local/nginx/logs'
make[1]: Leaving directory `/usr/local/src/nginx-1.10.3'
[root@localhost nginx-1.10.3]#
上面編譯時間跟你的電腦配置相關,所以可能需要一些等待時間。
查看安裝後的程序版本:
[root@localhost nginx-1.10.3]# /usr/local/nginx/sbin/nginx -v
nginx version: nginx/1.10.3
修改Nginx默認端口(可選):
[root@localhost nginx-1.10.3]# vi /usr/local/nginx/conf/nginx.conf找到 -
... ...
    #gzip  on;

    server {
        listen       80;
        server_name  localhost;

        #charset koi8-r;
... ...
把上面的 80 修改爲你想要的端口,如:8080 。
修改配置後驗證配置是否合法:
[root@localhost nginx-1.10.3]# /usr/local/nginx/sbin/nginx -t
nginx: the configuration file /usr/local/nginx/conf/nginx.conf syntax is ok
nginx: configuration file /usr/local/nginx/conf/nginx.conf test is successful
啓動Nginx程序、查看進程 -
[root@localhost nginx-1.10.3]# /usr/local/nginx/sbin/nginx
[root@localhost nginx-1.10.3]# ps -ef | grep nginx
root      29151      1  0 22:01 ?        00:00:00 nginx: master process /usr/local/nginx/sbin/nginx
nginx     29152  29151  0 22:01 ?        00:00:00 nginx: worker process
root      29154   2302  0 22:01 pts/0    00:00:00 grep --color=auto nginx
[root@localhost nginx-1.10.3]#
nginx停止、重啓
未添加nginx服務前對nginx的管理只能通過一下方式管理:
#  nginx 管理的幾種方式 -
# 啓動Nginx
/usr/local/nginx/sbin/nginx
# 從容停止Nginx:
kill -QUIT 主進程號 # 如上一步中的 ps 命令輸出的 29151,就是 Nginx的主進程號
# 快速停止Nginx:
kill -TERM 主進程號
# 強制停止Nginx:
pkill -9 nginx
# 平滑重啓nginx
/usr/nginx/sbin/nginx -s reload現在我們來看看安裝的Nginx的運行結果,可以簡單地使用curl命令訪問localhost測試,結果如下 -
[root@localhost nginx-1.10.3]# curl localhost
<!DOCTYPE html>
<html>
<head>
<title>Welcome to nginx!</title>
<style>
    body {
        width: 35em;
        margin: 0 auto;
        font-family: Tahoma, Verdana, Arial, sans-serif;
    }
</style>
</head>
<body>
<h1>Welcome to nginx!</h1>
<p>If you see this page, the nginx web server is successfully installed and
working. Further configuration is required.</p>

<p>For online documentation and support please refer to
<a href="http://nginx.org/">nginx.org</a>.<br/>
Commercial support is available at
<a href="http://nginx.com/">nginx.com</a>.</p>

<p><em>Thank you for using nginx.</em></p>
</body>
</html>
[root@localhost nginx-1.10.3]#
或者也可以打開瀏覽訪問目標服務器的IP,在本示例中,服務器的IP地址是:192.168.0.195,所以打開瀏覽器訪問如下結果 -

提示: 如果沒有看到以上界面,在確保Nginx啓動的前提下,檢查SeLinux和防火牆是否已關閉。關閉防火牆命令:
systemctl stop firewalld.service。