JavaFX按鈕
當用戶單擊按鈕時,JavaFX Button類可以觸發事件。Button類擴展了Labeled類,可以顯示文本,圖像或兩者都可以。
以下代碼顯示瞭如何向Button添加單擊操作偵聽器。
import javafx.application.Application;
import javafx.event.ActionEvent;
import javafx.event.EventHandler;
import javafx.scene.Scene;
import javafx.scene.control.Button;
import javafx.scene.layout.StackPane;
import javafx.stage.Stage;
public class Main extends Application {
public static void main(String[] args) {
launch(args);
}
@Override
public void start(Stage primaryStage) {
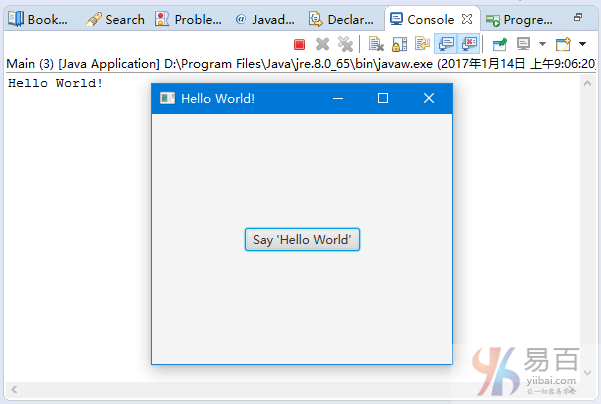
primaryStage.setTitle("Hello World!");
Button btn = new Button();
btn.setText("Say 'Hello World'");
btn.setOnAction(new EventHandler<ActionEvent>() {
@Override
public void handle(ActionEvent event) {
System.out.println("Hello World!");
}
});
StackPane root = new StackPane();
root.getChildren().add(btn);
primaryStage.setScene(new Scene(root, 300, 250));
primaryStage.show();
}
}上面的代碼生成以下結果。
創建按鈕
我們使用以下構造函數在JavaFX中創建一個Button。
創建帶有空文本標題的按鈕。
Button button = new Button();創建具有指定文本的按鈕。
Button button = new Button("OK");要創建帶有文本和圖標的按鈕。
Image imageOk = new Image(getClass().getResourceAsStream("OK.png"));
Button button = new Button("OK", new ImageView(imageOk));
按鈕內容
創建JavaFX Button對象後,我們可以使用以下方法設置文本並設置安裝圖標。
-
setText(String text)- 設置按鈕的文本標題 -
setGraphic(Node graphic)- 設置圖標
除了ImageView對象,我們可以使用javafx.scene.shape包中的形狀作爲Button中的圖形元素。
setGraphicTextGap方法設置文本和圖形內容之間的差距。
以下代碼將圖像安裝到按鈕。
Image okImage = new Image(getClass().getResourceAsStream("OK.png"));
button.setGraphic(new ImageView(okImage));
按鈕操作
我們可以使用Button類的setOnAction方法爲用戶單擊事件添加點擊事件處理程序。
button.setOnAction((ActionEvent e) -> {
    System.out.println("clicked");
});
按鈕效果
我們可以將javafx.scene.effect包中的效果應用到按鈕。
以下代碼將DropShadow效果應用於按鈕。
DropShadow shadow = new DropShadow();
button.setEffect(shadow);
button.setEffect(null);//remove the effect以下代碼顯示瞭如何爲Button設置陰影效果。
import javafx.application.Application;
import javafx.event.EventHandler;
import javafx.scene.Group;
import javafx.scene.Scene;
import javafx.scene.control.Button;
import javafx.scene.effect.DropShadow;
import javafx.scene.input.MouseEvent;
import javafx.scene.layout.VBox;
import javafx.stage.Stage;
public class Main extends Application {
DropShadow shadow = new DropShadow();
public static void main(String[] args) {
launch(args);
}
@Override
public void start(Stage stage) {
Scene scene = new Scene(new Group());
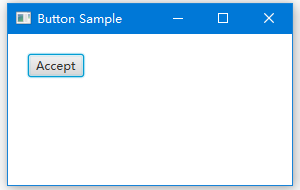
stage.setTitle("Button Sample");
stage.setWidth(300);
stage.setHeight(190);
VBox vbox = new VBox();
vbox.setLayoutX(20);
vbox.setLayoutY(20);
final Button button1 = new Button("Accept");
button1.addEventHandler(MouseEvent.MOUSE_ENTERED, new EventHandler<MouseEvent>() {
@Override
public void handle(MouseEvent e) {
button1.setEffect(shadow);
}
});
button1.addEventHandler(MouseEvent.MOUSE_EXITED, new EventHandler<MouseEvent>() {
@Override
public void handle(MouseEvent e) {
button1.setEffect(null);
}
});
vbox.getChildren().add(button1);
vbox.setSpacing(10);
((Group) scene.getRoot()).getChildren().add(vbox);
stage.setScene(scene);
stage.show();
}
}上面的代碼生成以下結果。
按鈕樣式
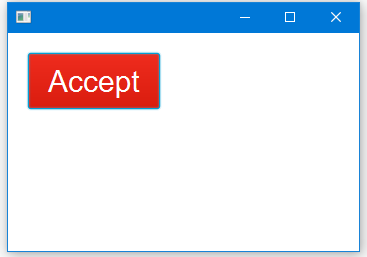
我們可以使用CSS樣式來改變按鈕的外觀和感覺。在單獨的CSS文件中定義樣式,並通過使用getStyleClass方法應用CSS文件。
下面的代碼是一個CSS文件,它改變了按鈕的字體和顏色。
.button1{
    -fx-font: 30 arial;
    -fx-base: #ee2211;
}
然後我們使用下面的代碼來安裝CSS。
button.getStyleClass().add("button1");-fx-font屬性設置button1的字體名稱和大小。 -fx-base屬性覆蓋默認顏色。
下面的代碼顯示瞭如何使用CSS來改變Button的外觀。
import javafx.application.Application;
import javafx.event.ActionEvent;
import javafx.event.EventHandler;
import javafx.scene.Group;
import javafx.scene.Scene;
import javafx.scene.control.Button;
import javafx.scene.layout.VBox;
import javafx.stage.Stage;

public class Main extends Application {

    public static void main(String[] args) {
        launch(args);
    }

    @Override
    public void start(Stage stage) {
        Scene scene = new Scene(new Group());
        stage.setWidth(300);
        stage.setHeight(190);

        VBox vbox = new VBox();
        vbox.setLayoutX(20);
        vbox.setLayoutY(20);

        Button button1 = new Button("Accept");
        button1.setStyle("-fx-font: 30 arial; -fx-base: #ee2211;");


        vbox.getChildren().add(button1);
        vbox.setSpacing(10);
        ((Group)scene.getRoot()).getChildren().add(vbox);

        stage.setScene(scene);
        stage.show();
    }
}
上面的代碼生成以下結果。
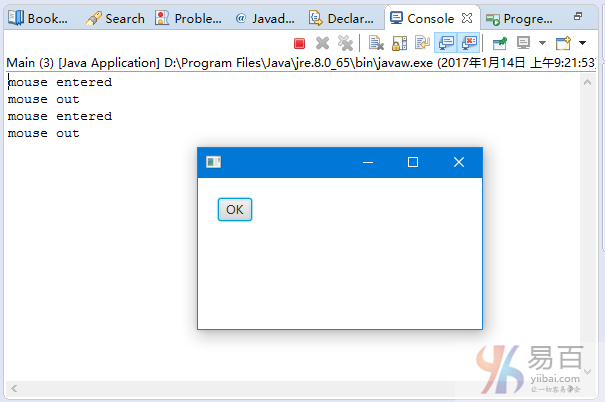
按鈕鼠標事件
以下代碼顯示瞭如何處理Button的Mouse in和Mouse out(鼠標移入和移出)事件。
import javafx.application.Application;
import javafx.event.EventHandler;
import javafx.scene.Group;
import javafx.scene.Scene;
import javafx.scene.control.Button;
import javafx.scene.input.MouseEvent;
import javafx.scene.layout.VBox;
import javafx.stage.Stage;

public class Main extends Application {
  public static void main(String[] args) {
    launch(args);
  }

  @Override
  public void start(Stage stage) {
    Scene scene = new Scene(new Group());
    stage.setWidth(300);
    stage.setHeight(190);

    VBox vbox = new VBox();
    vbox.setLayoutX(20);
    vbox.setLayoutY(20);

    final Button button1 = new Button("OK");

    button1.addEventHandler(MouseEvent.MOUSE_ENTERED,
        new EventHandler<MouseEvent>() {
          @Override
          public void handle(MouseEvent e) {
            System.out.println("mouse entered");
          }
        });

    button1.addEventHandler(MouseEvent.MOUSE_EXITED,
        new EventHandler<MouseEvent>() {
          @Override
          public void handle(MouseEvent e) {
            System.out.println("mouse out");
          }
        });

    vbox.getChildren().add(button1);
    ((Group) scene.getRoot()).getChildren().add(vbox);

    stage.setScene(scene);
    stage.show();
  }
}
上面的代碼生成以下結果。