Django快速入門-數據庫模型
本系列教程第一部分已經講完了。在上一個教程的基礎上,在這一講中我們將建立數據庫,創建第一個模型,並使用一個 Django 快速自動生成的管理站點。
數據庫配置
現在,打開mysite/settings.py。Django設置模塊級的變量與正常的Python模塊一樣。
默認情況下,配置使用SQLite。如果你是數據庫新手,或者想嘗試學習Django,這是最簡單的選擇。SQLite包含在Python,所以不需要安裝任何東西來支持你的數據庫。當開始你的第一個真正的項目,可能需要使用更強大的數據庫如:PostgreSQL,MySQL等,可以配置數據庫切換就可以了。
如果你想使用其他數據庫,請安裝相應的數據庫綁定,並更改以下鍵在數據庫中「默認」的配置項,以適合您的數據庫連接設置:
- ENGINE – 輸入'django.db.backends.sqlite3', 'django.db.backends.postgresql','django.db.backends.mysql',或'django.db.backends.oracle'
- NAME – 數據庫的名稱。如果使用SQLite,數據庫會在您的計算機上創建文件;在這種情況下,名稱應該是完整的絕對路徑的文件,包括文件名。默認值爲 os.path.join(BASE_DIR,「db.sqlite3」),將存儲在您的項目目錄中的文件。
如果你不使用SQLite作爲數據庫,而使用其他設置,如USER, PASSWORD, 和 HOST 必須加入。欲瞭解更多詳細信息,請參閱用於數據庫的參考文檔。
當你編輯 mysite/settings.py,時區設置TIME_ZONE。
此外,請注意,在該文件的頂部的 INSTALLED_APPS 設置。它包含了很多在本Django示例中激活的所有 Django 的應用程序的名稱。 應用程序可以在多個項目中使用,你可以打包給別人並在他們的項目分發使用。
默認情況下,INSTALLED_APPS包含以下內容的應用程序,這些都使用 Django :
- django.contrib.admin – 管理站點,這裏會很快使用它
- django.contrib.auth – 認證系統
- django.contrib.contenttypes – 一個框架,內容類型
- django.contrib.sessions – 會話框架
- django.contrib.messages – 消息傳遞框架
- django.contrib.staticfiles – 一個框架用來管理靜態文件
這些應用包括默認,作爲一個方便常見的例子。
其中的一些應用程序使用至少一個數據庫表,所以我們需要在數據庫中創建的表纔可以使用它們。要做到這一點,運行以下命令:
C:\Python27\mysite>python manage.py migrate
Operations to perform:
Apply all migrations: admin, contenttypes, auth, sessions
Running migrations:
Rendering model states... DONE
Applying contenttypes.0001_initial... OK
Applying auth.0001_initial... OK
Applying admin.0001_initial... OK
Applying admin.0002_logentry_remove_auto_add... OK
Applying contenttypes.0002_remove_content_type_name... OK
Applying auth.0002_alter_permission_name_max_length... OK
Applying auth.0003_alter_user_email_max_length... OK
Applying auth.0004_alter_user_username_opts... OK
Applying auth.0005_alter_user_last_login_null... OK
Applying auth.0006_require_contenttypes_0002... OK
Applying auth.0007_alter_validators_add_error_messages... OK
Applying sessions.0001_initial... OK
C:\Python27\mysite>
migrate 命令着眼於INSTALLED_APPS設置並創建根據您的 mysite/settings.py 文件數據庫設置,並隨應用程序數據庫遷移任何數據庫表(我們將在以後的教程討論)。你會看到每個適用移植的消息。 如果有興趣,運行命令行在你的數據庫客戶端,列如類型\dt (PostgreSQL), SHOW TABLES; (MySQL), .schema (SQLite), 或 SELECT TABLE_NAME FROMUSER_TABLES; (Oracle) 以顯示Django所創建的表。
創建模型
現在,我們將定義模型 - 本質上數據庫進行設計,使用其他元數據。
在我們的簡單調查的應用程序,我們將創建兩個模型:Question 和 Choice。Question有一個問題標題和發佈日期。Choice有兩個字段:選擇文本和票數。每個選項都與一個問題關聯。
這些概念由簡單的Python類來表示。編輯 polls/models.py 文件,所以 polls/models.py 看起來是這樣的:
from django.db import models
class Question(models.Model):
question_text = models.CharField(max_length=200)
pub_date = models.DateTimeField('date published')
class Choice(models.Model):
question = models.ForeignKey(Question, on_delete=models.CASCADE)
choice_text = models.CharField(max_length=200)
votes = models.IntegerField(default=0)
該代碼是直接的。每個模型是django.db.models.Model類的子類。 每個模型具有許多類變量,每一個在模型變量與數據庫表的字段關聯。
每個字段由 Field 類實例表示 – 例如,CharField表示字符型字段,DateTimeField表示日期時間字段。這告訴Django 每個字段保存的數據類型。
每個Field實例(例如,question_text或pub_date)的名稱是字段的名稱,這是機器友好的格式。在Python代碼中使用這個值,數據庫將使用它作爲列名。
字段也可以有不同的可選參數;在本示例中,我們已經將票數的默認值設置爲0。
最後,需要注意的是關係的定義,這裏使用了外鍵。這告訴 Django 每個選項關聯一個問題。 Django支持所有常見的數據庫關係:多對一,多對多以及一對之一。
激活模型
模型代碼很小,但表示了 Django 的很多信息。有了它 Django 可以:
爲這個應用程序創建數據庫(CREATE TABLE語句)
創建訪問 Question 和 Choice對象的Python數據庫訪問API
但首先我們需要告訴 polls 項安裝了的應用程序。
再次編輯 mysite/settings.py 文件,並更改INSTALLED_APPS設置包含字符串「polls.apps.PollsConfig」。結果如下所示:
mysite/settings.py文件內容如下:
INSTALLED_APPS = [
'polls.apps.PollsConfig',
'django.contrib.admin',
'django.contrib.auth',
'django.contrib.contenttypes',
'django.contrib.sessions',
'django.contrib.messages',
'django.contrib.staticfiles',
]
現在Django知道 polls 投票程序。讓我們運行另一個命令:
C:\Python27\mysite>python manage.py makemigrations polls
Migrations for 'polls':
0001_initial.py:
- Create model Choice
- Create model Question
- Add field question to choice
C:\Python27\mysite>
通過運行makemigrations,告訴Django你已經做了模型一些改動(在這種情況下,已經是最新的了),並且你想更改存儲作爲一個移植。
遷移是Django怎麼存儲您更改的模型(由你的數據庫架構決定)- 它們只是在磁盤上的文件。您如果喜歡可以讀取移植新的模型,它在文件 polls/migrations/0001_initial.py。你不會希望Django每一次都讀取它們,不過將它們設計成人可編輯的,你要知道Django是如何變化的並手動調整。
還有將運行migrations,自動管理數據庫模式(表)命令 - 這就是所謂的遷移,讓我們看看SQL瞭解移植運行。 sqlmigrate 命令將移植名稱返回SQL顯示:
$ python manage.py sqlmigrate polls 0001
應該看到類似下面的東西(我們已經重新格式化它的可讀性):
C:\Python27\mysite>python manage.py sqlmigrate polls 0001
BEGIN;
--
-- Create model Choice
--
CREATE TABLE "polls_choice" ("id" integer NOT NULL PRIMARY KEY AUTOINCREMENT, "c
hoice_text" varchar(200) NOT NULL, "votes" integer NOT NULL);
--
-- Create model Question
--
CREATE TABLE "polls_question" ("id" integer NOT NULL PRIMARY KEY AUTOINCREMENT,
"question_text" varchar(200) NOT NULL, "pub_date" datetime NOT NULL);
--
-- Add field question to choice
--
ALTER TABLE "polls_choice" RENAME TO "polls_choice__old";
CREATE TABLE "polls_choice" ("id" integer NOT NULL PRIMARY KEY AUTOINCREMENT, "c
hoice_text" varchar(200) NOT NULL, "votes" integer NOT NULL, "question_id" integ
er NOT NULL REFERENCES "polls_question" ("id"));
INSERT INTO "polls_choice" ("choice_text", "votes", "id", "question_id") SELECT
"choice_text", "votes", "id", NULL FROM "polls_choice__old";
DROP TABLE "polls_choice__old";
CREATE INDEX "polls_choice_7aa0f6ee" ON "polls_choice" ("question_id");
COMMIT;
C:\Python27\mysite>
遷移命令將所有還沒有被應用的遷移(Django跟蹤哪些是使用數據庫中的一個特殊的表名爲django_migrations應用)運行它們在數據庫中 - 基本上是,將使用模型在數據庫模式的變化同步。
使用API
現在,讓我們進入交互式 Python shell 和 Django 所提供的API 。要調用Python命令行,請使用以下命令:
C:\Python27\mysite>python manage.py shell
Python 2.7.10 (default, May 23 2015, 09:44:00) [MSC v.1500 64 bit (AMD64)] on wi
n32
Type "help", "copyright", "credits" or "license" for more information.
(InteractiveConsole)
只需鍵入「python」 來代替,因爲manage.py設置DJANGO_SETTINGS_MODULE環境變量,這給Django Python 導入路徑到 mysite/settings.py文件。
>>> import django
django.setup()
>>> from polls.models import Question, Choice # Import the model classes we just wrote.
No questions are in the system yet.
Question.objects.all()
[]
Create a new Question.
Support for time zones is enabled in the default settings file, so
Django expects a datetime with tzinfo for pub_date. Use timezone.now()
instead of datetime.datetime.now() and it will do the right thing.
from django.utils import timezone
q = Question(question_text="What's new?", pub_date=timezone.now())
Save the object into the database. You have to call save() explicitly.
q.save()
Now it has an ID. Note that this might say "1L" instead of "1", depending
on which database you're using. That's no biggie; it just means your
database backend prefers to return integers as Python long integer
objects.
q.id
1
Access model field values via Python attributes.
q.question_text
"What's new?"
q.pub_date
datetime.datetime(2012, 2, 26, 13, 0, 0, 775217, tzinfo=)
Change values by changing the attributes, then calling save().
q.question_text = "What's up?"
q.save()
objects.all() displays all the questions in the database.
Question.objects.all()
[<Question: Question object>]
這裏需要等待一會兒. <Question: Question object>完全是這個對象的無用表示。讓我們來解決這個問題:通過編輯Question模型(在polls/models.py 文件),並添加一個__str__() 方法到這兩個Question 和 Choice 模型: polls/models.py文件內容如下:
from django.db import models
from django.utils.encoding import python_2_unicode_compatible
@python_2_unicode_compatible # only if you need to support Python 2
class Question(models.Model):
# ...
def __str__(self):
return self.question_text
@python_2_unicode_compatible # only if you need to support Python 2
class Choice(models.Model):
# ...
def __str__(self):
return self.choice_text
添加 __str__() 方法是非常重要的,使用交互式提示處理添加到模型中,不僅爲自己方便,也是因爲對象的表示用於整個 Django 自動生成管理。
注意,這些都是正常的Python方法。讓我們添加一個自定義的方法,這裏只是爲了演示:polls/models.py
import datetime
from django.db import models
from django.utils import timezone
class Question(models.Model):
# ...
def was_published_recently(self):
return self.pub_date >= timezone.now() - datetime.timedelta(days=1)
注意這裏增加 import datetime 和from django.utils import timezon,引用Python的標準的datetime模塊和Django的時區相關的實用程序在django.utils.timezone,如果不熟悉在Python的時區處理,可以閱讀時區支持文檔。
保存這些修改,並再次運行 python manage.py shell 啓動一個新的Python交互shell:
>>> from polls.models import Question, Choice
Make sure our __str__() addition worked.
Question.objects.all()
[<Question: What's up?>]
Django provides a rich database lookup API that's entirely driven by
keyword arguments.
Question.objects.filter(id=1)
[<Question: What's up?>]
Question.objects.filter(question_text__startswith='What')
[<Question: What's up?>]
Get the question that was published this year.
from django.utils import timezone
current_year = timezone.now().year
Question.objects.get(pub_date__year=current_year)
<Question: What's up?>
Request an ID that doesn't exist, this will raise an exception.
Question.objects.get(id=2)
Traceback (most recent call last):
...
DoesNotExist: Question matching query does not exist.
Lookup by a primary key is the most common case, so Django provides a
shortcut for primary-key exact lookups.
The following is identical to Question.objects.get(id=1).
Question.objects.get(pk=1)
<Question: What's up?>
Make sure our custom method worked.
q = Question.objects.get(pk=1)
q.was_published_recently()
True
Give the Question a couple of Choices. The create call constructs a new
Choice object, does the INSERT statement, adds the choice to the set
of available choices and returns the new Choice object. Django creates
a set to hold the "other side" of a ForeignKey relation
(e.g. a question's choice) which can be accessed via the API.
q = Question.objects.get(pk=1)
Display any choices from the related object set -- none so far.
q.choice_set.all()
[]
Create three choices.
q.choice_set.create(choice_text='Not much', votes=0)
<Choice: Not much>
q.choice_set.create(choice_text='The sky', votes=0)
<Choice: The sky>
c = q.choice_set.create(choice_text='Just hacking again', votes=0)
Choice objects have API access to their related Question objects.
c.question
<Question: What's up?>
And vice versa: Question objects get access to Choice objects.
q.choice_set.all()
[<Choice: Not much>, <Choice: The sky>, <Choice: Just hacking again>]
q.choice_set.count()
3
The API automatically follows relationships as far as you need.
Use double underscores to separate relationships.
This works as many levels deep as you want; there's no limit.
Find all Choices for any question whose pub_date is in this year
(reusing the 'current_year' variable we created above).
Choice.objects.filter(question__pub_date__year=current_year)
[<Choice: Not much>, <Choice: The sky>, <Choice: Just hacking again>]
Let's delete one of the choices. Use delete() for that.
c = q.choice_set.filter(choice_text__startswith='Just hacking')
c.delete()
介紹 Django管理
創建一個管理員用戶
首先,我們需要創建可以登錄到管理界面的用戶。運行以下命令:
c:\python27\mysite> python manage.py createsuperuser
輸入你想要的用戶名(隨便一個),然後按Enter。
Username: admin
然後,將提示輸入電子郵件地址(隨便一個):
Email address: admin@yiibai.com
最後一步是要輸入密碼。它會要求輸入密碼兩次,第二次爲第一的確認。
Password: **********
Password (again): *********
Superuser created successfully.
啓動開發服務器
Django管理站點默認激活。讓我們啓動開發服務器,並探索它。
如果服務器未運行,啓動它,如下所示:
c:\python27\mysite>python manage.py runserver
現在,打開Web瀏覽器,進入「/admin/」 本地域名- 例如, http://127.0.0.1:8000/admin/ 應該看到管理員登錄界面:
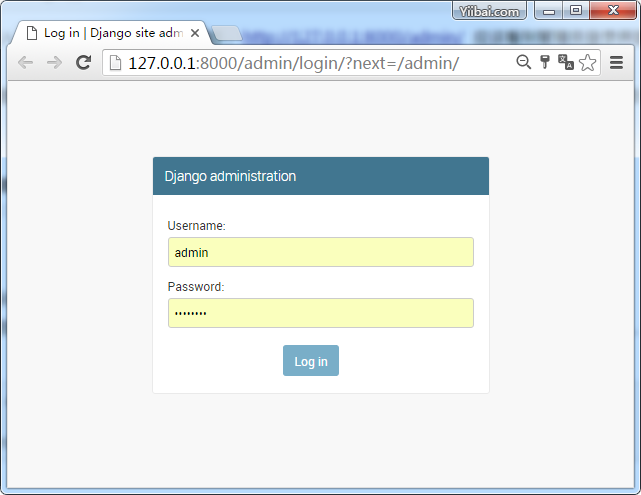
由於移在默認情況下開啓,登錄屏幕可能會顯示在你自己的語言, 由於翻譯在默認情況下開啓,登錄屏幕可能會顯示在你自己的語言,
輸入管理員網站
現在,嘗試與在上一步中創建的超級用戶帳號登錄。應該會看到 Django 管理的首頁:
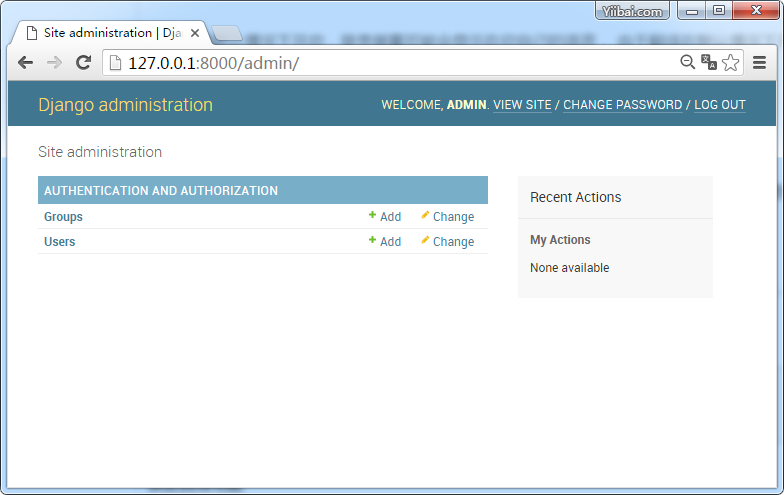
你應該看到一些可編輯內容:組和用戶。它們由django.contrib.auth,Django的認證框架提供。
修改poll 管理程序
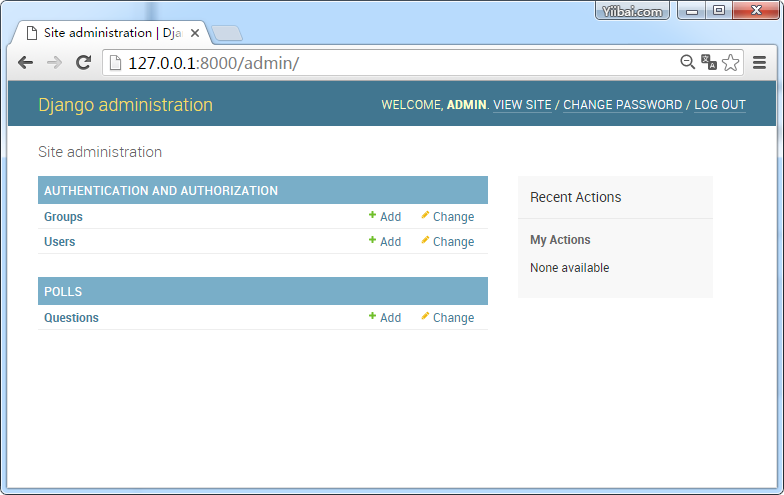
poll應用程序在哪裏?它不會顯示在管理索引頁面上。
只有一件事要做:我們需要告訴管理員這個Question對象有一個管理界面。要做到這一點,打開 polls/admin.py文件,並修改它如下:
from django.contrib import admin
from .models import Question
admin.site.register(Question)
瀏覽管理功能
現在,我們已經註冊Question,Django知道它應該在管理主頁面上顯示:
點擊「Questions」。現在,在「change list」頁面查看問題。該頁面顯示數據庫中的所有問題,並允許您選擇其中一個進行更改。還有我們先前創建的問題:
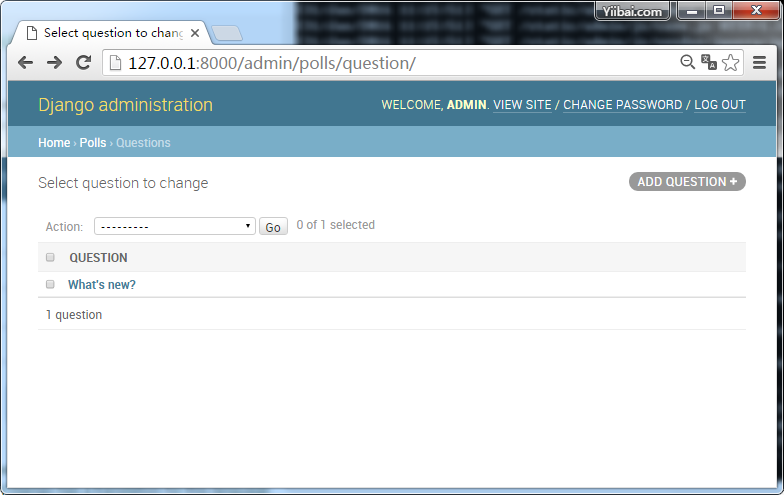
點擊「What's new?」這個問題進行編輯:
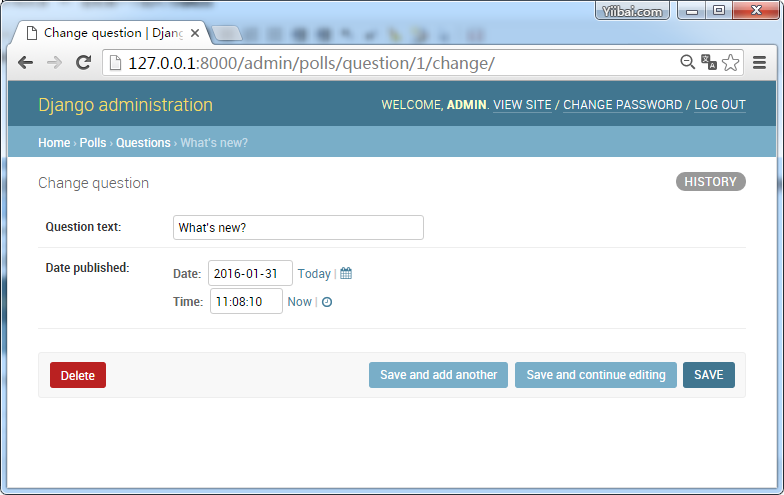
需要注意的事項在這裏列出:
表單是從問題(Question)模型自動產生。
不同型號的字段類型(DateTimeField,CharField)對應相應的HTML輸入部件。每個字段類型知道自己在Django管理中如何顯示。
每個DateTimeField字段得到 JavaScript 快捷方式。日期得到一個「Today」的快捷方式並且彈出日曆,並多次獲得了「Now」快捷方式並彈出窗口,列出了常用的輸入時間。
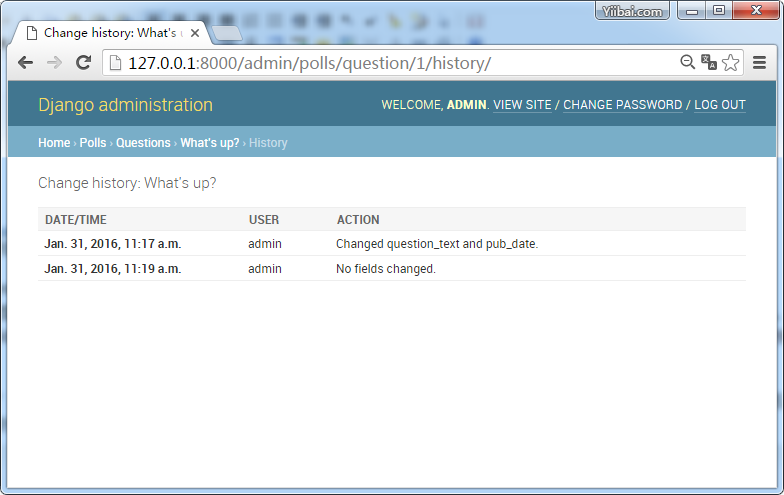
修改「Date published」點擊「Today」和「Now」快捷方式。然後點擊「Save and continue editing.」,然後點擊「History」在右上角。你會看到一個頁面,列出通過Django管理到這個對象的所有變化,修改人用戶名和時間戳:
代碼下載:http://pan.baidu.com/s/1jGR3wDg