AWTGridLayout
介紹
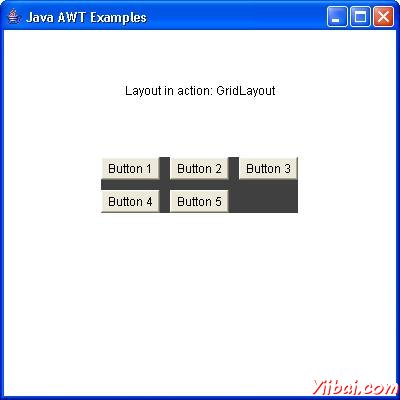
GridLayout 類組件排列在一個長方形的網格。
類的聲明
以下是聲明的java.awt.GridLayout類:
public class GridLayout extends Object implements LayoutManager, Serializable
類的構造函數
S.N.
構造函數與說明
1
GridLayout()
Creates a grid layout with a default of one column per component, in a single row.
2
GridLayout(int rows, int cols)
Creates a grid layout with the specified number of rows and columns.
3
GridLayout(int rows, int cols, int hgap, int vgap)
Creates a grid layout with the specified number of rows and columns.
類方法
S.N.
方法和說明
1
void addLayoutComponent(String name, Component comp)
Adds the specified component with the specified name to the layout.
2
int getColumns()
Gets the number of columns in this layout.
3
int getHgap()
Gets the horizontal gap between components.
4
int getRows()
Gets the number of rows in this layout.
5
int getVgap()
Gets the vertical gap between components.
6
void layoutContainer(Container parent)
Lays out the specified container using this layout.
7
Dimension minimumLayoutSize(Container parent)
Determines the minimum size of the container argument using this grid layout.
8
Dimension preferredLayoutSize(Container parent)
Determines the preferred size of the container argument using this grid layout.
9
void removeLayoutComponent(Component comp)
Removes the specified component from the layout.
10
void setColumns(int cols)
Sets the number of columns in this layout to the specified value.
11
void setHgap(int hgap)
Sets the horizontal gap between components to the specified value.
12
void setRows(int rows)
Sets the number of rows in this layout to the specified value.
13
void setVgap(int vgap)
Sets the vertical gap between components to the specified value.
14
String toString()
Returns the string representation of this grid layout's values.
繼承的方法
這個類繼承的方法從以下類:
- java.lang.Object
GridLayout 實例
在選擇使用任何編輯器創建以下java程序D:/ > AWT > com > yiibai > gui >
AwtLayoutDemo
package com.yiibai.gui; import java.awt.*; import java.awt.event.*; public class AwtLayoutDemo { private Frame mainFrame; private Label headerLabel; private Label statusLabel; private Panel controlPanel; private Label msglabel; public AwtLayoutDemo(){ prepareGUI(); } public static void main(String[] args){ AwtLayoutDemo awtLayoutDemo = new AwtLayoutDemo(); awtLayoutDemo.showGridLayoutDemo(); } private void prepareGUI(){ mainFrame = new Frame("Java AWT Examples"); mainFrame.setSize(400,400); mainFrame.setLayout(new GridLayout(3, 1)); mainFrame.addWindowListener(new WindowAdapter() { public void windowClosing(WindowEvent windowEvent){ System.exit(0); } }); headerLabel = new Label(); headerLabel.setAlignment(Label.CENTER); statusLabel = new Label(); statusLabel.setAlignment(Label.CENTER); statusLabel.setSize(350,100); msglabel = new Label(); msglabel.setAlignment(Label.CENTER); msglabel.setText("Welcome to TutorialsPoint AWT Tutorial."); controlPanel = new Panel(); controlPanel.setLayout(new FlowLayout()); mainFrame.add(headerLabel); mainFrame.add(controlPanel); mainFrame.add(statusLabel); mainFrame.setVisible(true); } private void showGridLayoutDemo(){ headerLabel.setText("Layout in action: GridLayout"); Panel panel = new Panel(); panel.setBackground(Color.darkGray); panel.setSize(300,300); GridLayout layout = new GridLayout(0,3); layout.setHgap(10); layout.setVgap(10); panel.setLayout(layout); panel.add(new Button("Button 1")); panel.add(new Button("Button 2")); panel.add(new Button("Button 3")); panel.add(new Button("Button 4")); panel.add(new Button("Button 5")); controlPanel.add(panel); mainFrame.setVisible(true); } }
編譯程序,使用命令提示符。進入到D:/> AWT,然後鍵入以下命令。
D:AWT>javac comyiibaiguiAwtlayoutDemo.java
如果沒有錯誤出現,這意味着編譯成功。使用下面的命令來運行程序。
D:AWT>java com.yiibai.gui.AwtlayoutDemo
驗證下面的輸出