Spring4 MVC表單驗證
在這篇文章中,我們將學習如何使用Spring表單標籤, 表單驗證使用 JSR303 的驗證註解,hibernate-validators,提供了使用MessageSource和訪問靜態資源(如CSS,JavaScript,圖片)國際化支持我們的視圖,使用ResourceHandlerRegistry,全部採用基於註解的配置。
我們將創建一個包含一個學生註冊表格的簡單應用,用戶輸入表單提交驗證通過 JSR303 的驗證註釋驗證,通過覆蓋屬性文件可使用國際驗證消息的默認消息,還訪問靜態資源(如應用引導CSS到網頁中)。
請注意,JSR303是一種規範,hibernate-validator是我們在這篇文章中使用的一種實現,它也提供了幾個不包含在規範中自己的驗證註釋。
使用以下技術:
- Spring 4.0.6.RELEASE
- validation-api 1.1.0.Final
- hibernate-validator 5.1.2.Final
- Bootstrap v3.1.0
- Maven 3
- JDK 1.6
- Tomcat 7.0.54
- Eclipse JUNO Service Release 2
我們現在開始!
第1步:創建目錄結構
以下將是最終的項目結構(這裏需要先創建一個Maven工程爲:Spring4MVCFormValidationExample):
現在讓我們在每個細節上述結構中提到的內容來做一點解釋。
第2步:更新pom.xml,包括所需的依賴關係
<?xml version="1.0"?>
<project xsi:schemaLocation="http://maven.apache.org/POM/4.0.0 http://maven.apache.org/xsd/maven-4.0.0.xsd"
    xmlns="http://maven.apache.org/POM/4.0.0" xmlns:xsi="http://www.w3.org/2001/XMLSchema-instance">

    <modelVersion>4.0.0</modelVersion>
    <groupId>com.yiibai.springmvc</groupId>
    <artifactId>Spring4MVCFormValidationExample</artifactId>
    <packaging>war</packaging>
    <version>1.0.0</version>
    <name>Spring4MVCFormValidationExample</name>

    <properties>
        <springframework.version>4.0.6.RELEASE</springframework.version>
        <hibernate.validator.version>5.1.2.Final</hibernate.validator.version>
        <javax.validation.version>1.1.0.Final</javax.validation.version>
    </properties>

    <dependencies>
        <!-- Spring dependencies -->
        <dependency>
            <groupId>org.springframework</groupId>
            <artifactId>spring-core</artifactId>
            <version>${springframework.version}</version>
        </dependency>
        <dependency>
            <groupId>org.springframework</groupId>
            <artifactId>spring-web</artifactId>
            <version>${springframework.version}</version>
        </dependency>
        <dependency>
            <groupId>org.springframework</groupId>
            <artifactId>spring-webmvc</artifactId>
            <version>${springframework.version}</version>
        </dependency>

        <!-- jsr303 validation dependencies-->
        <dependency>
            <groupId>javax.validation</groupId>
            <artifactId>validation-api</artifactId>
            <version>${javax.validation.version}</version>
        </dependency>
        <dependency>
            <groupId>org.hibernate</groupId>
            <artifactId>hibernate-validator</artifactId>
            <version>${hibernate.validator.version}</version>
        </dependency>

        <!-- Servlet dependencies -->
        <dependency>
            <groupId>javax.servlet</groupId>
            <artifactId>javax.servlet-api</artifactId>
            <version>3.1.0</version>
        </dependency>
        <dependency>
            <groupId>javax.servlet.jsp</groupId>
            <artifactId>javax.servlet.jsp-api</artifactId>
            <version>2.3.1</version>
        </dependency>
        <dependency>
            <groupId>javax.servlet</groupId>
            <artifactId>jstl</artifactId>
            <version>1.2</version>
        </dependency>
    </dependencies>

    <build>
        <pluginManagement>
            <plugins>
                <plugin>
                    <groupId>org.apache.maven.plugins</groupId>
                    <artifactId>maven-war-plugin</artifactId>
                    <version>2.4</version>
                    <configuration>
                        <warSourceDirectory>src/main/webapp</warSourceDirectory>
                        <warName>Spring4MVCFormValidationExample</warName>
                        <failOnMissingWebXml>false</failOnMissingWebXml>
                    </configuration>
                </plugin>
            </plugins>
        </pluginManagement>
        <finalName>Spring4MVCFormValidationExample</finalName>
    </build>
</project>
首先要注意這裏是 maven-war-plugin 插件聲明。由於我們使用的是全註解配置,我們甚至不包括在 web.xml 中,所以我們需要配置這個插件,以避免Maven構建war包失敗。在驗證部分 validation-api 代表規範, 而hibernate-validator是本規範的一個實現。hibernate-validator還提供了一些它自己的註解(@Email,@NotEmpty等)不屬於規範的一部分。
伴隨着這一點,我們也包括JSP/Servlet/Jstl 的依賴關係,也將需要爲使用 servlet API和JSTL視圖在我們的代碼中。在一般情況下,容器可能已經包含了這些庫,從而在pom.xml中我們可以設置範圍作爲「provided」。
此外,這裏還單獨下載了 bootstrap.css ,爲了演示在基於註解的配置如何使用資源處理。
第3步:創建POJO/域對象
訪問的對象將充當一個輔助bean的形式保存用戶提供簽證申請表提交的數據。我們將註釋,以驗證屬性(使用驗證註釋)。
com.yiibai.springmvc.model.Student

package com.yiibai.springmvc.model;

import java.io.Serializable;
import java.util.ArrayList;
import java.util.Date;
import java.util.List;

import javax.validation.constraints.NotNull;
import javax.validation.constraints.Past;
import javax.validation.constraints.Size;

import org.hibernate.validator.constraints.Email;
import org.hibernate.validator.constraints.NotEmpty;
import org.springframework.format.annotation.DateTimeFormat;

public class Student implements Serializable {

    @Size(min=3, max=30)
    private String firstName;

    @Size(min=3, max=30)
    private String lastName;

    @NotEmpty
    private String sex;

    @DateTimeFormat(pattern="yyyy-MM-dd")
    @Past @NotNull
    private Date dob;

    @Email @NotEmpty
    private String email;

    @NotEmpty
    private String section;

    @NotEmpty
    private String country;

    private boolean firstAttempt;

    @NotEmpty
    private List<String> subjects = new ArrayList<String>();

    public String getFirstName() {
        return firstName;
    }

    public void setFirstName(String firstName) {
        this.firstName = firstName;
    }

    public String getLastName() {
        return lastName;
    }

    public void setLastName(String lastName) {
        this.lastName = lastName;
    }

    public String getSex() {
        return sex;
    }

    public void setSex(String sex) {
        this.sex = sex;
    }

    public Date getDob() {
        return dob;
    }

    public void setDob(Date dob) {
        this.dob = dob;
    }

    public String getEmail() {
        return email;
    }

    public void setEmail(String email) {
        this.email = email;
    }

    public String getSection() {
        return section;
    }

    public void setSection(String section) {
        this.section = section;
    }

    public String getCountry() {
        return country;
    }

    public void setCountry(String country) {
        this.country = country;
    }

    public boolean isFirstAttempt() {
        return firstAttempt;
    }

    public void setFirstAttempt(boolean firstAttempt) {
        this.firstAttempt = firstAttempt;
    }

    public List<String> getSubjects() {
        return subjects;
    }

    public void setSubjects(List<String> subjects) {
        this.subjects = subjects;
    }

    @Override
    public String toString() {
        return "Student \[firstName=" + firstName + ", lastName=" + lastName
                + ", sex=" + sex + ", dob=" + dob + ", email=" + email
                + ", section=" + section + ", country=" + country
                + ", firstAttempt=" + firstAttempt + ", subjects=" + subjects
                + "\]";
    }

}
在上面的代碼中:@Size, @Past & @NotNull 是標準的標註,而@NotEmpty&@Emailare是規範的一部分。
第4步:添加控制器
控制器加入將有助於處理GET和POST請求。
com.yiibai.springmvc.controller.HelloWorldController

package com.yiibai.springmvc.controller;

import java.util.ArrayList;
import java.util.List;

import javax.validation.Valid;

import org.springframework.stereotype.Controller;
import org.springframework.ui.ModelMap;
import org.springframework.validation.BindingResult;
import org.springframework.web.bind.annotation.ModelAttribute;
import org.springframework.web.bind.annotation.RequestMapping;
import org.springframework.web.bind.annotation.RequestMethod;

import com.websystique.springmvc.model.Student;

@Controller
@RequestMapping("/")
public class HelloWorldController {

    /\*
     \* This method will serve as default GET handler.
     \*
     \*/
    @RequestMapping(method = RequestMethod.GET)
    public String newRegistration(ModelMap model) {
        Student student = new Student();
        model.addAttribute("student", student);
        return "enroll";
    }

    /\*
     \* This method will be called on form submission, handling POST request
     \* It also validates the user input
     \*/
    @RequestMapping(method = RequestMethod.POST)
    public String saveRegistration(@Valid Student student, BindingResult result, ModelMap model){

        if(result.hasErrors()) {
                return "enroll";
        }

        model.addAttribute("success", "Dear "+ student.getFirstName()+" , your Registration completed successfully");
        return "success";
    }

    /\*
     \* Method used to populate the Section list in view.
     \* Note that here you can call external systems to provide real data.
     \*/
    @ModelAttribute("sections")
    public List<String> initializeSections() {

        List<String> sections = new ArrayList<String>();
        sections.add("Graduate");
        sections.add("Post Graduate");
        sections.add("Research");
         return sections;
    }

    /\*
     \* Method used to populate the country list in view.
     \* Note that here you can call external systems to provide real data.
     \*/
    @ModelAttribute("countries")
    public List<String> initializeCountries() {

        List<String> countries = new ArrayList<String>();
        countries.add("USA");
        countries.add("CHINA");
        countries.add("FRANCE");
        countries.add("GERMANY");
        countries.add("ITALY");
        countries.add("OTHER");
         return countries;
    }

    /\*
     \* Method used to populate the subjects list in view.
     \* Note that here you can call external systems to provide real data.
     \*/
    @ModelAttribute("subjects")
    public List<String> initializeSubjects() {

        List<String> subjects = new ArrayList<String>();
        subjects.add("Physics");
        subjects.add("Chemistry");
        subjects.add("Life Science");
        subjects.add("Political Science");
        subjects.add("Computer Science");
        subjects.add("Mathmatics");
         return subjects;
    }

}
@Controller表明這個類是一個控制器在處理具有模式映射的@RequestMapping請求。這裏使用 ‘/’, 它被作爲默認的控制器。方法newRegistration是相當簡單的,註解爲@ RequestMethod.GET服務默認是GET請求,使用模型對象,以服務爲形式的數據,並呈現包含空白表單的網頁。
方法initializeSections, initializeCountries & initializeSubjects是簡單地創建請求級別的對象,其值在視圖/JSP中將被使用。
方法saveRegistration 標註有@ RequestMethod.POST,並將處理表單提交POST請求。注意本方法的參數和它們的順序。
@Valid要求spring來驗證相關的對象(學生)。 BindingResult包含此驗證,並可能在此驗證過程中發生(產生)任何錯誤的結果。請注意,BindingResult一定要在之後立即生效對象,否則spring將無法驗證並且將一個異常拋出。
注意,在校驗失敗後,默認/廣義錯誤消息顯示在屏幕上這可能不是所期望的。相反,可以重寫此行爲提供具體到每個字段中國際化消息。爲了做到這一點,我們需要配置 MessageSource 在應用程序配置類,並提供包含我們下一步將配置實際的信息屬性文件。
第5步:添加配置類
com.yiibai.springmvc.configuration.HelloWorldConfiguration

package com.yiibai.springmvc.configuration;

import org.springframework.context.MessageSource;
import org.springframework.context.annotation.Bean;
import org.springframework.context.annotation.ComponentScan;
import org.springframework.context.annotation.Configuration;
import org.springframework.context.support.ResourceBundleMessageSource;
import org.springframework.web.servlet.ViewResolver;
import org.springframework.web.servlet.config.annotation.EnableWebMvc;
import org.springframework.web.servlet.config.annotation.ResourceHandlerRegistry;
import org.springframework.web.servlet.config.annotation.WebMvcConfigurerAdapter;
import org.springframework.web.servlet.view.InternalResourceViewResolver;
import org.springframework.web.servlet.view.JstlView;

@Configuration
@EnableWebMvc
@ComponentScan(basePackages = "com.yiibai.springmvc")
public class HelloWorldConfiguration extends WebMvcConfigurerAdapter {

    /\*
     \* Configure View Resolver
     \*/
    @Bean
    public ViewResolver viewResolver() {
        InternalResourceViewResolver viewResolver = new InternalResourceViewResolver();
        viewResolver.setViewClass(JstlView.class);
        viewResolver.setPrefix("/WEB-INF/views/");
        viewResolver.setSuffix(".jsp");
        return viewResolver;
    }

    /\*
     \* Configure ResourceHandlers to serve static resources like CSS/ Javascript etc...
     \*
     \*/
    @Override
    public void addResourceHandlers(ResourceHandlerRegistry registry) {
        registry.addResourceHandler("/static/\*\*").addResourceLocations("/static/");
    }

    /\*
     \* Configure MessageSource to provide internationalized messages
     \*
     \*/

    @Bean
    public MessageSource messageSource() {
        ResourceBundleMessageSource messageSource = new ResourceBundleMessageSource();
        messageSource.setBasename("messages");
        return messageSource;
    }

}
@Configuration指示該類包含註解爲@Bean生產Bean管理是由Spring容器的一個或多個 bean 的方法。@EnableWebMvc 等效於 mvc:annotation-driven 在XML文件中。它能夠爲使用@RequestMapping 向特定的方法傳入的請求映射@Controller-annotated類。 @ComponentScan 等效於 context:component-scan base-package="..." 提供具有到哪裏查找管理Spring beans/類。
方法 ViewResolver 配置一個 ViewResolver 用來找出真正的視圖。方法 addResourceHandlers 配置 ResourceHandler 靜態資源。CSS, JavaScript, images 等都是靜態的資源在你的頁面裏。上面的配置表示,所有的資源請求開始/static/,將從webapps文件夾下提供/static/。在這個例子中,我們把所有的css文件放在 Web應用程序的 /static/css 目錄中。注意,此方法在 WebMvcConfigurerAdapter 中定義,因此我們需要擴展這個類來註冊我們的靜態資源覆蓋此方法。
方法爲 messageSource 配置消息包,以支持[國際化]消息屬性文件。請注意方法 baseName 提供的參數(消息)。Spring 將搜索應用程序類路徑中一個名爲messages.properties文件。讓我們添加的文件:
src/main/resources/messages.properties
Size.student.firstName=First Name must be between {2} and {1} characters long
Size.student.lastName=Last Name must be between {2} and {1} characters long
NotEmpty.student.sex=Please specify your gender
NotNull.student.dob=Date of birth can not be blank
Past.student.dob=Date of birth must be in the past
Email.student.email=Please provide a valid Email address
NotEmpty.student.email=Email can not be blank
NotEmpty.student.country=Please select your country
NotEmpty.student.section=Please select your section
NotEmpty.student.subjects=Please select at least one subject
typeMismatch=Invalid format
請注意,上述消息按照特定的模式
{ValidationAnnotationClass}.{modelObject}.{fieldName}
此外,根據具體的註釋(如@Size),也可以用傳遞參數給這些消息:{0},{1},..{i}
以XML格式上述結構將是
<beans xmlns="http://www.springframework.org/schema/beans"
    xmlns:context="http://www.springframework.org/schema/context"
    xmlns:xsi="http://www.w3.org/2001/XMLSchema-instance"
    xmlns:mvc="http://www.springframework.org/schema/mvc"
    xsi:schemaLocation="http://www.springframework.org/schema/beans http://www.springframework.org/schema/beans/spring-beans-4.0.xsd
    http://www.springframework.org/schema/mvc http://www.springframework.org/schema/mvc/spring-mvc-4.0.xsd
    http://www.springframework.org/schema/context http://www.springframework.org/schema/context/spring-context-4.0.xsd">

    <context:component-scan base-package="com.yiibai.springmvc" />
    <mvc:annotation-driven/>

    <mvc:resources mapping="/static/\*\*" location="/static/" />
    <mvc:default-servlet-handler />


    <bean id="messageSource" class="org.springframework.context.support.ResourceBundleMessageSource">
        <property name="basename">
            <value>messages</value>
        </property>
    </bean>


    <bean class="org.springframework.web.servlet.view.InternalResourceViewResolver">
        <property name="prefix">
            <value>/WEB-INF/views/</value>
        </property>
        <property name="suffix">
            <value>.jsp</value>
        </property>
    </bean>

</beans>
第6步:添加視圖(簡單的JSP頁面)
我們將添加兩個簡單的JSP頁面。第一個將包含一個表單,從用戶接收輸入, 而第二個在當表單輸入驗證成功時會顯示成功消息給用戶。
下面是代碼,用於包括靜態資源(在我們的例子中使用 bootstrap.css)
<link href="<c:url value='/static/css/bootstrap.css' />" rel="stylesheet"></link>
注意靜態資源路徑。既然我們已經在前面的步驟配置資源處理程序 /static/**, css文件將搜索 /static/文件夾。
完整的JSP文件如下所示:
WEB-INF/views/enroll.jsp
<%@ page language="java" contentType="text/html; charset=utf-8"
    pageEncoding="utf-8"%>
<%@ taglib prefix="form" uri="http://www.springframework.org/tags/form"%>
<%@ taglib prefix="c" uri="http://java.sun.com/jsp/jstl/core" %>
<html>
<head>
    <meta http-equiv="Content-Type" content="text/html; charset=utf-8">
    <title>Student Enrollment Form</title>
    <link href="<c:url value='/static/css/bootstrap.css' />" rel="stylesheet"></link>
    <link href="<c:url value='/static/css/custom.css' />" rel="stylesheet"></link>
</head>

<body>
     <div class="form-container">
     <h1>Enrollment Form</h1>
    <form:form method="POST" modelAttribute="student" class="form-horizontal">
        <div class="row">
            <div class="form-group col-md-12">
                <label class="col-md-3 control-lable" for="firstName">First Name</label>
                <div class="col-md-7">
                    <form:input type="text" path="firstName" id="firstName" class="form-control input-sm"/>
                    <div class="has-error">
                        <form:errors path="firstName" class="help-inline"/>
                    </div>
                </div>
            </div>
        </div>

        <div class="row">
            <div class="form-group col-md-12">
                <label class="col-md-3 control-lable" for="lastName">Last Name</label>
                <div class="col-md-7">
                    <form:input type="text" path="lastName" id="lastName" class="form-control input-sm"/>
                    <div class="has-error">
                        <form:errors path="lastName" class="help-inline"/>
                    </div>
                </div>
            </div>
        </div>

        <div class="row">
            <div class="form-group col-md-12">
                <label class="col-md-3 control-lable" for="sex">Sex</label>
                <div class="col-md-7" class="form-control input-sm">
                    <form:radiobutton path="sex" value="M" />Male
                    <form:radiobutton path="sex" value="F" />Female
                    <div class="has-error">
                        <form:errors path="sex" class="help-inline"/>
                    </div>
                </div>
            </div>
        </div>

        <div class="row">
            <div class="form-group col-md-12">
                <label class="col-md-3 control-lable" for="dob">Date of birth</label>
                <div class="col-md-7">
                    <form:input type="text" path="dob" id="dob" class="form-control input-sm"/>
                    <div class="has-error">
                        <form:errors path="dob" class="help-inline"/>
                    </div>
                </div>
            </div>
        </div>

        <div class="row">
            <div class="form-group col-md-12">
                <label class="col-md-3 control-lable" for="email">Email</label>
                <div class="col-md-7">
                    <form:input type="text" path="email" id="email" class="form-control input-sm"/>
                    <div class="has-error">
                        <form:errors path="email" class="help-inline"/>
                    </div>
                </div>
            </div>
        </div>


        <div class="row">
            <div class="form-group col-md-12">
                <label class="col-md-3 control-lable" for="section">Section</label>
                <div class="col-md-7" class="form-control input-sm">
                    <form:radiobuttons path="section" items="${sections}" />
                    <div class="has-error">
                        <form:errors path="section" class="help-inline"/>
                    </div>
                </div>
            </div>
        </div>


        <div class="row">
            <div class="form-group col-md-12">
                <label class="col-md-3 control-lable" for="country">Country</label>
                <div class="col-md-7">
                    <form:select path="country" id="country" class="form-control input-sm">
                        <form:option value="">Select Country</form:option>
                        <form:options items="${countries}" />
                    </form:select>
                    <div class="has-error">
                        <form:errors path="country" class="help-inline"/>
                    </div>
                </div>
            </div>
        </div>

        <div class="row">
            <div class="form-group col-md-12">
                <label class="col-md-3 control-lable" for="firstAttempt">First Attempt ?</label>
                <div class="col-md-1">
                    <form:checkbox path="firstAttempt" class="form-control input-sm"/>
                    <div class="has-error">
                        <form:errors path="firstAttempt" class="help-inline"/>
                    </div>
                </div>
            </div>
        </div>


        <div class="row">
            <div class="form-group col-md-12">
                <label class="col-md-3 control-lable" for="subjects">Subjects</label>
                <div class="col-md-7">
                    <form:select path="subjects" items="${subjects}" multiple="true" class="form-control input-sm"/>
                    <div class="has-error">
                        <form:errors path="subjects" class="help-inline"/>
                    </div>
                </div>
            </div>
        </div>

        <div class="row">
            <div class="form-actions floatRight">
                <input type="submit" value="Register" class="btn btn-primary btn-sm">
            </div>
        </div>
    </form:form>
    </div>
</body>
</html>
WEB-INF/views/success.jsp
<%@ page language="java" contentType="text/html; charset=ISO-8859-1"
    pageEncoding="ISO-8859-1"%>
<%@ taglib prefix="c" uri="http://java.sun.com/jsp/jstl/core" %>
<html>
<head>
    <meta http-equiv="Content-Type" content="text/html; charset=ISO-8859-1">
    <title>Student Enrollment Detail Confirmation</title>
    <link href="<c:url value='/static/css/custom.css' />" rel="stylesheet"></link>
</head>
<body>
    <div class="success">
        Confirmation message : ${success}
        <br>
        We have also sent you a confirmation mail to your email address : ${student.email}.
    </div>
</body>
</html>
第7步:添加初始化器類
com.yiibai.springmvc.configuration.HelloWorldInitializer

package com.yiibai.springmvc.configuration;

import javax.servlet.ServletContext;
import javax.servlet.ServletException;
import javax.servlet.ServletRegistration;

import org.springframework.web.WebApplicationInitializer;
import org.springframework.web.context.support.AnnotationConfigWebApplicationContext;
import org.springframework.web.servlet.DispatcherServlet;

public class HelloWorldInitializer implements WebApplicationInitializer {

    public void onStartup(ServletContext container) throws ServletException {

        AnnotationConfigWebApplicationContext ctx = new AnnotationConfigWebApplicationContext();
        ctx.register(HelloWorldConfiguration.class);
        ctx.setServletContext(container);

        ServletRegistration.Dynamic servlet = container.addServlet(
                "dispatcher", new DispatcherServlet(ctx));

        servlet.setLoadOnStartup(1);
        servlet.addMapping("/");
    }

}
內容上面類似之前教程的 web.xml 文件內容,因爲我們使用的是前端控制器的DispatcherServlet,分配映射(URL模式的XML)和而不是提供給Spring配置文件(spring-servlet.xml)的路徑,在這裏,我們使用註冊配置類。
更新:請注意,上面的類可以寫成更加簡潔[和這是最佳方法],通過擴展 AbstractAnnotationConfigDispatcherServletInitializer 基類,如下所示:
package com.websystique.springmvc.configuration;

import org.springframework.web.servlet.support.AbstractAnnotationConfigDispatcherServletInitializer;

public class HelloWorldInitializer extends AbstractAnnotationConfigDispatcherServletInitializer {

    @Override
    protected Class<?>\[\] getRootConfigClasses() {
        return new Class\[\] { HelloWorldConfiguration.class };
    }

    @Override
    protected Class<?>\[\] getServletConfigClasses() {
        return null;
    }

    @Override
    protected String\[\] getServletMappings() {
        return new String\[\] { "/" };
    }

}
第8步:構建和部署應用程序
有一點要記住,如:WebApplicationInitializer,Spring 基於Java 配置API是依賴Servlet3.0容器的。所以一定要確保你沒有使用 Servlet 聲明任何在 web.xml 小於3.0。對於我們的情況,我們要從應用程序中刪除 web.xml 文件。
現在構建war 或通過Maven 命令行(mvn clean install)。 部署 war 到Servlet3.0容器。
運行應用程序,訪問URL: http://localhost:8080/Spring4MVCFormValidationExample
得到的初始頁面如下圖所示:

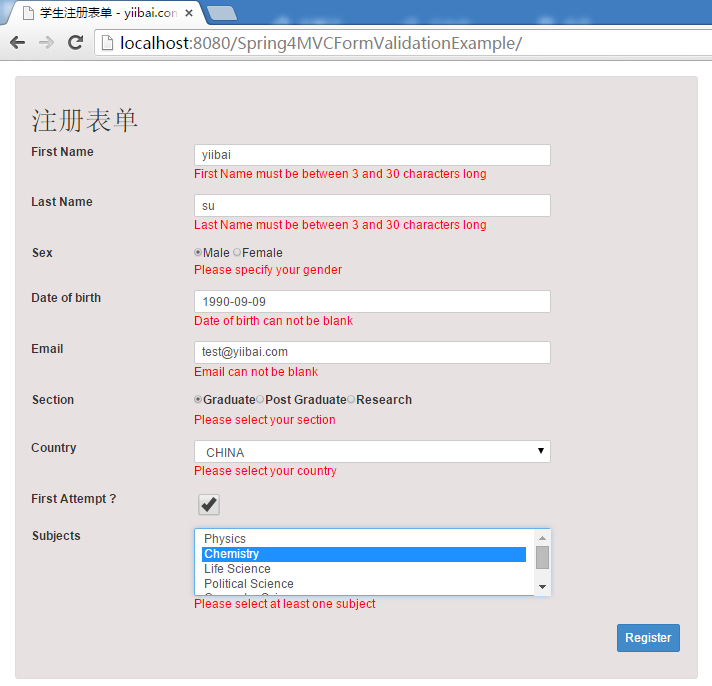
現在,如果你提交,會得到驗證錯誤(在 message.properties 中用戶定義的消息)

現在提供示例輸入
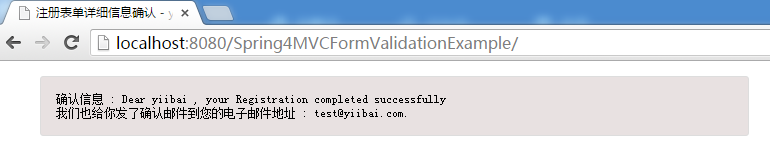
現在提交表單,結果如下:
到這裏,完成!
代碼下載:http://pan.baidu.com/s/1nukn6HV