JPA實體關係
本章將指導完成學習實體間的關係。一般的關係數據庫中的表之間的更有效。這裏的實體類都被視爲關係表(JPA的概念),因此是實體類之間的關係如下:
- @ManyToOne 關係
- @OneToMany 關係
- @OneToOne 關係
- @ManyToMany 關係
@ManyToOne 關係
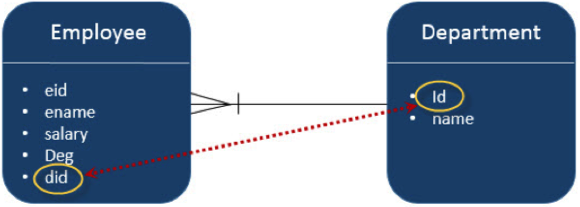
多對一實體之間存在的關係,其中一個實體(列或組列)的引用與另一個實體(列或組列)包含唯一值。在關係數據庫中,這些關係是通過使用表之間的外鍵/主鍵應用。
讓我們考慮Employee和Department 實體之間的關係的一個例子。在單向方式,即從員工到部門,多到一的關係是可行的。這意味着員工每個記錄包含一個部門ID,它應該是在部門表的主鍵。在這裏,在Employee表,Department 的ID是外鍵。
下圖顯示了兩個表之間的多對一關係。
在Eclipse中創建一個IDE JPA項目命名爲JPA_Eclipselink_MTO。這個項目的所有模塊下面討論。
創建實體
遵循用於創建實體上面給出的圖,在src下創建「com.tutorialspoin.eclipselink.entity'包。創建一個名爲Department.java的類。類系實體如下:
package com.yiibai.eclipselink.entity; import javax.persistence.Entity; import javax.persistence.GeneratedValue; import javax.persistence.GenerationType; import javax.persistence.Id; @Entity public class Department { @Id @GeneratedValue( strategy=GenerationType.AUTO ) private int id; private String name; public int getId() { return id; } public void setId(int id) { this.id = id; } public String getName( ) { return name; } public void setName( String deptName ) { this.name = deptName; } }
建立在這種關係中的第二個實體 - 名爲Employee.java在「com.yiibai.eclipselink.entity'包下的Employee實體類。 Employee實體類如下所示:
package com.yiibai.eclipselink.entity; import javax.persistence.Entity; import javax.persistence.GeneratedValue; import javax.persistence.GenerationType; import javax.persistence.Id; import javax.persistence.ManyToOne; @Entity public class Employee { @Id @GeneratedValue( strategy= GenerationType.AUTO ) private int eid; private String ename; private double salary; private String deg; @ManyToOne private Department department; public Employee(int eid, String ename, double salary, String deg) { super( ); this.eid = eid; this.ename = ename; this.salary = salary; this.deg = deg; } public Employee( ) { super(); } public int getEid( ) { return eid; } public void setEid(int eid) { this.eid = eid; } public String getEname( ) { return ename; } public void setEname(String ename) { this.ename = ename; } public double getSalary( ) { return salary; } public void setSalary(double salary) { this.salary = salary; } public String getDeg( ) { return deg; } public void setDeg(String deg) { this.deg = deg; } public Department getDepartment() { return department; } public void setDepartment(Department department) { this.department = department; } }
Persistence.xml
persistence.xml文件需要配置數據庫和實體類的註冊。
Persitence.xml由Eclipse IDE在創建時由JPA項目創建。詳細配置信息是用戶的規範。 persistence.xml 文件如下所示:
<persistence version="2.0" xmlns="http://java.sun.com/xml/ns/persistence" xmlns:xsi="http://www.w3.org/2001/XMLSchema-instance" xsi:schemaLocation="http://java.sun.com/xml/ns/persistence
http://java.sun.com/xml/ns/persistence/persistence\_2\_0.xsd"\> <persistence-unit name="Eclipselink_JPA" transaction-type="RESOURCE_LOCAL">
服務類
該模塊包含服務類,它實現了使用屬性初始化關係的一部分。在src下創建一個名爲「com.yiibai.eclipselink.service'包。創建一個名爲ManyToOne.java的DAO類。在DAO類如下所示:
package com.yiibaieclipselink.service; import javax.persistence.EntityManager; import javax.persistence.EntityManagerFactory; import javax.persistence.Persistence; import com.yiibai.eclipselink.entity.Department; import com.yiibai.eclipselink.entity.Employee; public class ManyToOne { public static void main( String[ ] args ) { EntityManagerFactory emfactory = Persistence. createEntityManagerFactory( "Eclipselink_JPA" ); EntityManager entitymanager = emfactory. createEntityManager( ); entitymanager.getTransaction( ).begin( ); //Create Department Entity Department department = new Department(); department.setName("Development"); //Store Department entitymanager.persist(department); //Create Employee1 Entity Employee employee1 = new Employee(); employee1.setEname("Satish"); employee1.setSalary(45000.0); employee1.setDeg("Technical Writer"); employee1.setDepartment(department); //Create Employee2 Entity Employee employee2 = new Employee(); employee2.setEname("Krishna"); employee2.setSalary(45000.0); employee2.setDeg("Technical Writer"); employee2.setDepartment(department); //Create Employee3 Entity Employee employee3 = new Employee(); employee3.setEname("Masthanvali"); employee3.setSalary(50000.0); employee3.setDeg("Technical Writer"); employee3.setDepartment(department); //Store Employees entitymanager.persist(employee1); entitymanager.persist(employee2); entitymanager.persist(employee3); entitymanager.getTransaction().commit(); entitymanager.close(); emfactory.close(); } }
編譯並執行上述程序後,Eclipse IDE控制檯面板上會顯示的通知。對於輸出,檢查MySQL工作臺。在此示例中,將創建兩個表。
通過在MySQL管理界面中執行下面的查詢,Department表的結果顯示如下:
Select * from department
ID
Name
101
Development
通過在MySQL界面執行下面的查詢,Employee表顯示如下的結果。
Select * from employee
Eid
Deg
Ename
Salary
Department_Id
102
Technical Writer
Satish
45000
101
103
Technical Writer
Krishna
45000
101
104
Technical Writer
Masthanwali
50000
101
在上表中Deparment_Id是Department表的外鍵(參考字段)。
@OneToMany 關係
在這種關係中,一個實體中的每一行被引用到其它實體的許多子記錄。最重要的是,子記錄不能有多個父。在表A和表B之間的1對多的關係,在表A中的每一行都可以在表B中被鏈接到一個或多個行
讓我們考慮上面的例子。假設Employee 和Department在上述例子中的表連接在一個相反的單向方式,那麼關係成爲一個一對多的關係。在Eclipse中創建一個IDE JPA項目命名JPA_Eclipselink_OTM。這個項目的所有模塊下面討論。
創建實體
遵循用於創建實體上面給出的圖,在src下創建「com.tutorialspoin.eclipselink.entity'包。創建一個名爲Department.java的類。類系實體如下:
package com.yiibai.eclipselink.entity; import java.util.List; import javax.persistence.Entity; import javax.persistence.GeneratedValue; import javax.persistence.GenerationType; import javax.persistence.Id; import javax.persistence.OneToMany; @Entity public class Department { @Id @GeneratedValue( strategy=GenerationType.AUTO ) private int id; private String name; @OneToMany( targetEntity=Employee.class ) private List employeelist; public int getId() { return id; } public void setId(int id) { this.id = id; } public String getName( ) { return name; } public void setName( String deptName ) { this.name = deptName; } public List getEmployeelist() { return employeelist; } public void setEmployeelist(List employeelist) { this.employeelist = employeelist; } }
創建第二個實體類關係-Employee實體類,命名爲Employee.java在「com.yiibai.eclipselink.entity'包下。 Employee實體類如下所示:
package com.yiibai.eclipselink.entity; import javax.persistence.Entity; import javax.persistence.GeneratedValue; import javax.persistence.GenerationType; import javax.persistence.Id; @Entity public class Employee { @Id @GeneratedValue( strategy= GenerationType.AUTO ) private int eid; private String ename; private double salary; private String deg; public Employee(int eid, String ename, double salary, String deg) { super( ); this.eid = eid; this.ename = ename; this.salary = salary; this.deg = deg; } public Employee( ) { super(); } public int getEid( ) { return eid; } public void setEid(int eid) { this.eid = eid; } public String getEname( ) { return ename; } public void setEname(String ename) { this.ename = ename; } public double getSalary( ) { return salary; } public void setSalary(double salary) { this.salary = salary; } public String getDeg( ) { return deg; } public void setDeg(String deg) { this.deg = deg; } }
Persistence.xml
persistence.xml文件如下:
<persistence version="2.0" xmlns="http://java.sun.com/xml/ns/persistence" xmlns:xsi="http://www.w3.org/2001/XMLSchema-instance" xsi:schemaLocation="http://java.sun.com/xml/ns/persistence
http://java.sun.com/xml/ns/persistence/persistence\_2\_0.xsd"\> <persistence-unit name="Eclipselink_JPA" transaction-type="RESOURCE_LOCAL">
服務類
該模塊包含服務類,它實現了使用屬性初始化關係的一部分。在src下創建一個名爲「com.yiibai.eclipselink.service'包。並在包下創建一個名爲OneToMany.java的DAO類。在DAO類如下所示:
package com.yiibaieclipselink.service; import java.util.List; import java.util.ArrayList; import javax.persistence.EntityManager; import javax.persistence.EntityManagerFactory; import javax.persistence.Persistence; import com.yiibai.eclipselink.entity.Department; import com.yiibai.eclipselink.entity.Employee; public class OneToMany { public static void main(String[] args) { EntityManagerFactory emfactory = Persistence. createEntityManagerFactory( "Eclipselink_JPA" ); EntityManager entitymanager = emfactory. createEntityManager( ); entitymanager.getTransaction( ).begin( ); //Create Employee1 Entity Employee employee1 = new Employee(); employee1.setEname("Satish"); employee1.setSalary(45000.0); employee1.setDeg("Technical Writer"); //Create Employee2 Entity Employee employee2 = new Employee(); employee2.setEname("Krishna"); employee2.setSalary(45000.0); employee2.setDeg("Technical Writer"); //Create Employee3 Entity Employee employee3 = new Employee(); employee3.setEname("Masthanvali"); employee3.setSalary(50000.0); employee3.setDeg("Technical Writer"); //Store Employee entitymanager.persist(employee1); entitymanager.persist(employee2); entitymanager.persist(employee3); //Create Employeelist List<Employee> emplist = new ArrayList(); emplist.add(employee1); emplist.add(employee2); emplist.add(employee3); //Create Department Entity Department department= new Department(); department.setName("Development"); department.setEmployeelist(emplist); //Store Department entitymanager.persist(department); entitymanager.getTransaction().commit(); entitymanager.close(); emfactory.close(); } }
編譯和執行上述程序後,在Eclipse IDE的控制檯面板中得到通知。對於輸出檢查MySQL工作臺如下。
在這個項目中創建三個表。通過在MySQL界面查詢,department_employee表的結果顯示如下:
Select * from department_Id;
Department_ID
Employee_Eid
254
251
254
252
254
253
在上表中,deparment_id和employee_id 是部門和員工表的外鍵(參考字段)。
通過在MySQL界面下面查詢,department表的結果將顯示如下表格格式。
Select * from department;
ID
Name
254
Development
通過在MySQL界面下面查詢,employee表的結果顯示如下:
Select * from employee;
Eid
Deg
Ename
Salary
251
Technical Writer
Satish
45000
252
Technical Writer
Krishna
45000
253
Technical Writer
Masthanwali
50000
@OneToOne 關係
在一對一關係,一個項可以鏈接到只能另一個項。這意味着一個實體中的每一行被稱爲一個且僅一個行對另一個實體。
讓我們考慮上面的例子。Employee和Department在反向單向的方式,關係是一對一的關係。這意味着每個員工只能屬於一個部門。
在Eclipse中創建一個IDE JPA項目命名JPA_Eclipselink_OTO。這個項目的所有模塊下面討論。
創建實體
遵循用於創建實體上面給出的圖。在src下創建一個名爲「com.tutorialspoin.eclipselink.entity'的包。在這個包下創建類名爲:Department.java。類系實體被示爲如下:
package com.yiibai.eclipselink.entity; import javax.persistence.Entity; import javax.persistence.GeneratedValue; import javax.persistence.GenerationType; import javax.persistence.Id; @Entity public class Department { @Id @GeneratedValue( strategy=GenerationType.AUTO ) private int id; private String name; public int getId() { return id; } public void setId(int id) { this.id = id; } public String getName( ) { return name; } public void setName( String deptName ) { this.name = deptName; } }
創建第二個實體類關係-Employee實體類,命名爲Employee.java在「com.yiibai.eclipselink.entity'包下。 Employee實體類如下所示:
package com.yiibai.eclipselink.entity; import javax.persistence.Entity; import javax.persistence.GeneratedValue; import javax.persistence.GenerationType; import javax.persistence.Id; import javax.persistence.OneToOne; @Entity public class Employee { @Id @GeneratedValue( strategy= GenerationType.AUTO ) private int eid; private String ename; private double salary; private String deg; @OneToOne private Department department; public Employee(int eid, String ename, double salary, String deg) { super( ); this.eid = eid; this.ename = ename; this.salary = salary; this.deg = deg; } public Employee( ) { super(); } public int getEid( ) { return eid; } public void setEid(int eid) { this.eid = eid; } public String getEname( ) { return ename; } public void setEname(String ename) { this.ename = ename; } public double getSalary( ) { return salary; } public void setSalary(double salary) { this.salary = salary; } public String getDeg( ) { return deg; } public void setDeg(String deg) { this.deg = deg; } public Department getDepartment() { return department; } public void setDepartment(Department department) { this.department = department; } }
Persistence.xml
persistence.xml文件,如下所示:
<persistence version="2.0" xmlns="http://java.sun.com/xml/ns/persistence" xmlns:xsi="http://www.w3.org/2001/XMLSchema-instance" xsi:schemaLocation="http://java.sun.com/xml/ns/persistence
http://java.sun.com/xml/ns/persistence/persistence\_2\_0.xsd"\> <persistence-unit name="Eclipselink_JPA" transaction-type="RESOURCE_LOCAL">
服務類
在src下創建一個名爲「com.yiibai.eclipselink.service'的包。在這個包下創建一個名爲OneToOne.java的DAO類。在DAO類如下所示:
package com.yiibaieclipselink.service; import javax.persistence.EntityManager; import javax.persistence.EntityManagerFactory; import javax.persistence.Persistence; import com.yiibai.eclipselink.entity.Department; import com.yiibai.eclipselink.entity.Employee; public class OneToOne { public static void main(String[] args) { EntityManagerFactory emfactory = Persistence. createEntityManagerFactory( "Eclipselink_JPA" ); EntityManager entitymanager = emfactory. createEntityManager( ); entitymanager.getTransaction( ).begin( ); //Create Department Entity Department department = new Department(); department.setName("Development"); //Store Department entitymanager.persist(department); //Create Employee Entity Employee employee = new Employee(); employee.setEname("Satish"); employee.setSalary(45000.0); employee.setDeg("Technical Writer"); employee.setDepartment(department); //Store Employee entitymanager.persist(employee); entitymanager.getTransaction().commit(); entitymanager.close(); emfactory.close(); } }
編譯和執行上述程序後,在Eclipse IDE控制檯面板的顯示通知。對於輸出,檢查MySQL工作臺如下。
在上面的例子中,將創建兩個表。通過在MySQL的界面下面的查詢,department表的結果顯示如下:
Select * from department
ID
Name
301
Development
通過在MySQL界面下面查詢,employee表的結果顯示如下:
Select * from employee
Eid
Deg
Ename
Salary
Department_id
302
Technical Writer
Satish
45000
301
@ManyToMany 關係
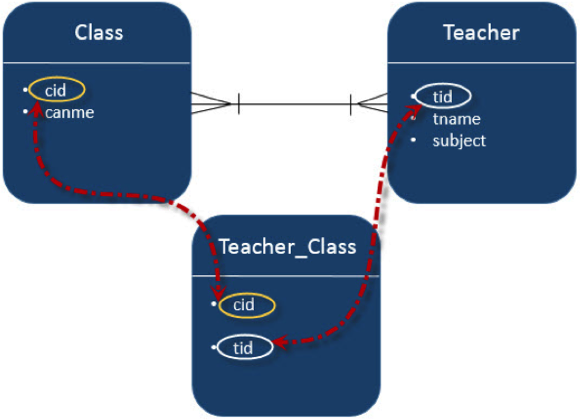
多對多的關係,就是從一個實體中的一個或多個行與其他實體的多個行相關聯。
讓我們考慮兩個實體之間的關係的一個例子:班級和教師。以雙向的方式,既班級和教師有多對一的關係。這意味着類中的每個記錄由教師組(教師ID),這應該是在教師表中的主鍵和存儲在Teacher_Class表,反之亦然簡稱。在這裏,Teachers_Class表包含外鍵字段。在Eclipse中創建一個IDE JPA項目命名JPA_Eclipselink_MTM。這個項目的所有模塊下面討論。
創建實體
按照上面的圖中所示的方案中創建的實體。在src下創建一個名爲「com.tutorialspoin.eclipselink.entity'的包。創建一個名爲Class.java的類在這個包下。類系實體顯示如下:
package com.yiibai.eclipselink.entity; import java.util.Set; import javax.persistence.Entity; import javax.persistence.GeneratedValue; import javax.persistence.GenerationType; import javax.persistence.Id; import javax.persistence.ManyToMany; @Entity public class Clas { @Id @GeneratedValue( strategy = GenerationType.AUTO ) private int cid; private String cname; @ManyToMany(targetEntity=Teacher.class) private Set teacherSet; public Clas() { super(); } public Clas(int cid, String cname, Set teacherSet) { super(); this.cid = cid; this.cname = cname; this.teacherSet = teacherSet; } public int getCid() { return cid; } public void setCid(int cid) { this.cid = cid; } public String getCname() { return cname; } public void setCname(String cname) { this.cname = cname; } public Set getTeacherSet() { return teacherSet; } public void setTeacherSet(Set teacherSet) { this.teacherSet = teacherSet; } }
創建第二個實體這種關係的Employee實體類,命名爲Teacher.java 在「com.yiibai.eclipselink.entity'包下。 Employee實體類如下所示:
package com.yiibai.eclipselink.entity; import java.util.Set; import javax.persistence.Entity; import javax.persistence.GeneratedValue; import javax.persistence.GenerationType; import javax.persistence.Id; import javax.persistence.ManyToMany; @Entity public class Teacher { @Id @GeneratedValue( strategy = GenerationType.AUTO ) private int tid; private String tname; private String subject; @ManyToMany(targetEntity=Clas.class) private Set clasSet; public Teacher() { super(); } public Teacher(int tid, String tname, String subject, Set clasSet) { super(); this.tid = tid; this.tname = tname; this.subject = subject; this.clasSet = clasSet; } public int getTid() { return tid; } public void setTid(int tid) { this.tid = tid; } public String getTname() { return tname; } public void setTname(String tname) { this.tname = tname; } public String getSubject() { return subject; } public void setSubject(String subject) { this.subject = subject; } public Set getClasSet() { return clasSet; } public void setClasSet(Set clasSet) { this.clasSet = clasSet; } }
Persistence.xml
Persistence.xml 文件的內容如下:
<persistence version="2.0" xmlns="http://java.sun.com/xml/ns/persistence" xmlns:xsi="http://www.w3.org/2001/XMLSchema-instance" xsi:schemaLocation="http://java.sun.com/xml/ns/persistence
http://java.sun.com/xml/ns/persistence/persistence\_2\_0.xsd"\> <persistence-unit name="Eclipselink_JPA" transaction-type="RESOURCE_LOCAL">
服務類
在src下創建一個名爲「com.yiibai.eclipselink.service'的包,在這個包下創建一個名爲ManyToMany.java的DAO類。在DAO類如下所示:
package com.yiibai.eclipselink.service; import java.util.HashSet; import java.util.Set; import javax.persistence.EntityManager; import javax.persistence.EntityManagerFactory; import javax.persistence.Persistence; import com.yiibai.eclipselink.entity.Clas; import com.yiibai.eclipselink.entity.Teacher; public class ManyToMany { public static void main(String[] args) { EntityManagerFactory emfactory = Persistence. createEntityManagerFactory( "Eclipselink_JPA" ); EntityManager entitymanager = emfactory. createEntityManager( ); entitymanager.getTransaction( ).begin( ); //Create Clas Entity Clas clas1=new Clas(0,"1st",null); Clas clas2=new Clas(0,"2nd",null); Clas clas3=new Clas(0,"3rd",null); //Store Clas entitymanager.persist(clas1); entitymanager.persist(clas2); entitymanager.persist(clas3); //Create Clas Set1 Set<Clas> classSet1 = new HashSet(); classSet1.add(clas1); classSet1.add(clas2); classSet1.add(clas3); //Create Clas Set2 Set<Clas> classSet2 = new HashSet(); classSet2.add(clas3); classSet2.add(clas1); classSet2.add(clas2); //Create Clas Set3 Set<Clas> classSet3 = new HashSet(); classSet3.add(clas2); classSet3.add(clas3); classSet3.add(clas1); //Create Teacher Entity Teacher teacher1 = new Teacher(0, "Satish","Java",classSet1); Teacher teacher2 = new Teacher(0, "Krishna","Adv Java",classSet2); Teacher teacher3 = new Teacher(0, "Masthanvali","DB2",classSet3); //Store Teacher entitymanager.persist(teacher1); entitymanager.persist(teacher2); entitymanager.persist(teacher3); entitymanager.getTransaction( ).commit( ); entitymanager.close( ); emfactory.close( ); } }
在這個例子中工程,將創建三個表。通過在MySQL界面執行下面的查詢,teacher_clas表將顯示如下的結果:
Select * form teacher_clas
Teacher_tid
Classet_cid
354
351
355
351
356
351
354
352
355
352
356
352
354
353
355
353
356
353
在上表中teacher_tid是從eacher表的外鍵,classet_cid是class表的外鍵。因此不同的老師被分配到不同的班級。
通過在MySQL的界面下面的查詢,teacher表的結果顯示如下:
Select * from teacher
Tid
Subject
Tname
354
Java
Satish
355
Adv Java
Krishna
356
DB2
Masthanvali
通過在MySQL的界面執行下面的查詢, clas表將顯示如下的結果:
Select * from clas
Cid
Cname
351
1st
352
2nd
353
3rd