JUnit 4 Vs TestNG比較
JUnit 4和TestNG都是Java中非常受歡迎的單元測試框架。兩種框架在功能上看起來非常相似。 哪一個更好? 在Java項目中應該使用哪個單元測試框架?
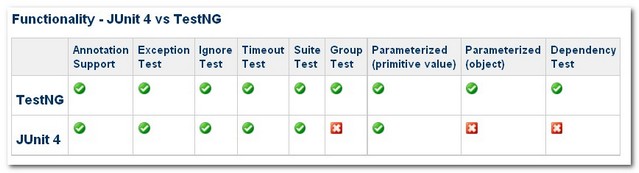
下面表中概括了JUnit 4和TestNG之間的功能比較。如下圖所示 -
1. 註釋支持
註釋/註解支持在JUnit 4和TestNG中是非常類似的。
特點
JUnit 4
TestNG
測試註釋
在套件中的所有測試運行之前運行
-
在套件中的所有測試運行之後運行
-
測試之前運行
-
測試之後運行
-
在調用屬於任何這些組的第一個測試方法之前運行
-
在調用屬於任何這些組的第一個測試方法之後運行
-
在調用當前類的第一個測試方法之前運行
在調用當前類的第一個測試方法之後運行
在每個測試方法之前運行
在每個測試方法之後運行
忽略測試
@Test(enbale=false)
預期的異常
@Test(expected = ArithmeticException.class)
@Test(expectedExceptions = ArithmeticException.class)
超時測試
@Test(timeout = 1000)
@Test(timeout = 1000)
JUnit4和TestNG之間的主要註釋差異是:
在JUnit 4中,我們必須聲明「
[](https://github.com/BeforeClass "@BeforeClass")[@BeforeClass](https://github.com/BeforeClass "@BeforeClass")」和「[](https://github.com/AfterClass "@AfterClass")[@AfterClass](https://github.com/AfterClass "@AfterClass")」方法作爲靜態方法。 TestNG在方法聲明中更靈活,它沒有這個約束。3個額外的setUp / tearDown級別:suite和group([](https://github.com/Before "@Before")[@Before](https://github.com/Before "@Before") / AfterSuite,[](https://github.com/Before "@Before")[@Before](https://github.com/Before "@Before") / After Test,[](https://github.com/Before "@Before")[@Before](https://github.com/Before "@Before") / After Group)。
JUnit 4
@BeforeClass
public static void oneTimeSetUp() {
    // one-time initialization code
    System.out.println("@BeforeClass - oneTimeSetUp");
}
TestNG
@BeforeClass
public void oneTimeSetUp() {
        // one-time initialization code
        System.out.println("@BeforeClass - oneTimeSetUp");
}
在JUnit 4中,註釋命名約定有點混亂,例如「Before」,「After」和「Expected」,我們並不真正瞭解「Before」和「After」之前的內容,以及要測試中的「預期」 方法。TestiNG更容易理解,它使用類似「BeforeMethod」,「AfterMethod」和「ExpectedException」就很明瞭。
2. 異常測試
「異常測試」是指從單元測試中拋出的異常,此功能在JUnit 4和TestNG中都可實現。
JUnit 4
@Test(expected = ArithmeticException.class)
public void divisionWithException() {
  int i = 1/0;
}
TestNG
@Test(expectedExceptions = ArithmeticException.class)
public void divisionWithException() {
  int i = 1/0;
}
3. 忽略測試
「忽略」表示是否應該忽略單元測試,該功能在JUnit 4和TestNG中均可實現。
JUnit 4
@Ignore("Not Ready to Run")
@Test
public void divisionWithException() {
  System.out.println("Method is not ready yet");
}
TestNG
@Test(enabled=false)
public void divisionWithException() {
  System.out.println("Method is not ready yet");
}
4. 時間測試
「時間測試」表示如果單元測試所花費的時間超過指定的毫秒數,則測試將會終止,並將其標記爲失敗,此功能在JUnit 4和TestNG中均可實現。
JUnit 4
@Test(timeout = 1000)
public void infinity() {
    while (true);
}
TestNG
@Test(timeOut = 1000)
public void infinity() {
    while (true);
}
5. 套件測試
「套件測試」是指捆綁幾個單元測試並一起運行。 此功能在JUnit 4和TestNG中都可實現。 然而,兩者都使用非常不同的方法來實現它。
JUnit 4
「@RunWith」和「@Suite」用於運行套件測試。下面的類代碼表示在JunitTest5執行之後,單元測試「JunitTest1」和「JunitTest2」一起運行。 所有的聲明都是在類內定義的。
@RunWith(Suite.class)
@Suite.SuiteClasses({
        JunitTest1.class,
        JunitTest2.class
})
public class JunitTest5 {
}
TestNG
XML文件用於運行套件測試。以下XML文件表示單元測試「TestNGTest1」和「TestNGTest2」將一起運行。
<suite name="My test suite">
  <test name="testing">
    <classes>
       <class name="com.fsecure.demo.testng.TestNGTest1" />
       <class name="com.fsecure.demo.testng.TestNGTest2" />
    </classes>
  </test>
</suite>
TestNG可以做捆綁類測試,也可以捆綁方法測試。 憑藉TestNG獨特的「分組」概念,每種方法都可以與一個組合相結合,可以根據功能對測試進行分類(分組)。 例如,
下面是一個有四個方法的類,三個組(method1,method2和method3)
@Test(groups="method1")
public void testingMethod1() {
  System.out.println("Method - testingMethod1()");
}

@Test(groups="method2")
public void testingMethod2() {
    System.out.println("Method - testingMethod2()");
}

@Test(groups="method1")
public void testingMethod1_1() {
    System.out.println("Method - testingMethod1_1()");
}

@Test(groups="method4")
public void testingMethod4() {
    System.out.println("Method - testingMethod4()");
}使用以下XML文件,可以僅使用組「method1」執行單元測試。
<suite name="My test suite">
  <test name="testing">
      <groups>
      <run>
        <include name="method1"/>
      </run>
    </groups>
    <classes>
       <class name="com.fsecure.demo.testng.TestNGTest5_2_0" />
    </classes>
  </test>
</suite>
通過「分組」測試概念,集成測試的可能性是無限制的。 例如,我們只能從所有單元測試類中測試「DatabaseFuntion」分組。
6. 參數化測試
「參數化測試」是指單位測試參數值的變化。 此功能在JUnit 4和TestNG中都實現。 然而,兩者都使用非常不同的方法來實現它。
JUnit 4
「[@RunWith](https://github.com/RunWith "@RunWith")」和「[@Parameter](https://github.com/Parameter "@Parameter")」用於提供單元測試的參數值,[@Parameters](https://github.com/Parameters "@Parameters")必須返回List [],參數將作爲參數傳入類構造函數。
@RunWith(value = Parameterized.class)
public class JunitTest6 {

     private int number;

     public JunitTest6(int number) {
        this.number = number;
     }

     @Parameters
     public static Collection<Object[]> data() {
       Object[][] data = new Object[][] { { 1 }, { 2 }, { 3 }, { 4 } };
       return Arrays.asList(data);
     }

     @Test
     public void pushTest() {
       System.out.println("Parameterized Number is : " + number);
     }
}這裏有很多限制,我們必須遵循「JUnit」的方式來聲明參數,並且必須將參數傳遞給構造函數才能初始化類成員作爲測試的參數值。參數類的返回類型爲「List []」,數據已被限制爲String或用於測試的原始類型值。
TestNG
XML文件或「[@DataProvider](https://github.com/DataProvider "@DataProvider")」用於提供不同參數進行測試。
用於參數化測試的XML文件 -
只有「[@Parameters](https://github.com/Parameters "@Parameters")」在需要參數測試的方法中聲明,參數化數據將在TestNG的XML配置文件中提供。 通過這樣做,我們可以使用不同數據集的單個測試用例,甚至獲得不同的結果。 另外,即使是最終用戶,QA還是QE都可以在XML文件中提供自己的數據進行測試。
public class TestNGTest6_1_0 {

@Test
@Parameters(value="number")
public void parameterIntTest(int number) {
       System.out.println("Parameterized Number is : " + number);
    }
}
XML文件的內容如下 -
<suite name="My test suite">
  <test name="testing">

    <parameter name="number" value="2"/>

    <classes>
       <class name="com.fsecure.demo.testng.TestNGTest6_0" />
    </classes>
  </test>
</suite>@DataProvider用於參數化測試
將數據值拉入XML文件可能非常方便,但測試偶爾會需要複雜的類型,這些類型不能被表示爲一個字符串或一個原始類型值。 TestNG使用[@DataProvider](https://github.com/DataProvider "@DataProvider")註解來處理這種情況,這有助於將複雜參數類型映射到測試方法。
@DataProvider for Vector,String或Integer作爲參數,參考如下代碼 -
@Test(dataProvider = "Data-Provider-Function")
    public void parameterIntTest(Class clzz, String[] number) {
       System.out.println("Parameterized Number is : " + number[0]);
       System.out.println("Parameterized Number is : " + number[1]);
    }

    //This function will provide the patameter data
    @DataProvider(name = "Data-Provider-Function")
    public Object[][] parameterIntTestProvider() {
        return new Object[][]{
                   {Vector.class, new String[] {"java.util.AbstractList",
"java.util.AbstractCollection"}},
                   {String.class, new String[] {"1", "2"}},
                   {Integer.class, new String[] {"1", "2"}}
                  };
}@DataProvider作爲對象的參數
「TestNGTest6_3_0」是一個簡單的對象,只需使用get/set方法進行演示。
@Test(dataProvider = "Data-Provider-Function")
public void parameterIntTest(TestNGTest6_3_0 clzz) {
   System.out.println("Parameterized Number is : " + clzz.getMsg());
   System.out.println("Parameterized Number is : " + clzz.getNumber());
}

//This function will provide the patameter data
@DataProvider(name = "Data-Provider-Function")
public Object[][] parameterIntTestProvider() {

    TestNGTest6_3_0 obj = new TestNGTest6_3_0();
    obj.setMsg("Hello");
    obj.setNumber(123);

    return new Object[][]{
               {obj}
    };
}
TestNG的參數化測試非常用戶友好和靈活(在XML文件或類內)。 它可以支持許多複雜的數據類型作爲參數值,可能性是無限的。 如上例所示,我們甚至可以傳入我們自己的對象(TestNGTest6_3_0)進行參數化測試
7.依賴性測試
「參數化測試」表示方法是依賴性測試,它將在所需方法之前執行。 如果依賴方法失敗,則所有後續測試將會被跳過,不會被標記爲失敗。
JUnit 4
JUnit框架着重於測試隔離; 目前它不支持此功能。
TestNG
它使用「dependOnMethods」來實現依賴測試如下 -
@Test
public void method1() {
   System.out.println("This is method 1");
}

@Test(dependsOnMethods={"method1"})
public void method2() {
    System.out.println("This is method 2");
}「method2()」只有在「method1()」運行成功的情況下才會執行,否則「method2()」將跳過測試。
結論
在考慮所有功能比較之後,建議使用TestNG作爲Java項目的核心單元測試框架,因爲TestNG在參數化測試,依賴測試和套件測試(分組概念)方面更加突出。 TestNG用於高級測試和複雜集成測試。 它的靈活性對於大型測試套件尤其有用。 此外,TestNG還涵蓋了整個核心的JUnit4功能。這樣說來,好像也沒有理由使用JUnit了。