Spring JDBC處理CLOB類型字段
以下示例將演示使用spring jdbc更新CLOB類型的字段值,即更新student表中的可用記錄。
student表的結構如下 -
CREATE TABLE student(
   ID   INT NOT NULL AUTO_INCREMENT,
   NAME VARCHAR(20) NOT NULL,
   AGE  INT NOT NULL,
   DESCRIPTION LONGTEXT,
   PRIMARY KEY (ID)
);

INSERT INTO student(ID,NAME,AGE,DESCRIPTION) VALUES(1,'Maxsu', 23, NULL);
語法:
MapSqlParameterSource in = new MapSqlParameterSource();
in.addValue("id", id);
in.addValue("description",  new SqlLobValue(description, new DefaultLobHandler()), Types.CLOB);

String SQL = "update Student set description = :description where id = :id";
NamedParameterJdbcTemplate jdbcTemplateObject = new NamedParameterJdbcTemplate(dataSource);
jdbcTemplateObject.update(SQL, in);
在上面語法中 -
-
SqlLobValue- 表示SQL BLOB / CLOB值參數的對象。 -
in-SqlParameterSource對象將參數傳遞給更新查詢。 -
jdbcTemplateObject-NamedParameterJdbcTemplate對象來更新數據庫中的學生對象。
創建項目
要了解上面提到的Spring JDBC相關的概念,這裏創建一個項目用來演示如何操作CLOB類型字段。打開Eclipse IDE,並按照以下步驟創建一個名稱爲:HandlingCLOB 的Spring應用程序項目。
步驟說明
- 參考第一個Spring JDBC項目來創建一個Maven項目
- 更新bean配置並運行應用程序。
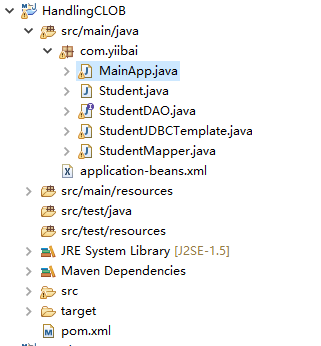
完整的項目結構如下所示 -
文件 : pom.xml 的內容 -
<project xmlns="http://maven.apache.org/POM/4.0.0" xmlns:xsi="http://www.w3.org/2001/XMLSchema-instance"
    xsi:schemaLocation="http://maven.apache.org/POM/4.0.0 http://maven.apache.org/xsd/maven-4.0.0.xsd">
    <modelVersion>4.0.0</modelVersion>
    <groupId>com.yiibai</groupId>
    <artifactId>HandlingCLOB</artifactId>
    <version>0.0.1-SNAPSHOT</version>
    <packaging>jar</packaging>
    <name>HandlingCLOB</name>
    <url>http://maven.apache.org</url>
    <dependencies>
        <dependency>
            <groupId>junit</groupId>
            <artifactId>junit</artifactId>
            <version>3.8.1</version>
            <scope>test</scope>
        </dependency>
        <dependency>
            <groupId>mysql</groupId>
            <artifactId>mysql-connector-java</artifactId>
            <version>5.1.40</version>
        </dependency>
        <dependency>
            <groupId>org.springframework</groupId>
            <artifactId>spring-jdbc</artifactId>
            <version>4.1.0.RELEASE</version>
        </dependency>
        <dependency>
            <groupId>org.springframework</groupId>
            <artifactId>spring-context</artifactId>
            <version>4.1.4.RELEASE</version>
        </dependency>
    </dependencies>
</project>以下是數據訪問對象接口文件:StudentDAO.java的代碼內容:
package com.yiibai;

import java.util.List;
import javax.sql.DataSource;

import java.util.List;
import javax.sql.DataSource;

public interface StudentDAO {
    /**
     * This is the method to be used to initialize database resources ie.
     * connection.
     */
    public void setDataSource(DataSource ds);

    /**
     * This is the method to be used to update a record into the Student table.
     */
    public void updateDescription(Integer id, String description);

}以下是文件:Student.java的代碼內容:
package com.yiibai;

public class Student {
    private Integer age;
    private String name;
    private Integer id;
    private String description;

    public void setAge(Integer age) {
        this.age = age;
    }

    public Integer getAge() {
        return age;
    }

    public void setName(String name) {
        this.name = name;
    }

    public String getName() {
        return name;
    }

    public void setId(Integer id) {
        this.id = id;
    }

    public Integer getId() {
        return id;
    }

    public String getDescription() {
        return description;
    }

    public void setDescription(String description) {
        this.description = description;
    }
}以下是文件:StudentMapper.java的代碼內容:
package com.yiibai;

import java.sql.ResultSet;
import java.sql.SQLException;
import org.springframework.jdbc.core.RowMapper;

import java.sql.ResultSet;
import java.sql.SQLException;
import org.springframework.jdbc.core.RowMapper;

public class StudentMapper implements RowMapper<Student> {
    public Student mapRow(ResultSet rs, int rowNum) throws SQLException {
        Student student = new Student();
        student.setId(rs.getInt("id"));
        student.setName(rs.getString("name"));
        student.setAge(rs.getInt("age"));
        student.setDescription(rs.getString("description"));
        return student;
    }
}以下是實現類文件:StudentJDBCTemplate.java,它實現了接口StudentDAO.java:
以下是文件:StudentJDBCTemplate.java的代碼內容:
package com.yiibai;

import java.util.List;
import javax.sql.DataSource;
import org.springframework.jdbc.core.JdbcTemplate;
import org.springframework.jdbc.core.namedparam.MapSqlParameterSource;
import org.springframework.jdbc.core.namedparam.NamedParameterJdbcTemplate;
import org.springframework.jdbc.core.namedparam.SqlParameterSource;
import org.springframework.jdbc.core.simple.SimpleJdbcCall;
import org.springframework.jdbc.core.support.SqlLobValue;
import org.springframework.jdbc.support.lob.DefaultLobHandler;
import java.io.ByteArrayInputStream;
import java.sql.Types;

public class StudentJDBCTemplate implements StudentDAO {
    private DataSource dataSource;
    private JdbcTemplate jdbcTemplateObject;

    public void setDataSource(DataSource dataSource) {
        this.dataSource = dataSource;
    }

    public void updateDescription(Integer id, String description) {

        MapSqlParameterSource in = new MapSqlParameterSource();
        in.addValue("id", id);
        in.addValue("description", new SqlLobValue(description, new DefaultLobHandler()), Types.CLOB);

        String SQL = "update Student set description = :description where id = :id";
        NamedParameterJdbcTemplate jdbcTemplateObject = new NamedParameterJdbcTemplate(dataSource);
        jdbcTemplateObject.update(SQL, in);
        System.out.println("Updated Record with ID = " + id);
    }
}以下是程序執行入口文件:MainApp.java的代碼內容:
package com.yiibai;

import org.springframework.context.ApplicationContext;
import org.springframework.context.support.ClassPathXmlApplicationContext;
import com.yiibai.StudentJDBCTemplate;

public class MainApp {
    public static void main(String[] args) {
        ApplicationContext context = new ClassPathXmlApplicationContext("application-beans.xml");

        StudentJDBCTemplate studentJDBCTemplate = (StudentJDBCTemplate) context.getBean("studentJDBCTemplate");

        studentJDBCTemplate.updateDescription(1, "This can be a very long text upto 4 GB of size.");
    }
}以下是Bean和數據庫配置文件:application-beans.xml的代碼內容:
<?xml version="1.0" encoding="UTF-8"?>
<beans xmlns="http://www.springframework.org/schema/beans"
    xmlns:xsi="http://www.w3.org/2001/XMLSchema-instance"
    xsi:schemaLocation="http://www.springframework.org/schema/beans
    http://www.springframework.org/schema/beans/spring-beans-3.0.xsd ">

    <!-- Initialization for data source -->
    <bean id="dataSource"
        class="org.springframework.jdbc.datasource.DriverManagerDataSource">
        <property name="driverClassName" value="com.mysql.jdbc.Driver" />
        <property name="url" value="jdbc:mysql://localhost:3306/test?characterEncoding=utf8&useSSL=true" />
        <property name="username" value="root" />
        <property name="password" value="123456" />
    </bean>

    <!-- Definition for studentJDBCTemplate bean -->
    <bean id="studentJDBCTemplate" class="com.yiibai.StudentJDBCTemplate">
        <property name="dataSource" ref="dataSource" />
    </bean>

</beans>
注意: application-beans.xml 文件的位置是:{workspace}/fistapp/src/main/java 目錄,如果放置錯了,程序可能會因爲找不到此配置文件而出錯。
完成創建源代碼和bean和數據庫連接信息的文件配置後,運行應用程序。這裏先簡單說明一下運行的步驟,在項目名稱(HandlingCLOB)上點擊右鍵,在彈出的菜單中選擇:【Run As】-> 【Maven test】
在運行測試成功後,應該會輸出類似以下內容(含有 BUILD SUCCESS 的信息) 。
接下來,點擊類文件:MainApp.java 選擇【Run As】->【Java Application】,如果應用程序一切正常,這將打印以下消息:
Updated Record with ID = 1數據庫中的student表中的數據被修改爲:
mysql> select * from student;
+----+-------+-----+-------------------------------------------------+
| ID | NAME  | AGE | DESCRIPTION                                     |
+----+-------+-----+-------------------------------------------------+
|  1 | Maxsu |  23 | This can be a very long text upto 4 GB of size. |
+----+-------+-----+-------------------------------------------------+
1 row in set

mysql>