使用 MongoDB 和 Spring AI 建立 RAG 應用程式
1. 概述
人工智慧技術的使用正在成為現代發展的關鍵技能。在本文中,我們將建立一個 RAG Wiki 應用程序,該應用程式可以根據儲存的文件回答問題。
我們將使用 Spring AI 將我們的應用程式與MongoDB Vector 資料庫和 LLM 整合。
2.RAG應用
當自然語言產生需要依賴上下文資料時,我們使用檢索增強生成(RAG)應用程式。 RAG 應用程式的關鍵元件是向量資料庫,它在有效管理和檢索這些資料方面發揮著至關重要的作用:
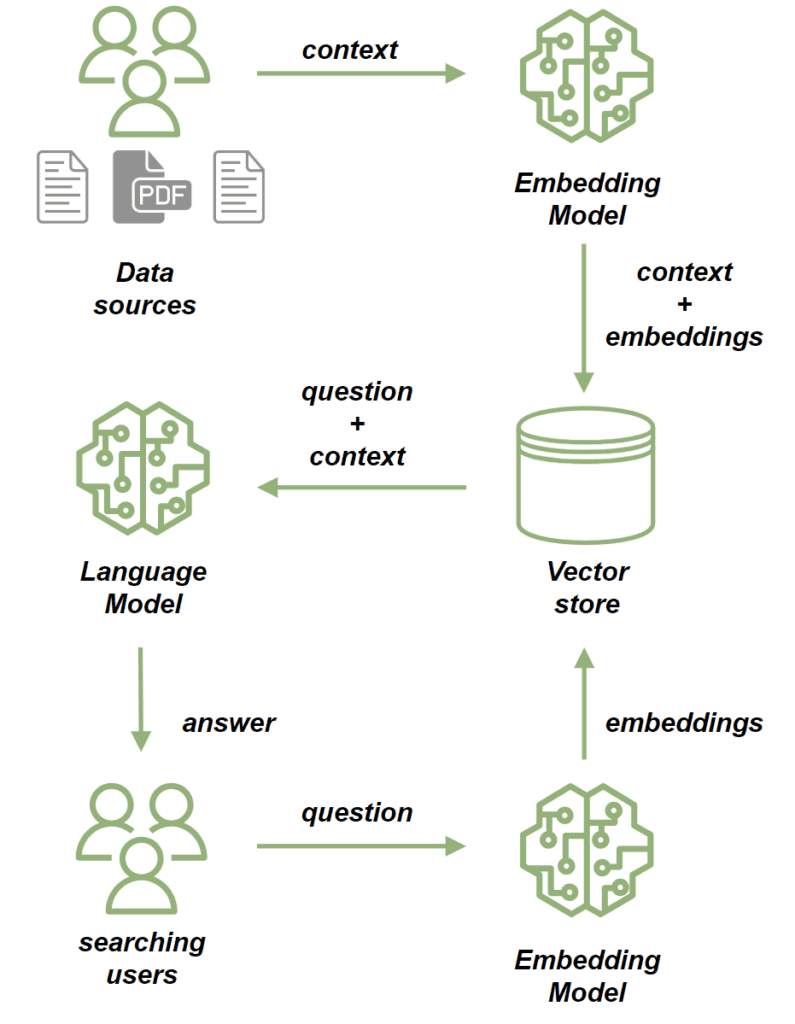
我們使用embedding model來處理來源文件。嵌入模型將文件中的文字轉換為高維向量。這些向量捕獲內容的語義,使我們能夠根據上下文而不只是關鍵字匹配來比較和檢索相似的內容。然後我們將文檔儲存在向量儲存中。
儲存文件後,我們可以透過以下方式發送基於它們的提示:
- 首先,我們使用嵌入模型來處理問題,將其轉換為捕獲其語義的向量。
- 接下來,我們執行相似性搜索,將問題的向量與向量儲存中儲存的文件向量進行比較。
- 根據最相關的文檔,我們為該問題建立了背景。
- 最後,我們將問題及其上下文發送給法學碩士,法學碩士構建與查詢相關的回應,並透過所提供的上下文進行豐富。
3.MongoDB Atlas向量搜尋
在本教程中,我們將使用 MongoDB Atlas Search 作為我們的向量儲存。它提供的向量搜尋功能可以滿足我們在這個專案中的需求。為了設定 MongoDB Atlas Search 的本機實例以進行測試,我們將使用mongodb-atlas-local docker 容器。讓我們建立一個docker-compose.yml檔案:
version: '3.1'


 services:

 my-mongodb:

 image: mongodb/mongodb-atlas-local:7.0.9

 container_name: my-mongodb

 environment:

 - MONGODB_INITDB_ROOT_USERNAME=wikiuser

 - MONGODB_INITDB_ROOT_PASSWORD=password

 ports:

 - 27017:27017
4. 依賴和配置
讓我們先加入必要的依賴項。由於我們的應用程式將提供 HTTP API,因此我們將包含spring-boot-starter-web依賴項:
<dependency>

 <groupId>org.springframework.boot</groupId>

 <artifactId>spring-boot-starter-web</artifactId>

 <version>LATEST_VERSION</version>

 </dependency>
此外,我們將使用開放 AI API 用戶端連接到 LLM,因此我們也新增其相依性:
<dependency>

 <groupId>org.springframework.ai</groupId>

 <artifactId>spring-ai-openai-spring-boot-starter</artifactId>

 <version>LATEST_VERSION</version>

 </dependency>
最後,我們將新增 MongoDB Atlas Store 依賴項:
<dependency>

 <groupId>org.springframework.ai</groupId>

 <artifactId>spring-ai-mongodb-atlas-store-spring-boot-starter</artifactId>

 <version>LATEST_VERSION</version>

 </dependency>
現在,讓我們為我們的應用程式新增配置屬性:
spring:

 data:

 mongodb:

 uri: mongodb://wikiuser:password@localhost:27017/admin

 database: wiki

 ai:

 vectorstore:

 mongodb:

 collection-name: vector_store

 initialize-schema: true

 path-name: embedding

 indexName: vector_index

 openai:

 api-key: ${OPENAI_API_KEY}

 chat:

 options:

 model: gpt-3.5-turbo
我們已經指定了 MongoDB URL 和資料庫,並且還透過設定集合名稱、嵌入欄位名稱和向量索引名稱來配置向量儲存。由於initialize-schema屬性,所有這些工件都將由Spring AI框架自動建立。
最後,我們新增了開放 AI API 金鑰和模型版本。
5. 將文件儲存到向量存儲
現在,我們正在添加將資料保存到向量儲存的過程。我們的應用程式將負責根據現有文件為用戶問題提供答案——本質上就像是維基百科。
讓我們新增一個模型來儲存檔案內容以及檔案路徑:
public class WikiDocument {

 private String filePath;

 private String content;


 // standard getters and setters

}下一步,我們將新增WikiDocumentsRepository 。在此儲存庫中,我們封裝了所有持久性邏輯:
import org.springframework.ai.document.Document;

 import org.springframework.ai.transformer.splitter.TokenTextSplitter;


 @Component

 public class WikiDocumentsRepository {

 private final VectorStore vectorStore;


 public WikiDocumentsRepository(VectorStore vectorStore) {

 this.vectorStore = vectorStore;

 }


 public void saveWikiDocument(WikiDocument wikiDocument) {


 Map<String, Object> metadata = new HashMap<>();

 metadata.put("filePath", wikiDocument.getFilePath());

 Document document = new Document(wikiDocument.getContent(), metadata);

 List<Document> documents = new TokenTextSplitter().apply(List.of(document));


 vectorStore.add(documents);

 }

 }
在這裡,我們注入了VectorStore介面 bean,它將由spring-ai-mongodb-atlas-store-spring-boot-starter提供的MongoDBAtlasVectorStore實作。在saveWikiDocument方法中,我們建立一個Document實例並用內容和元資料填入它。
然後我們使用TokenTextSplitter將文件分成更小的區塊並將它們保存在我們的向量儲存中。現在讓我們建立一個WikiDocumentsServiceImpl :
@Service

 public class WikiDocumentsServiceImpl {

 private final WikiDocumentsRepository wikiDocumentsRepository;


 // constructors


 public void saveWikiDocument(String filePath) {

 try {

 String content = Files.readString(Path.of(filePath));

 WikiDocument wikiDocument = new WikiDocument();

 wikiDocument.setFilePath(filePath);

 wikiDocument.setContent(content);


 wikiDocumentsRepository.saveWikiDocument(wikiDocument);

 } catch (IOException e) {

 throw new RuntimeException(e);

 }

 }

}在服務層,我們檢索文件內容,建立WikiDocument實例,並將它們傳送到儲存庫以進行持久化。
在控制器中,我們只需將文件路徑傳遞給服務層,如果文件保存成功,則傳回 201 狀態代碼:
@RestController

 @RequestMapping("wiki")

 public class WikiDocumentsController {

 private final WikiDocumentsServiceImpl wikiDocumentsService;


 // constructors


 @PostMapping

 public ResponseEntity<Void> saveDocument(@RequestParam String filePath) {

 wikiDocumentsService.saveWikiDocument(filePath);


 return ResponseEntity.status(201).build();

 }

 }
現在,讓我們啟動我們的應用程式並看看我們的流程如何運作。讓我們新增 Spring Boot 測試依賴項,這將允許我們設定測試 Web 上下文:
<dependency>

 <groupId>org.springframework.boot</groupId>

 <artifactId>spring-boot-starter-test</artifactId>

 <version>LATEST_VERSION</version>

 </dependency>
現在,我們將引導測試應用程式實例並呼叫兩個文件的 POST 端點:
@AutoConfigureMockMvc

 @ExtendWith(SpringExtension.class)

 @SpringBootTest

 class RAGMongoDBApplicationManualTest {


 @Autowired

 private MockMvc mockMvc;


 @Test

 void givenMongoDBVectorStore_whenCallingPostDocumentEndpoint_thenExpectedResponseCodeShouldBeReturned() throws Exception {

 mockMvc.perform(post("/wiki?filePath={filePath}",

 "src/test/resources/documentation/owl-documentation.md"))

 .andExpect(status().isCreated());


 mockMvc.perform(post("/wiki?filePath={filePath}",

 "src/test/resources/documentation/rag-documentation.md"))

 .andExpect(status().isCreated());

 }

 }
兩個呼叫都應傳回 201 狀態代碼,因此文件已新增。我們可以使用MongoDB Compass來確認文件已成功儲存到向量儲存:
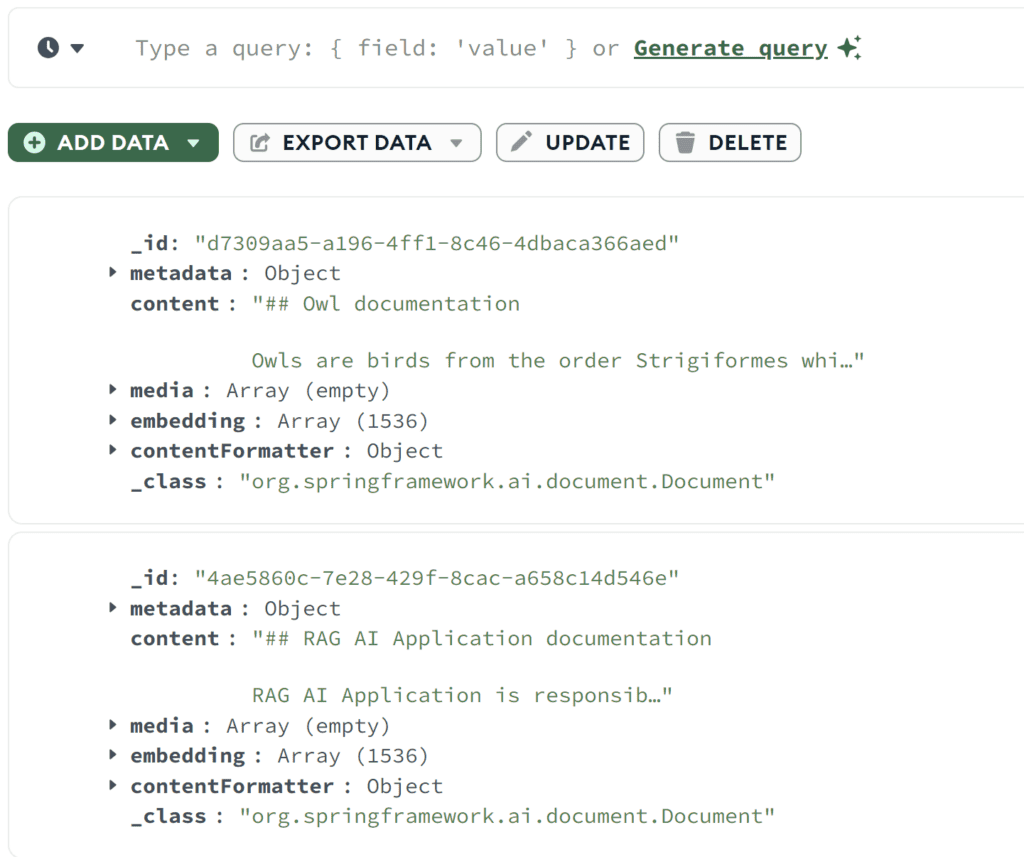
正如我們所看到的 - 兩個文件都已保存。我們可以看到原始內容以及嵌入數組。
6. 相似性搜尋
讓我們新增相似性搜尋功能。我們將在我們的儲存庫中包含一個findSimilarDocuments方法:
@Component

 public class WikiDocumentsRepository {

 private final VectorStore vectorStore;


 public List<WikiDocument> findSimilarDocuments(String searchText) {


 return vectorStore

 .similaritySearch(SearchRequest

 .query(searchText)

 .withSimilarityThreshold(0.87)

 .withTopK(10))

 .stream()

 .map(document -> {

 WikiDocument wikiDocument = new WikiDocument();

 wikiDocument.setFilePath((String) document.getMetadata().get("filePath"));

 wikiDocument.setContent(document.getContent());


 return wikiDocument;

 })

 .toList();

 }

 }
我們從 VectorStore 中呼叫了similaritySearch方法VectorStore.除了搜尋文字之外,我們還指定了結果限制和相似度閾值。相似性閾值參數可讓我們控製文件內容與搜尋文字的匹配程度。
在服務層,我們將代理程式對儲存庫的呼叫:
public List<WikiDocument> findSimilarDocuments(String searchText) {

 return wikiDocumentsRepository.findSimilarDocuments(searchText);

 }
在控制器中,我們新增一個 GET 端點,該端點接收搜尋文字作為參數並將其傳遞給服務:
@RestController

 @RequestMapping("/wiki")

 public class WikiDocumentsController {

 @GetMapping

 public List<WikiDocument> get(@RequestParam("searchText") String searchText) {

 return wikiDocumentsService.findSimilarDocuments(searchText);

 }

 }
現在讓我們呼叫新端點並看看相似性搜尋是如何運作的:
@Test

 void givenMongoDBVectorStoreWithDocuments_whenMakingSimilaritySearch_thenExpectedDocumentShouldBePresent() throws Exception {

 String responseContent = mockMvc.perform(get("/wiki?searchText={searchText}", "RAG Application"))

 .andExpect(status().isOk())

 .andReturn()

 .getResponse()

 .getContentAsString();


 assertThat(responseContent)

 .contains("RAG AI Application is responsible for storing the documentation");

}我們使用與文件中不完全匹配的搜尋文字來呼叫端點。但是,我們仍然檢索了具有相似內容的文檔,並確認它包含我們儲存在rag-documentation.md文件中的文字。
7. 提示端點
讓我們開始建立提示流程,這是我們應用程式的核心功能。我們將從AdvisorConfiguration開始:
@Configuration

 public class AdvisorConfiguration {


 @Bean

 public QuestionAnswerAdvisor questionAnswerAdvisor(VectorStore vectorStore) {

 return new QuestionAnswerAdvisor(vectorStore, SearchRequest.defaults());

 }

}我們建立了一個QuestionAnswerAdvisor bean,負責建置提示請求,包括初始問題。此外,它還會附加向量儲存的相似性搜尋回應作為問題的上下文。現在,讓我們將搜尋端點新增到我們的 API 中:
@RestController

 @RequestMapping("/wiki")

 public class WikiDocumentsController {

 private final WikiDocumentsServiceImpl wikiDocumentsService;

 private final ChatClient chatClient;

 private final QuestionAnswerAdvisor questionAnswerAdvisor;


 public WikiDocumentsController(WikiDocumentsServiceImpl wikiDocumentsService,

 @Qualifier("openAiChatModel") ChatModel chatModel,

 QuestionAnswerAdvisor questionAnswerAdvisor) {

 this.wikiDocumentsService = wikiDocumentsService;

 this.questionAnswerAdvisor = questionAnswerAdvisor;

 this.chatClient = ChatClient.builder(chatModel).build();

 }


 @GetMapping("/search")

 public String getWikiAnswer(@RequestParam("question") String question) {

 return chatClient.prompt()

 .user(question)

 .advisors(questionAnswerAdvisor)

 .call()

 .content();

 }

 }
在這裡,我們透過將使用者的輸入新增至提示並附加我們的QuestionAnswerAdvisor來建立提示請求。
最後,讓我們呼叫我們的端點,看看它告訴我們有關 RAG 應用程式的資訊:
@Test

 void givenMongoDBVectorStoreWithDocumentsAndLLMClient_whenAskQuestionAboutRAG_thenExpectedResponseShouldBeReturned() throws Exception {

 String responseContent = mockMvc.perform(get("/wiki/search?question={question}", "Explain the RAG Applications"))

 .andExpect(status().isOk())

 .andReturn()

 .getResponse()

 .getContentAsString();


 logger.atInfo().log(responseContent);


 assertThat(responseContent).isNotEmpty();

 }
我們將問題「解釋 RAG 應用程式」發送到我們的端點並記錄 API 回應:
bsrmRAGMongoDBApplicationManualTest : Based on the context provided, the RAG AI Application is a tool

used for storing documentation and enabling users to search for specific information efficiently...正如我們所看到的,端點根據我們先前保存在向量資料庫中的文件檔案傳回了有關 RAG 應用程式的資訊。
現在讓我們試著問一些我們知識庫中肯定沒有的問題:
@Test

 void givenMongoDBVectorStoreWithDocumentsAndLLMClient_whenAskUnknownQuestion_thenExpectedResponseShouldBeReturned() throws Exception {

 String responseContent = mockMvc.perform(get("/wiki/search?question={question}", "Explain the Economic theory"))

 .andExpect(status().isOk())

 .andReturn()

 .getResponse()

 .getContentAsString();


 logger.atInfo().log(responseContent);


 assertThat(responseContent).isNotEmpty();

 }
現在我們詢問了經濟理論,以下是答案:
bsrmRAGMongoDBApplicationManualTest : I'm sorry, but the economic theory is not directly related to the information provided about owls and the RAG AI Application.

If you have a specific question about economic theory, please feel free to ask.這次,我們的應用程式沒有找到任何相關文檔,也沒有使用任何其他來源來提供答案。
八、結論
在本文中,我們使用Spring AI框架成功實現了RAG應用程序,它是整合各種AI技術的優秀工具。此外,事實證明,MongoDB 是處理向量儲存的絕佳選擇。
借助這種強大的組合,我們可以建立用於各種目的的基於人工智慧的現代應用程序,包括聊天機器人、自動化維基系統和搜尋引擎。
與往常一樣,程式碼可以在 GitHub 上取得。