Spring Security標籤庫顯示視圖
本教程介紹瞭如何保護視圖層,基於已登錄用戶的角色,使用Spring Security標籤來顯示/隱藏 Spring MVC Web應用程序的JSP/視圖。
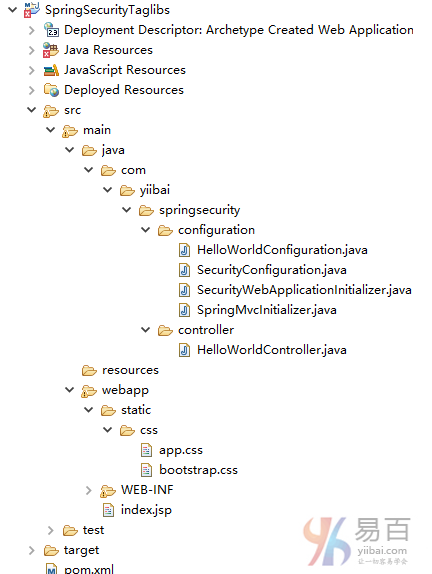
完整的工程結構如下所示 -
首先,爲了使用Spring Security標籤,我們需要在pom.xml中包括 spring-security-taglibs 標記庫的依賴庫,如下圖所示:
然後在下一步在 視圖/JSP 包括這些標籤庫。如下代碼所示 -
<%@ taglib prefix="sec" uri="http://www.springframework.org/security/tags"%>
最後,我們就可以使用Spring Security表達式類似 hasRole,hasAnyRole 等。在視圖中,如下圖所示:
<%@ page language="java" contentType="text/html; charset=UTF-8" pageEncoding="UTF-8"%>
<%@ taglib prefix="c" uri="http://java.sun.com/jsp/jstl/core"%>
<%@ taglib prefix="sec" uri="http://www.springframework.org/security/tags"%>
<br/>
<br/>
<div>
    <label>View all information| This part is visible to Everyone</label>
</div>

<br/>
<div>
    <sec:authorize access="hasRole('ADMIN')">
        <label><a href="#">Edit this page</a> | This part is visible only to ADMIN</label>
    </sec:authorize>
</div>

<br/>
<div>
    <sec:authorize access="hasRole('ADMIN') and hasRole('DBA')">
        <label><a href="#">Start backup</a> | This part is visible only to one who is both ADMIN & DBA</label>
    </sec:authorize>
</div>
這裏就是需要基於角色這個有選擇地顯示/隱藏視圖片段,使用Spring Security表達式在視圖中。
以下是用於這個例子的 Security 配置:
package com.yiibai.springsecurity.configuration;
import org.springframework.beans.factory.annotation.Autowired;
import org.springframework.context.annotation.Configuration;
import org.springframework.security.config.annotation.authentication.builders.AuthenticationManagerBuilder;
import org.springframework.security.config.annotation.web.builders.HttpSecurity;
import org.springframework.security.config.annotation.web.configuration.EnableWebSecurity;
import org.springframework.security.config.annotation.web.configuration.WebSecurityConfigurerAdapter;
@Configuration
@EnableWebSecurity
public class SecurityConfiguration extends WebSecurityConfigurerAdapter {
@Autowired
public void configureGlobalSecurity(AuthenticationManagerBuilder auth) throws Exception {
    auth.inMemoryAuthentication().withUser("yiibai").password("123456").roles("USER");
    auth.inMemoryAuthentication().withUser("admin").password("123456").roles("ADMIN");
    auth.inMemoryAuthentication().withUser("dba").password("123456").roles("ADMIN","DBA");
}

@Override
protected void configure(HttpSecurity http) throws Exception {

  http.authorizeRequests()
      .antMatchers("/", "/home").access("hasRole('USER') or hasRole('ADMIN') or hasRole('DBA')")
      .and().formLogin().loginPage("/login")
      .usernameParameter("ssoId").passwordParameter("password")
      .and().exceptionHandling().accessDeniedPage("/Access\_Denied");
}
}
上面的安全配置基於XML配置格式如下所示:
<beans:beans xmlns="http://www.springframework.org/schema/security"
xmlns:beans="http://www.springframework.org/schema/beans"
xmlns:xsi="http://www.w3.org/2001/XMLSchema-instance"
xsi:schemaLocation="http://www.springframework.org/schema/beans http://www.springframework.org/schema/beans/spring-beans-4.1.xsd
http://www.springframework.org/schema/security http://www.springframework.org/schema/security/spring-security-4.0.xsd">
<http auto-config="true" >
    <intercept-url pattern="/"     access="hasRole('USER') or hasRole('ADMIN') or hasRole('DBA')" />
    <intercept-url pattern="/home" access="hasRole('USER') or hasRole('ADMIN') or hasRole('DBA')" />
    <form-login  login-page="/login"
                 username-parameter="ssoId"
                 password-parameter="password"
                 authentication-failure-url="/Access\_Denied" />
</http>

<authentication-manager >
    <authentication-provider>
        <user-service>
            <user name="yiibai"  password="123456"  authorities="ROLE\_USER" />
            <user name="admin" password="123456" authorities="ROLE\_ADMIN" />
            <user name="dba"   password="123456" authorities="ROLE\_ADMIN,ROLE\_DBA" />
        </user-service>
    </authentication-provider>
</authentication-manager>
下面是控制器的完整代碼,如下所示 -
package com.yiibai.springsecurity.controller;
import javax.servlet.http.HttpServletRequest;
import javax.servlet.http.HttpServletResponse;
import org.springframework.security.core.Authentication;
import org.springframework.security.core.context.SecurityContextHolder;
import org.springframework.security.core.userdetails.UserDetails;
import org.springframework.security.web.authentication.logout.SecurityContextLogoutHandler;
import org.springframework.stereotype.Controller;
import org.springframework.ui.ModelMap;
import org.springframework.web.bind.annotation.RequestMapping;
import org.springframework.web.bind.annotation.RequestMethod;
@Controller
public class HelloWorldController {
@RequestMapping(value = { "/", "/home" }, method = RequestMethod.GET)
public String homePage(ModelMap model) {
    model.addAttribute("user", getPrincipal());
    return "welcome";
}

@RequestMapping(value = "/Access\_Denied", method = RequestMethod.GET)
public String accessDeniedPage(ModelMap model) {
    model.addAttribute("user", getPrincipal());
    return "accessDenied";
}

@RequestMapping(value = "/login", method = RequestMethod.GET)
public String loginPage() {
    return "login";
}

@RequestMapping(value="/logout", method = RequestMethod.GET)
public String logoutPage (HttpServletRequest request, HttpServletResponse response) {
    Authentication auth = SecurityContextHolder.getContext().getAuthentication();
    if (auth != null){
        new SecurityContextLogoutHandler().logout(request, response, auth);
    }
    return "redirect:/login?logout";
}

private String getPrincipal(){
    String userName = null;
    Object principal = SecurityContextHolder.getContext().getAuthentication().getPrincipal();

    if (principal instanceof UserDetails) {
        userName = ((UserDetails)principal).getUsername();
    } else {
        userName = principal.toString();
    }
    return userName;
}
}
應用程序的其餘部分代碼和這個系列的其他教程文章是相同的。
部署和運行
如需要自己動手實踐,可在文章底部提供的下載鏈接並點擊下載本示例代碼,這個項目的完整代碼。它是在Servlet 3.0的容器(Tomcat7/8,本文章使用 Tomcat7)上構建和部署運行的。
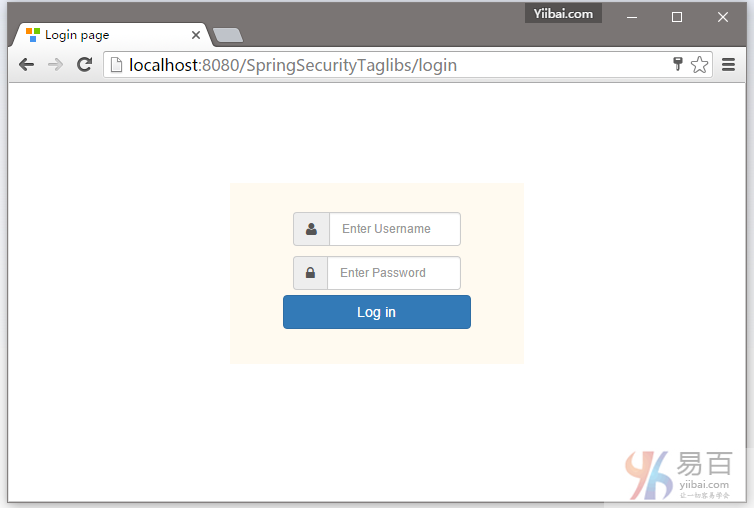
打開您的瀏覽器,在地址欄中輸入網址: http://localhost:8080/SpringSecurityTaglibs,默認的頁面將顯示(提示登錄頁面)如下 -
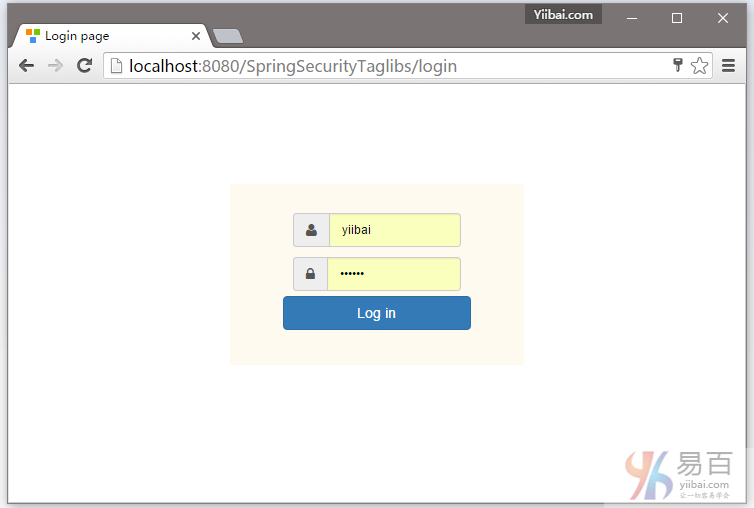
提供用戶登錄憑據(用戶名及密碼),首先我們使用 yiibai 這個用戶名登錄如下所示 -
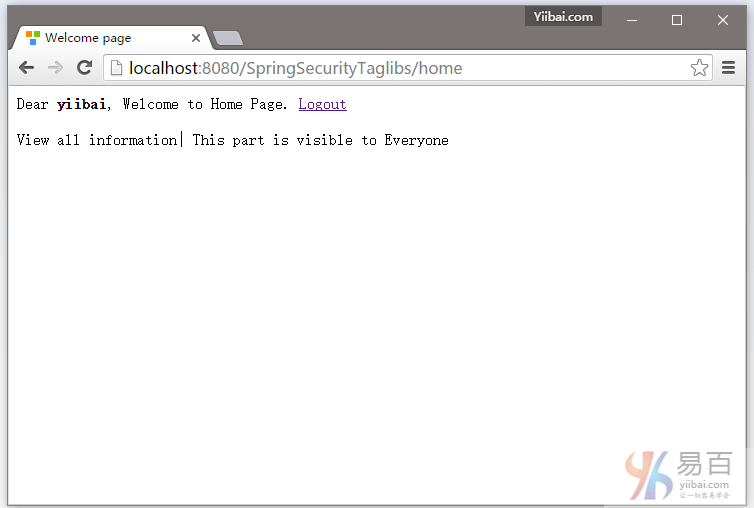
登錄成功後可以看到,有限的信息顯示頁面上,如下圖中所示 -
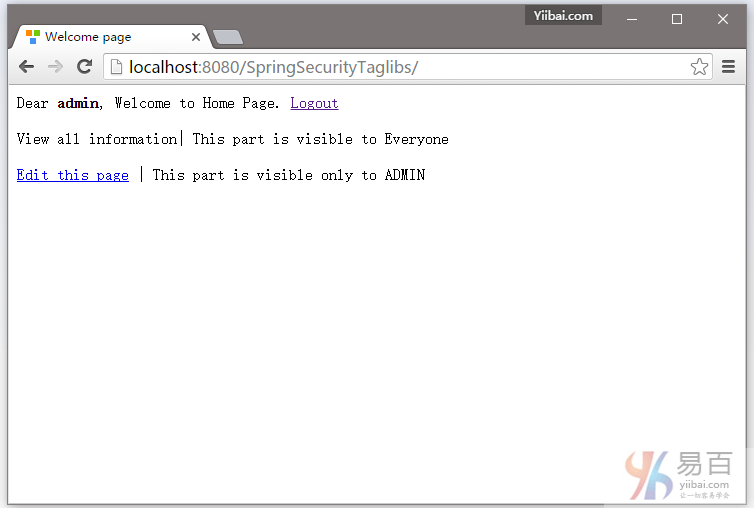
現在點擊註銷,並使用管理員角色登錄,所下圖中所示 -

提交登錄成功後,你會看到使用ADMIN角色的操作訪問,如下圖中所示 -
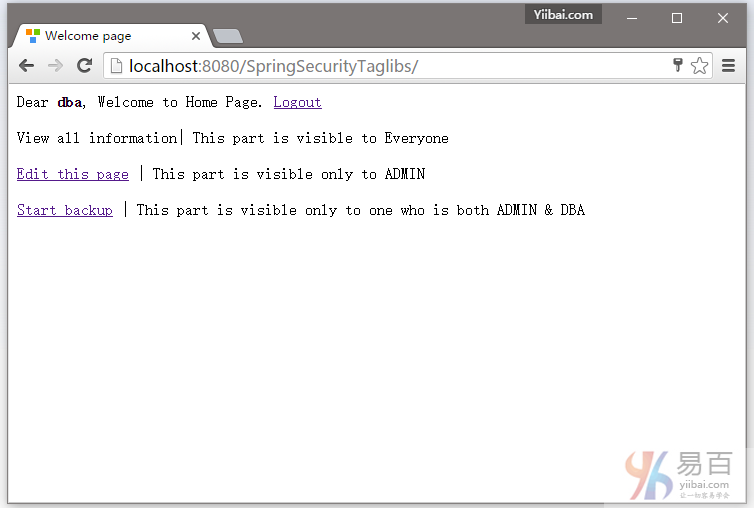
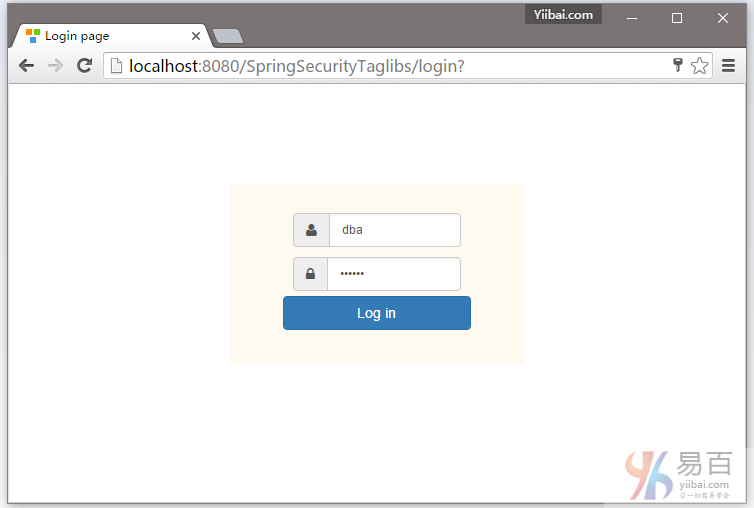
現在註銷登錄,然後使用 DBA 角色登錄,如下圖中所示 -
提交登錄成功後,你會看到與DBA角色相關的操作訪問。
全部就這樣(包教不包會)。下一篇教程文章將我們學習如何使用基於角色登錄。這意味着可根據自己分配的角色,在登錄成功後用戶將重定向到不同的URL。