Spring Cloud Netflix Hystrix指南
1.概述
在本教程中,我們將介紹Spring Cloud Netflix Hystrix –容錯庫。我們將使用該庫並實現Circuit Breaker企業模式,該模式描述了在應用程序的不同級別上防止故障級聯的策略。
該原理類似於電子產品:Hystrix正在觀察未能成功調用相關服務的方法。如果出現此類故障,它將斷開電路並將呼叫轉發給後備方法。
該庫將允許的故障達到閾值。除此之外,它還使電路斷開。這意味著,它將所有後續調用轉發給fallback方法,以防止將來發生故障。這將為相關服務從其失敗狀態恢復創建時間緩衝區。
2. REST生產者
要創建演示斷路器模式的方案,我們首先需要服務。我們將其命名為“ REST Producer”,因為它為啟用了Hystrix的“ REST Consumer”提供了數據,我們將在下一步中創建該數據。
讓我們使用[spring-boot-starter-web](https://search.maven.org/classic/#search%7Cgav%7C1%7Cg%3A%22org.springframework.boot%22%20AND%20a%3A%22spring-boot-starter-web%22)依賴關係創建一個新的Maven項目:
<dependency>

 <groupId>org.springframework.boot</groupId>

 <artifactId>spring-boot-starter-web</artifactId>

 <version>2.2.6.RELEASE</version>

 </dependency>
該項目本身有意保持簡單。它包括與一個控制器接口的@RequestMapping註釋GET方法簡單地返回一個String,一個@RestController實現此接口和一個@SpringBootApplication 。
我們將從界面開始:
public interface GreetingController {

 @GetMapping("/greeting/{username}")

 String greeting(@PathVariable("username") String username);

 }
並執行:
@RestController

 public class GreetingControllerImpl implements GreetingController {


 @Override

 public String greeting(@PathVariable("username") String username) {

 return String.format("Hello %s!\n", username);

 }

 }
接下來,我們將寫下主要的應用程序類:
@SpringBootApplication

 public class RestProducerApplication {

 public static void main(String[] args) {

 SpringApplication.run(RestProducerApplication.class, args);

 }

 }
為了完成本節,剩下要做的就是配置一個我們將在其上監聽的應用程序端口。我們將不使用默認端口8080,因為該端口應保留用於下一步描述的應用程序。
此外,我們正在定義一個應用程序名稱,以便能夠從我們稍後將介紹的客戶端應用程序中查找生產者。
然後,在application.properties文件中指定端口9090和rest-producer的名稱:
server.port=9090

 spring.application.name=rest-producer
現在我們可以使用cURL測試生產者:
$> curl http://localhost:9090/greeting/Cid

 Hello Cid!
3. REST消費者與Hystrix
對於我們的演示場景,我們將實現一個Web應用程序,它將使用RestTemplate和Hystrix使用上一步中的REST服務。為了簡單起見,我們將其稱為“ REST使用者”。
因此,我們使用spring-cloud-starter-hystrix , spring-boot-starter-web , 和[spring-boot-starter-thymeleaf`](https://search.maven.org/classic/#search|gav|1|g:"org.springframework.boot"%20AND%20a:"spring-boot-starter-thymeleaf")作為依賴關係創建了一個新的Maven項目:
<dependency>

 <groupId>org.springframework.cloud</groupId>

 <artifactId>spring-cloud-starter-hystrix</artifactId>

 <version>1.4.7.RELEASE</version>

 </dependency>

 <dependency>

 <groupId>org.springframework.boot</groupId>

 <artifactId>spring-boot-starter-web</artifactId>

 <version>2.2.6.RELEASE</version>

 </dependency>

 <dependency>

 <groupId>org.springframework.boot</groupId>

 <artifactId>spring-boot-starter-thymeleaf</artifactId>

 <version>2.2.6.RELEASE</version>

</dependency>為了使斷路器工作,Hystix將掃描@Component或@Service註釋的類以@HystixCommand註釋的方法,為其實現代理並監視其調用。
我們將首先創建一個@Service類,該類將被注入到@Controller 。由於我們使用Thymeleaf構建Web應用程序,因此我們還需要一個HTML模板作為視圖。
這將是我們的可注入@Service實現了帶有關聯的後備方法的@HystrixCommand 。此後備必須使用與原始簽名相同的簽名:
@Service

 public class GreetingService {

 @HystrixCommand(fallbackMethod = "defaultGreeting")

 public String getGreeting(String username) {

 return new RestTemplate()

 .getForObject("http://localhost:9090/greeting/{username}",

 String.class, username);

 }


 private String defaultGreeting(String username) {

 return "Hello User!";

 }

}RestConsumerApplication將是我們的主要應用程序類。 @EnableCircuitBreaker註釋將掃描類路徑以查找任何兼容的Circuit Breaker實現。
要顯式使用Hystrix,我們必須使用@EnableHystrix註釋此類:
@SpringBootApplication

 @EnableCircuitBreaker

 public class RestConsumerApplication {

 public static void main(String[] args) {

 SpringApplication.run(RestConsumerApplication.class, args);

 }

}我們將使用GreetingService設置控制器:
@Controller

 public class GreetingController {


 @Autowired

 private GreetingService greetingService;


 @GetMapping("/get-greeting/{username}")

 public String getGreeting(Model model, @PathVariable("username") String username) {

 model.addAttribute("greeting", greetingService.getGreeting(username));

 return "greeting-view";

 }

 }
這是HTML模板:
<!DOCTYPE html>

 <html xmlns:th="http://www.thymeleaf.org">

 <head>

 <title>Greetings from Hystrix</title>

 </head>

 <body>

 <h2 th:text="${greeting}"/>

 </body>

</html>為了確保應用程序正在偵聽已定義的端口,我們將以下內容放在application.properties文件中:
server.port=8080要查看運行中的Hystix斷路器,我們正在啟動我們的使用者並將瀏覽器指向http://localhost:8080/get-greeting/Cid 。在正常情況下,將顯示以下內容:
Hello Cid!為了模擬生產者的失敗,我們將停止它,然後在完成瀏覽器刷新後,我們應該看到一條通用消息,該消息是@Service fallback方法返回的:
Hello User!4.具有Hystrix和Feign的REST消費者
現在,我們將修改上一步的項目,以使用Spring Netflix Feign作為聲明性REST客戶端,而不是Spring RestTemplate 。
好處是我們以後可以輕鬆重構Feign Client界面,以使用Spring Netflix Eureka進行服務發現。
要開始新項目,我們將復制我們的使用者,並添加我們的生產者和spring-cloud-starter-feign作為依賴項:
<dependency>

 <groupId>com.baeldung.spring.cloud</groupId>

 <artifactId>spring-cloud-hystrix-rest-producer</artifactId>

 <version>1.0.0-SNAPSHOT</version>

 </dependency>

 <dependency>

 <groupId>org.springframework.cloud</groupId>

 <artifactId>spring-cloud-starter-feign</artifactId>

 <version>1.1.5.RELEASE</version>

</dependency>現在,我們可以使用GreetingController擴展Feign Client。我們將Hystrix後備作為一個內部內部類實現,並帶有@Component註釋。
另外,我們可以定義一個@Bean註釋方法,以返回此後備類的實例。
@FeignClient的name屬性是必需的。如果指定了此屬性,則可以通過Eureka客戶端通過服務發現或URL來查找應用程序:
@FeignClient(

 name = "rest-producer"

 url = "http://localhost:9090",

 fallback = GreetingClient.GreetingClientFallback.class

 )

 public interface GreetingClient extends GreetingController {


 @Component

 public static class GreetingClientFallback implements GreetingController {


 @Override

 public String greeting(@PathVariable("username") String username) {

 return "Hello User!";

 }

 }

 }
有關使用Spring Netflix Eureka進行服務發現的更多信息,請查看本文。
在RestConsumerFeignApplication ,我們將在主應用程序類中添加一個附加註釋以啟用Feign集成,實際上是@EnableFeignClients :
@SpringBootApplication

 @EnableCircuitBreaker

 @EnableFeignClients

 public class RestConsumerFeignApplication {


 public static void main(String[] args) {

 SpringApplication.run(RestConsumerFeignApplication.class, args);

 }

 }
我們將修改控制器以使用自動連接的Feign Client,而不是先前註入的@Service來檢索問候語:
@Controller

 public class GreetingController {

 @Autowired

 private GreetingClient greetingClient;


 @GetMapping("/get-greeting/{username}")

 public String getGreeting(Model model, @PathVariable("username") String username) {

 model.addAttribute("greeting", greetingClient.greeting(username));

 return "greeting-view";

 }

}從以前的區分這個例子中,我們將改變在應用程序監聽端口application.properties :
server.port=8082最後,我們將像上一節中一樣測試支持Feign的消費者。預期結果應相同。
5. Hystrix緩存 Fallback
現在,我們將Hystrix添加到我們的Spring Cloud項目中。在這個雲項目中,我們有一個評級服務,該服務與數據庫對話並獲取書籍的評級。
假設我們的數據庫是一種需求資源,它的響應延遲可能會隨時間變化或可能不可用。我們將通過Hystrix斷路器回退到數據緩存來處理這種情況。
5.1。設置和配置
讓我們將spring-cloud-starter-hystrix依賴性添加到我們的評級模塊中:
<dependency>

 <groupId>org.springframework.cloud</groupId>

 <artifactId>spring-cloud-starter-hystrix</artifactId>

</dependency>在數據庫中插入/更新/刪除分級後,我們將使用Repository將其複製到Redis緩存中。要了解有關Redis的更多信息,請查看本文。
讓我們更新RatingService包裹在一個猬命令從數據庫中查詢方法@HystrixCommand ,並用備用配置它從Redis的閱讀:
@HystrixCommand(

 commandKey = "ratingsByIdFromDB",

 fallbackMethod = "findCachedRatingById",

 ignoreExceptions = { RatingNotFoundException.class })

 public Rating findRatingById(Long ratingId) {

 return Optional.ofNullable(ratingRepository.findOne(ratingId))

 .orElseThrow(() ->

 new RatingNotFoundException("Rating not found. ID: " + ratingId));

 }


 public Rating findCachedRatingById(Long ratingId) {

 return cacheRepository.findCachedRatingById(ratingId);

}請注意,後備方法應該具有與包裝方法相同的簽名,並且必須位於同一類中。現在,當findRatingById失敗或延遲超過給定閾值時,Hystrix將回findCachedRatingById.
由於Hystrix功能是作為AOP通知透明地註入的,因此,如果我們還有其他建議(例如Spring的交易建議),我們必須調整建議的堆疊順序。在這裡,我們將Spring的交易AOP建議調整為比Hystrix AOP建議的優先級低:
@EnableHystrix

 @EnableTransactionManagement(

 order=Ordered.LOWEST_PRECEDENCE,

 mode=AdviceMode.ASPECTJ)

 public class RatingServiceApplication {

 @Bean

 @Primary

 @Order(value=Ordered.HIGHEST_PRECEDENCE)

 public HystrixCommandAspect hystrixAspect() {

 return new HystrixCommandAspect();

 }


 // other beans, configurations

 }
在這裡,我們調整了Spring的交易AOP建議,使其優先級低於Hystrix AOP建議。
5.2。測試Hystrix Fallback
現在我們已經配置了電路,我們可以通過關閉與存儲庫交互的H2數據庫來對其進行測試。但是首先,讓我們將H2實例作為外部進程運行,而不是將其作為嵌入式數據庫運行。
讓我們將H2庫( h2-1.4.193.jar )複製到一個已知目錄,然後啟動H2服務器:
>java -cp h2-1.4.193.jar org.h2.tools.Server -tcp

TCP server running at tcp://192.168.99.1:9092 (only local connections)現在,讓我們在rating-service.properties更新模塊的數據源URL,以指向此H2服務器:
spring.datasource.url = jdbc:h2:tcp://localhost/~/ratings我們可以從Spring Cloud系列的上一篇文章中開始提供服務,並通過降低正在運行的外部H2實例來測試每本書的等級。
我們可以看到,當無法訪問H2數據庫時,Hystrix會自動退回到Redis,以讀取每本書的評分。演示此用例的源代碼可以在這裡找到。
6.使用範圍
通常,在線程池上下文中執行@HytrixCommand註釋的方法。但是有時它需要在本地範圍內運行,例如@SessionScope或@RequestScope 。這可以通過為命令註釋提供參數來完成:
@HystrixCommand(fallbackMethod = "getSomeDefault", commandProperties = {

 @HystrixProperty(name = "execution.isolation.strategy", value = "SEMAPHORE")

 })
7. Hystrix儀表板
Hystrix的一個不錯的可選功能是能夠在儀表板上監視其狀態。
為了啟用它,我們將spring-cloud-starter-hystrix-dashboard和spring-boot-starter-actuator放入我們消費者的pom.xml中:
<dependency>

 <groupId>org.springframework.cloud</groupId>

 <artifactId>spring-cloud-starter-hystrix-dashboard</artifactId>

 <version>1.4.7.RELEASE</version>

 </dependency>

 <dependency>

 <groupId>org.springframework.boot</groupId>

 <artifactId>spring-boot-starter-actuator</artifactId>

 <version>2.2.6.RELEASE</version>

</dependency>前者需要通過使用@EnableHystrixDashboard註釋@Configuration來啟用,而後者則需要在我們的Web應用程序中自動啟用所需的指標。
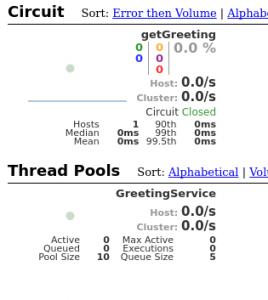
重新啟動應用程序後,將瀏覽器指向[http://localhost:8080/hystrix](http://localhost:8080/hystrix) ,輸入Hystrix流的指標URL並開始監視。
最後,我們應該看到如下所示:
監視Hystrix流是可以的,但是如果我們必須監視多個啟用Hystrix的應用程序,它將變得很不方便。為此,Spring Cloud提供了一個稱為Turbine的工具,該工具可以聚合流以在一個Hystrix儀表板中顯示。
配置Turbine超出了本文的討論範圍,但此處應提及可能性。因此,也可以使用Turbine流通過消息收集這些流。
8.結論
到目前為止,我們已經能夠使用Spring Netflix Hystrix以及Spring RestTemplate或Spring Netflix Feign來實現Circuit Breaker模式。
這意味著我們可以使用默認數據使用包含回退的服務,並且可以監視此數據的使用情況。
和往常一樣,我們可以在GitHub上找到源。