Spring Boot 3.1 的 ConnectionDetails 抽象
1. 概述
在本教程中,我們將了解 Spring Boot 3.1 中引入的ConnectionDetails接口,用於外部化連接屬性。 Spring Boot 提供開箱即用的抽象化來與關聯式資料庫、NoSQL 資料庫、訊息服務等遠端服務整合。
傳統上, application.properties檔案用於儲存遠端服務的連線詳細資訊。因此,將這些屬性外部化到外部服務(如AWS Secret Manager 、 Hashicorp Vault等)變得很困難。
為了解決這個問題,Spring Boot 引入了ConnectionDetails.這個介面是空的,就像一個標籤。 Spring 提供了它的子接口,例如JdbcConnectionDetails 、 CassandraConnectionDetails 、 KafkaConnectionDetails等等。它們可以在 Spring 配置類別中作為 bean 來實作和指定。此後,Spring 依賴這些配置 bean 來動態檢索連線屬性,而不是靜態application.properties檔案。
我們先介紹一個用例,然後繼續實現。
2. 用例描述
讓我們想像一家名為馬爾古迪銀行的跨國銀行。它運行著許多在 Spring Boot 上運行的應用程式。這些應用程式連接到各種遠端服務。目前,這些遠端服務的連接詳細資訊儲存在application.properties檔案中。
經過最近的審查後,銀行合規機構對這些財產的安全提出了一些擔憂。他們與這些問題相關的一些請求是:
- 加密所有秘密
- 定期輪換秘密
- 不得在電子郵件中交換秘密
3. 提出的解決方案與設計
馬爾古迪銀行的應用程式所有者針對上述問題進行了集思廣益,最終提出了解決方案。他們提議將所有秘密轉移到Hashicorp Vault 。
因此,所有 Spring Boot 應用程式都必須從 Vault 讀取機密。以下是建議的高層設計:

現在,Spring Boot 應用程式必須使用金鑰呼叫 Vault 服務來檢索金鑰。然後使用檢索到的機密,它可以呼叫遠端服務來取得連接物件以進行進一步的操作。
因此,應用程式將依賴 Vault 來安全地儲存機密。 Vault 將根據組織的政策定期輪調機密。如果應用程式快取了機密,它們也必須重新載入它們。
4. 使用ConnectionDetails實現
透過ConnectionDetails接口,Spring Boot 應用程式可以自行發現連接詳細信息,而無需任何手動幹預。話雖如此,值得注意的是ConnectionDetails優先於application.properties檔案。但是,仍然有一些非連線屬性(例如 JDBC 連線池大小)仍然可以透過application.properties檔案進行設定。
在接下來的部分中,我們將看到透過利用 Spring Boot docker compose 功能來操作的各種ConnectionDetails實作類別。
4.1.外部化 JDBC 連線詳細信息
這裡我們以 Spring Boot 應用程式與 Postgres 資料庫集成為例。讓我們從類別圖開始:

在上面的類別圖中, JdbcConnectionDetails介面來自Spring Boot框架。 PostgresConnectionDetails類別實作了從 Vault 取得詳細資訊的介面方法:
public class PostgresConnectionDetails implements JdbcConnectionDetails {
 @Override
 public String getUsername() {
 return VaultAdapter.getSecret("postgres_user_key");
 }

 @Override
 public String getPassword() {
 return VaultAdapter.getSecret("postgres_secret_key");
 }

 @Override
 public String getJdbcUrl() {
 return VaultAdapter.getSecret("postgres_jdbc_url");
 }
 }
如下所示, JdbcConnectionDetailsConfiguration是應用程式中的設定類別:
@Configuration(proxyBeanMethods = false)
 public class JdbcConnectionDetailsConfiguration {
 @Bean
 @Primary
 public JdbcConnectionDetails getPostgresConnection() {
 return new PostgresConnectionDetails();
 }
 }
有趣的是,Spring Boot 在應用程式啟動過程中自動發現它並取得JdbcConnectionDetails bean。如前所述,該 bean 包含從 Vault 檢索 Postgres 資料庫連接詳細資訊的邏輯。
由於我們使用 Docker Compose 來啟動 Postgres 資料庫容器,因此 Spring Boot 會自動建立一個ConnectionDetails bean 來保存必要的連接詳細資訊。因此,我們使用@Primary註釋來賦予JdbcConectionDetails bean 優先權。
讓我們看看它是如何運作的:
@Test
 public void givenSecretVault_whenIntegrateWithPostgres_thenConnectionSuccessful() {
 String sql = "select current_date;";
 Date date = jdbcTemplate.queryForObject(sql, Date.class);
 assertEquals(LocalDate.now().toString(), date.toString());
 }
正如預期的那樣,應用程式連接到資料庫並成功獲取結果。
4.2.外部化 Rabbit MQ 連接詳細信息
與JdbcConnectionDetails, Spring Boot 提供了介面RabbitConnectionDetails來與 RabbitMQ Server 整合。讓我們看看如何使用此介面外部化 Spring Boot 屬性以連接到 RabbitMQ Server:

首先,根據合同,讓我們實作RabbitConnectionDetails介面以從 Vault 取得連接屬性:
public class RabbitMQConnectionDetails implements RabbitConnectionDetails {
 @Override
 public String getUsername() {
 return VaultAdapter.getSecret("rabbitmq_username");
 }

 @Override
 public String getPassword() {
 return VaultAdapter.getSecret("rabbitmq_password");
 }

 @Override
 public String getVirtualHost() {
 return "/";
 }

 @Override
 public List<Address> getAddresses() {
 return List.of(this.getFirstAddress());
 }

 @Override
 public Address getFirstAddress() {
 return new Address(VaultAdapter.getSecret("rabbitmq_host"),
 Integer.valueOf(VaultAdapter.getSecret("rabbitmq_port")));
 }
}接下來,我們將在RabbitMQConnectionDetailsConfiguration類別中定義上述 bean RabbitMQConnectionDetails :
@Configuration(proxyBeanMethods = false)
 public class RabbitMQConnectionDetailsConfiguration {
 @Primary
 @Bean
 public RabbitConnectionDetails getRabbitmqConnection() {
 return new RabbitMQConnectionDetails();
 }
 }
最後,讓我們看看這是否有效:
@Test
 public void givenSecretVault_whenPublishMessageToRabbitmq_thenSuccess() {
 final String MSG = "this is a test message";
 this.rabbitTemplate.convertAndSend(queueName, MSG);
 assertEquals(MSG, this.rabbitTemplate.receiveAndConvert(queueName));
}上面的方法將訊息傳送到RabbitMQ中的佇列,然後讀取它。物件rabbitTemplate由Spring Boot透過引用RabbitMQConnectionDetails bean中的連接詳細資訊自動配置。我們將rabbitTemplate物件注入到測試類別中,然後在上面的測試方法中使用它。
4.3.外部化 Redis 連接詳細信息
現在讓我們繼續討論 Redis 上 Spring ConnectionDetails抽象。首先,我們從類別圖開始:

我們來看看**RedisCacheConnectionDetails ,它透過實作**RedisConnectionDetails****來外部化 Redis 的連線屬性:
public class RedisCacheConnectionDetails implements RedisConnectionDetails {
 @Override
 public String getPassword() {
 return VaultAdapter.getSecret("redis_password");
 }

 @Override
 public Standalone getStandalone() {
 return new Standalone() {
 @Override
 public String getHost() {
 return VaultAdapter.getSecret("redis_host");
 }

 @Override
 public int getPort() {
 return Integer.valueOf(VaultAdapter.getSecret("redis_port"));
 }
 };
 }
}如下所示,配置類別RedisConnectionDetailsConfiguration回傳RedisConnectionDetails bean:
@Configuration(proxyBeanMethods = false)
 @Profile("redis")
 public class RedisConnectionDetailsConfiguration {
 @Bean
 @Primary
 public RedisConnectionDetails getRedisCacheConnection() {
 return new RedisCacheConnectionDetails();
 }
 }
最後我們看看是否可以和Redis整合:
@Test
 public void giveSecretVault_whenStoreInRedisCache_thenSuccess() {
 redisTemplate.opsForValue().set("City", "New York");
 assertEquals("New York", redisTemplate.opsForValue().get("City"));
}首先,Spring框架成功將redisTemplate注入到測試類別中。然後它用於將鍵值對添加到快取中。最後,我們也檢索該值。
4.4.外部化 MongoDB 連接詳細信息
就像之前一樣,讓我們從通常的類別圖開始:

我們來看看上面MongoDBConnectionDetails類別的實作:
public class MongoDBConnectionDetails implements MongoConnectionDetails {
 @Override
 public ConnectionString getConnectionString() {
 return new ConnectionString(VaultAdapter.getSecret("mongo_connection_string"));
 }
}就像類別圖一樣,我們實作了MongoConnectionDetails介面的getConnectionString()方法。 getConnectionString()方法從 Vault 檢索連接字串。
現在我們可以看一下MongoDBConnectionDetailsConfiguration類別如何建立MongoConnectionDetails bean:
@Configuration(proxyBeanMethods = false)
 public class MongoDBConnectionDetailsConfiguration {
 @Bean
 @Primary
 public MongoConnectionDetails getMongoConnectionDetails() {
 return new MongoDBConnectionDetails();
 }
 }
讓我們看看我們的努力是否成功與 MongoDB Server 整合:
@Test
 public void givenSecretVault_whenExecuteQueryOnMongoDB_ReturnResult() {
 mongoTemplate.insert("{\"msg\":\"My First Entry in MongoDB\"}", "myDemoCollection");
 String result = mongoTemplate.find(new Query(), String.class, "myDemoCollection").get(0);

 JSONObject jsonObject = new JSONObject(result);
 result = jsonObject.get("msg").toString();

 assertEquals("My First Entry in MongoDB", result);
 }
因此,正如我們在上面看到的,該方法將資料插入 MongoDB,然後成功檢索它。這是可能的,因為 Spring Boot 在MongoDBConnectionDetailsConfiguration中定義的MongoConnectionDetails bean 的幫助下建立mongoTemplate bean。
4.5.外部化 R2dbc 連接詳細信息
Spring Boot ConnectionDetails **R2dbcConnectionDetails**的幫助下為反應式關係資料庫連接程式設計提供了 ConnectionDetails 抽象。讓我們來看看下面的類別圖來外部化連接細節:

首先,讓我們實作R2dbcPostgresConnectionDetails :
public class R2dbcPostgresConnectionDetails implements R2dbcConnectionDetails {
 @Override
 public ConnectionFactoryOptions getConnectionFactoryOptions() {
 ConnectionFactoryOptions options = ConnectionFactoryOptions.builder()
 .option(ConnectionFactoryOptions.DRIVER, "postgresql")
 .option(ConnectionFactoryOptions.HOST, VaultAdapter.getSecret("r2dbc_postgres_host"))
 .option(ConnectionFactoryOptions.PORT, Integer.valueOf(VaultAdapter.getSecret("r2dbc_postgres_port")))
 .option(ConnectionFactoryOptions.USER, VaultAdapter.getSecret("r2dbc_postgres_user"))
 .option(ConnectionFactoryOptions.PASSWORD, VaultAdapter.getSecret("r2dbc_postgres_secret"))
 .option(ConnectionFactoryOptions.DATABASE, VaultAdapter.getSecret("r2dbc_postgres_database"))
 .build();

 return options;
 }
}就像前面的部分一樣,這裡我們也使用VaultAdapter來檢索連線詳細資訊。
現在,讓我們實作R2dbcPostgresConnectionDetailsConfiguration類別以將R2dbcPostgresConnectionDetails作為 Spring bean 傳回:
@Configuration(proxyBeanMethods = false)
 public class R2dbcPostgresConnectionDetailsConfiguration {
 @Bean
 @Primary
 public R2dbcConnectionDetails getR2dbcPostgresConnectionDetails() {
 return new R2dbcPostgresConnectionDetails();
 }
 }
由於上述 bean,Spring Boot 框架會自動配置R2dbcEntityTemplate 。最後,它可以自動連接並用於以反應方式運行查詢:
@Test
 public void givenSecretVault_whenQueryPostgresReactive_thenSuccess() {
 String sql = "select * from information_schema.tables";

 List<String> result = r2dbcEntityTemplate.getDatabaseClient().sql(sql).fetch().all()
 .map(r -> {
 return "hello " + r.get("table_name").toString();
 }).collectList().block();
 logger.info("count ------" + result.size());
 }
4.6.外部化 Elasticsearch 連接詳細信息
為了外部化 Elasticsearch 服務的連接詳細信息,Spring Boot 提供了ElasticsearchConnectionDetails介面。讓我們先來看看下面的類別圖:

就像以前一樣,我們採用相同的模式來檢索連接詳細資訊。現在,我們可以繼續實現,從CustomElasticsearchConnectionDetails類別開始:
public class CustomElasticsearchConnectionDetails implements ElasticsearchConnectionDetails {
 @Override
 public List<Node> getNodes() {
 Node node1 = new Node(
 VaultAdapter.getSecret("elastic_host"),
 Integer.valueOf(VaultAdapter.getSecret("elastic_port1")),
 Node.Protocol.HTTP
 );
 Node node2 = new Node(
 VaultAdapter.getSecret("elastic_host"),
 Integer.valueOf(VaultAdapter.getSecret("elastic_port2")),
 Node.Protocol.HTTP
 );
 return List.of(node1, node2);
 }

 @Override
 public String getUsername() {
 return VaultAdapter.getSecret("elastic_user");
 }

 @Override
 public String getPassword() {
 return VaultAdapter.getSecret("elastic_secret");
 }

}此類別使用VaultAdapter設定連接詳細資訊。
讓我們來看看 Spring Boot 用於發現ElasticSearchConnectionDetails bean 的設定類別:
@Configuration(proxyBeanMethods = false)
 @Profile("elastic")
 public class CustomElasticsearchConnectionDetailsConfiguration {
 @Bean
 @Primary
 public ElasticsearchConnectionDetails getCustomElasticConnectionDetails() {
 return new CustomElasticsearchConnectionDetails();
 }
 }
最後,是時候檢查它是如何運作的了:
@Test
 public void givenSecretVault_whenCreateIndexInElastic_thenSuccess() {
 Boolean result = elasticsearchTemplate.indexOps(Person.class).create();
 logger.info("index created:" + result);
 assertTrue(result);
 }
有趣的是,Spring Boot 會使用正確的連接詳細資訊將elasticsearchTemplate自動配置到測試類別中。然後,它用於在 Elasticsearch 中建立索引。
4.7.外部化 Cassandra 連接詳細信息
與往常一樣,以下是建議實現的類別圖:

根據 Spring Boot,我們必須實作CassandraConnectionDetails介面的方法,如上所示。讓我們看看CustomCassandraConnectionDetails:
public class CustomCassandraConnectionDetails implements CassandraConnectionDetails {
 @Override
 public List<Node> getContactPoints() {
 Node node = new Node(
 VaultAdapter.getSecret("cassandra_host"),
 Integer.parseInt(VaultAdapter.getSecret("cassandra_port"))
 );
 return List.of(node);
 }

 @Override
 public String getUsername() {
 return VaultAdapter.getSecret("cassandra_user");
 }

 @Override
 public String getPassword() {
 return VaultAdapter.getSecret("cassandra_secret");
 }

 @Override
 public String getLocalDatacenter() {
 return "datacenter-1";
 }
 }
基本上,我們正在從 Vault 中檢索大部分敏感連接詳細資訊。
現在,我們可以看一下負責建立CustomCassandraConnectionDetails bean 的設定類別:
@Configuration(proxyBeanMethods = false)
 public class CustomCassandraConnectionDetailsConfiguration {
 @Bean
 @Primary
 public CassandraConnectionDetails getCustomCassandraConnectionDetails() {
 return new CustomCassandraConnectionDetails();
 }
 }
最後,讓我們看看 Spring Boot 是否能夠自動配置CassandraTemplate :
@Test
 public void givenSecretVaultVault_whenRunQuery_thenSuccess() {
 Boolean result = cassandraTemplate.getCqlOperations()
 .execute("CREATE KEYSPACE IF NOT EXISTS spring_cassandra"
 + " WITH replication = {'class':'SimpleStrategy', 'replication_factor':3}");
 logger.info("the result -" + result);
 assertTrue(result);
}使用cassandraTemplate,上述方法成功在Cassandra資料庫中建立了一個keyspace。
4.8.外部化 Neo4j 連接詳細信息
Spring Boot 為 Neo4j 資料庫(一種流行的圖形資料庫)提供ConnectionDetails抽象:

繼續,讓我們實現CustomNeo4jConnectionDetails :
public class CustomNeo4jConnectionDetails implements Neo4jConnectionDetails {
 @Override
 public URI getUri() {
 try {
 return new URI(VaultAdapter.getSecret("neo4j_uri"));
 } catch (URISyntaxException e) {
 throw new RuntimeException(e);
 }
 }
 @Override
 public AuthToken getAuthToken() {
 return AuthTokens.basic("neo4j", VaultAdapter.getSecret("neo4j_secret"));
 }
}同樣,我們在這裡也使用VaultAdapter從 Vault 讀取連接詳細資訊。
現在,讓我們實作CustomNeo4jConnectionDetailsConfiguration:
@Configuration(proxyBeanMethods = false)
 public class CustomNeo4jConnectionDetailsConfiguration {
 @Bean
 @Primary
 public Neo4jConnectionDetails getNeo4jConnectionDetails() {
 return new CustomNeo4jConnectionDetails();
 }
 }
Spring Boot 框架使用上述設定類別載入Neo4jConncetionDetails bean。
最後,看看下面的方法是否成功連接到Neo4j資料庫:
@Test
 public void giveSecretVault_whenRunQuery_thenSuccess() {
 Person person = new Person();
 person.setName("James");
 person.setZipcode("751003");

 Person data = neo4jTemplate.save(person);
 assertEquals("James", data.getName());
 }
值得注意的是, Neo4jTemplate會自動連接到測試類,並將資料儲存到資料庫中。
4.9.外部化 Kafka 連接詳細信息
Kafka 作為一種流行且極其強大的訊息代理,Spring Boot 也為其提供了整合程式庫。 KafkaConnectionDetails是 Spring 支援外部化連線屬性的最新功能。因此,讓我們看看如何在以下類別圖的幫助下使用它:

上述設計與迄今為止討論的早期設計基本相似。因此,我們將直接跳到它的實現,從CustomKafkaConnectionDetails類別開始:
public class CustomKafkaConnectionDetails implements KafkaConnectionDetails {
 @Override
 public List<String> getBootstrapServers() {
 return List.of(VaultAdapter.getSecret("kafka_servers"));
 }
 }
對於 Kafka 單節點伺服器的非常基本的設置,上面的類別只是覆蓋方法getBootstrapServers()以從保管庫讀取屬性。對於更複雜的多節點設置,可以覆寫其他方法。
我們現在可以看一下CustomKafkaConnectionDetailsConfiguration類別:
@Configuration(proxyBeanMethods = false)
 public class CustomKafkaConnectionDetailsConfiguration {
 @Bean
 public KafkaConnectionDetails getKafkaConnectionDetails() {
 return new CustomKafkaConnectionDetails();
 }
}上面的方法回傳KafkaConnectionDetails bean。最後,Spring 使用它將kafkaTemplate注入到以下方法中:
@Test
 public void givenSecretVault_whenPublishMsgToKafkaQueue_thenSuccess() {
 assertDoesNotThrow(kafkaTemplate::getDefaultTopic);
 }
4.10.外部化 Couchbase 連接詳細信息
Spring Boot 還提供了CouchbaseConnectionDetails接口,用於外部化 Couchbase 資料庫的連接屬性。我們來看看下面的類別圖:

我們首先透過重寫其方法來實作CouchbaseConnectionDetails介面以取得使用者、密碼和連接字串:
public class CustomCouchBaseConnectionDetails implements CouchbaseConnectionDetails {
 @Override
 public String getConnectionString() {
 return VaultAdapter.getSecret("couch_connection_string");
 }

 @Override
 public String getUsername() {
 return VaultAdapter.getSecret("couch_user");
 }

 @Override
 public String getPassword() {
 return VaultAdapter.getSecret("couch_secret");
 }
}然後,我們將在CustomCouchBaseConnectionDetails類別中建立上述自訂 bean:
@Configuration(proxyBeanMethods = false)
 @Profile("couch")
 public class CustomCouchBaseConnectionDetailsConfiguration {
 @Bean
 public CouchbaseConnectionDetails getCouchBaseConnectionDetails() {
 return new CustomCouchBaseConnectionDetails();
 }
 }
Spring Boot,在應用程式啟動時載入上述設定類別。
現在,我們可以檢查以下方法是否能夠成功連接 Couchbase 伺服器:
@Test
 public void givenSecretVault_whenConnectWithCouch_thenSuccess() {
 assertDoesNotThrow(cluster.ping()::version);
}[Cluster](https://docs.couchbase.com/sdk-api/couchbase-java-client/com/couchbase/client/java/Cluster.html)類別在方法中自動組裝,然後用於與資料庫整合。
4.11.外部化 Zipkin 連接詳細信息
最後,在本節中,我們將討論ZipkinConnectionDetails接口,用於外部化連接到 Zipkin Server(一種流行的分散式追蹤系統)的屬性。讓我們從下面的類別圖開始:

在類別圖中使用上述設計,我們首先實作CustomZipkinConnectionDetails :
public class CustomZipkinConnectionDetails implements ZipkinConnectionDetails {
 @Override
 public String getSpanEndpoint() {
 return VaultAdapter.getSecret("zipkin_span_endpoint");
 }
 }
getSpanEndpoint() fetches方法使用VaultAdapter從 Vault 取得 Zipkin API 端點。
接下來,我們將實作CustomZipkinConnectionDetailsConfiguration類別:
@Configuration(proxyBeanMethods = false)
 @Profile("zipkin")
 public class CustomZipkinConnectionDetailsConfiguration {
 @Bean
 @Primary
 public ZipkinConnectionDetails getZipkinConnectionDetails() {
 return new CustomZipkinConnectionDetails();
 }
}正如我們所看到的,它返回ZipkinConnectionDetails bean。在應用程式啟動期間,Spring Boot 會發現該 bean,以便Zipkin 庫可以將追蹤資訊推送到 Zipkin 中。
讓我們先運行該應用程式:
mvn spring-boot:run -P connection-details
 -Dspring-boot.run.arguments="--spring.config.location=./target/classes/connectiondetails/application-zipkin.properties"
在運行應用程式之前,我們必須在本地工作站上執行 Zipkin。
然後,我們將執行以下命令來存取ZipkinDemoController中定義的控制器端點:
curl http://localhost:8080/zipkin/test最後,我們可以檢查 Zipkin 前端的追蹤:
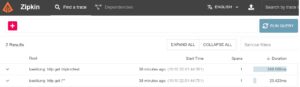
5. 結論
在本文中,我們了解了 Spring Boot 3.1 中的ConnectionDetails介面。我們看到了它如何幫助將敏感連接詳細資訊外部化到應用程式使用的遠端服務。值得注意的是,一些與連接無關的資訊仍然是從application.properties檔案中讀取的。
最後,這裡使用的程式碼範例可以在 GitHub 上找到。