使用 Redis 實作 Spring Authorization Server 的核心服務
1.概述
Spring Authorization Server 的預設實作將所有內容儲存在記憶體中。諸如RegisteredClient 、Token 儲存、授權狀態等內容都會在 JVM 每次啟動/停止時建立和刪除。這在某些情況下很有用,例如演示和測試。然而,在實際應用中,這會成為一個問題,因為它不適用於水平擴展、重啟和其他類似場景。
為了解決這個問題,Spring 提供了使用 Redis 實作 Spring 授權服務核心服務的方法。這樣,我們可以確保令牌和註冊客戶端的持久性和持久性。此外,我們還可以享受更好的品質和安全性,並擁有管理令牌的權限。此外,我們還可以擴展授權伺服器,提供可觀察性和事件溯源,並提供跨多個節點撤銷令牌的權限,等等。
在本文中,我們將探討如何使用 Redis 實現 Spring 授權服務的核心服務。我們將研究需要更改或添加的元件,並提供程式碼範例來實現。我們將使用嵌入式 Redis 伺服器進行示範。但是,對於基於容器或已部署的實例,所有操作都應該以相同的方式進行。
2. 基礎項目
在本教程中,我們將基於現有的 Spring Security OAuth 專案編寫示範程式碼,該專案將所有內容儲存在記憶體中。然後,我們將介紹使用 Redis 的 Spring Authorization Service 的核心服務。
現有項目是一個提供文章清單的 REST API。但該端點是安全的,需要身份驗證和授權,如連結文章中所述。在本教程的範圍內,我們不會對該服務本身進行任何更改。
2.1. 項目結構
基礎項目包含三個模組:
- 授權伺服器作為文章資源和客戶端伺服器的身份驗證來源
- 資源伺服器在向授權伺服器驗證授權後,提供文章列表
- 客戶端伺服器是一個 REST API 用戶端,它在對使用者進行身份驗證後取得文章,並向資源伺服器發出授權請求
在本文中,我們將使用與基礎專案相同的程式碼,並對授權伺服器進行一些更改。
2.2. 依賴項
首先,讓我們定義所有模組中使用的 Spring 依賴項的通用版本。為此,所有模組將使用一個通用的父級,而該父級使用spring-boot-starter-parent作為其父級:
<parent>

 <groupId>org.springframework.boot</groupId>

 <artifactId>spring-boot-starter-parent</artifactId>

 <version>3.5.0</version>

 </parent>
我們需要提及的另一個版本是嵌入式 Redis 伺服器依賴項,用於授權伺服器:
<dependency>

 <groupId>com.github.codemonstur</groupId>

 <artifactId>embedded-redis</artifactId>

 <version>1.4.2</version>

 </dependency>
3. 使用 Redis 的 Spring 授權伺服器
預設情況下,Spring Authorization Server 使用記憶體實作:
-
RegisteredClientRepository - 代幣商店
- 授權同意
- 授權狀態
這在某些情況下非常有用,尤其是在我們需要快速回應且無需長期儲存的情況下。這類場景可能包括運行測試、演示等。但如果用例更加複雜,需要長期儲存、擴展能力和監控功能,那麼授權伺服器就需要能夠將資料儲存在資料庫中。
Spring 提供了此選項,可以使用 Redis 實現 Spring 授權服務的核心服務。為此,我們需要:
- 定義實體模型
- 建立 Spring Data 儲存庫
- 實施核心服務
- 配置核心服務
3.1. 使用 Redis 的授權服務實體模型
首先,我們需要定義一些實體來表示核心元件: RegisteredClient 、 OAuth2Authorization和OAuth2AuthorizationConsent 。我們根據授權許可類型對OAuth2Authorization類別進行了細分。讓我們來看看我們將要建立的實體:
- 註冊客戶端實體(
OAuth2RegisteredClient)用於持久化從RegisteredClient映射的訊息 - 授權同意實體(
OAuth2UserConsent)用於保存從OAuth2AuthorizationConsent映射的資訊 - 授權授予基礎實體(
OAuth2AuthorizationGrantAuthorization)是持久化映射到OAuth2Authorization資訊的基礎實體,並且具有每種授權授予類型的通用屬性 - OAuth 2.0 的授權碼授予實體(
OAuth2AuthorizationCodeGrantAuthorization)為 OAuth 2.0「authorization_code」授予類型定義了附加屬性 - OpenID Connect 1.0 的授權碼授予實體(
OidcAuthorizationCodeGrantAuthorization)為 OpenID Connect 1.0「authorization_code」授予類型定義了附加屬性 - 客戶端憑證授予實體(
OAuth2ClientCredentialsGrantAuthorization)為「client_credentials」授予類型定義了附加屬性 - 裝置代碼授予實體(
OAuth2DeviceCodeGrantAuthorization)為「urn:ietf:params:oauth:grant-type:device_code」授予類型定義了附加屬性 - 令牌交換授權實體(
OAuth2TokenExchangeGrantAuthorization)為「urn:ietf:params:oauth:grant-type:token-exchange」授權類型定義了附加屬性
我們可以在 GitHub 上找到實體檔案的實作程式碼。
3.2. 使用 Redis 的授權服務 Spring Data Repositories
然後,我們建立實作 Spring Authorization Service 核心服務(使用 Redis 實作)所需的最小儲存庫集。這些是:
- 註冊客戶端儲存庫(
OAuth2RegisteredClientRepository)透過id或clientId查找OAuth2RegisteredClient - 授權同意儲存庫(
OAuth2UserConsentRepository)透過registeredClientId和principalName尋找和刪除任何OAuth2UserConsent記錄 - 授權授予儲存庫(
OAuth2AuthorizationGrantAuthorizationRepository)根據授權類型,透過id、state、deviceCode等查找OAuth2AuthorizationGrantAuthorization
我們可以在 GitHub 上找到儲存庫的實作程式碼。
3.3. Redis 授權服務的核心服務
類似地,我們要建構與前面授權服務的核心服務相對應的服務。這些核心服務是:
- 模型映射器(
ModelMapper)不是核心服務,但我們將在以下所有核心服務中使用它來進行實體物件和域物件之間的映射 - 註冊客戶端儲存庫(
RedisRegisteredClientRepository)結合了OAuth2RegisteredClientRepository,OAuth2RegisteredClient,和ModelMapper類別來持久化RegisteredClient對象 - 授權同意服務(
RedisOAuth2AuthorizationConsentService)結合了OAuth2UserConsentRepository, OAuth2UserConsent和ModelMapper類別來持久化OAuth2AuthorizationConsent對象 - 授權服務(
RedisOAuth2AuthorizationService)結合了OAuth2AuthorizationGrantAuthorizationRepository,OAuth2AuthorizationGrantAuthorization和ModelMapper類別來持久化OAuth2Authorization物件
我們可以在 GitHub 上找到該服務的實作程式碼。
3.4. Spring 使用 Redis 設定授權服務
最後,我們需要建立 Spring 設定文件,以便使用 Redis 啟用 Spring 授權服務的核心服務。
SecurityConfig類別應該包含與基礎項目相同的 bean。我們註冊的使用者憑證(稍後示範中會用到)是使用者名稱“admin”,密碼“password”。讓我們來看看 Redis 的配置:
@Configuration(proxyBeanMethods = false)

 @EnableRedisRepositories

 public class RedisConfig {

 // fields omitted


 @PostConstruct

 public void postConstruct() throws IOException {

 redisServer.start();

 }


 @PreDestroy

 public void preDestroy() throws IOException {

 redisServer.stop();

 }


 @Bean

 @Order(1)

 public JedisConnectionFactory redisConnectionFactory() {

 RedisStandaloneConfiguration redisStandaloneConfiguration

 = new RedisStandaloneConfiguration(redisHost, redisPort);


 return new JedisConnectionFactory(redisStandaloneConfiguration);

 }


 @Bean

 @Order(2)

 public RedisTemplate<?, ?> redisTemplate(JedisConnectionFactory connectionFactory) {

 RedisTemplate<byte[], byte[]> template = new RedisTemplate<>();

 template.setConnectionFactory(connectionFactory);

 return template;

 }


 @Bean

 @Order(3)

 public RedisCustomConversions redisCustomConversions() {

 return new RedisCustomConversions(

 Arrays.asList(

 new UsernamePasswordAuthenticationTokenToBytesConverter(),

 new BytesToUsernamePasswordAuthenticationTokenConverter(),

 new OAuth2AuthorizationRequestToBytesConverter(),

 new BytesToOAuth2AuthorizationRequestConverter(),

 new ClaimsHolderToBytesConverter(),

 new BytesToClaimsHolderConverter()));

 }


 @Bean

 @Order(4)

 public RedisRegisteredClientRepository registeredClientRepository(

 OAuth2RegisteredClientRepository registeredClientRepository) {

 RedisRegisteredClientRepository redisRegisteredClientRepository

 = new RedisRegisteredClientRepository(registeredClientRepository);

 redisRegisteredClientRepository.save(RegisteredClients.messagingClient());


 return redisRegisteredClientRepository;

 }


 @Bean

 @Order(5)

 public RedisOAuth2AuthorizationService authorizationService(

 RegisteredClientRepository registeredClientRepository,

 OAuth2AuthorizationGrantAuthorizationRepository authorizationGrantAuthorizationRepository) {

 return new RedisOAuth2AuthorizationService(registeredClientRepository,

 authorizationGrantAuthorizationRepository);

 }


 @Bean

 @Order(6)

 public RedisOAuth2AuthorizationConsentService authorizationConsentService(

 OAuth2UserConsentRepository userConsentRepository) {

 return new RedisOAuth2AuthorizationConsentService(userConsentRepository);

 }

}RedisConfig類別為 Redis 提供 Spring bean 以及 Redis 授權服務的核心元件:
-
@PostConstruct和@PreDestroy註解用於啟動和停止嵌入式 Redis 伺服器 -
JedisConnectionFactory和RedisTemplatebeans 用於連接 Redis - 持久化到 Redis 所需的 Object-to-hash 轉換需要
RedisCustomConversionsbean -
RedisRegisteredClientRepository用於設定registeredClientRepositorybean,然後註冊客戶端,我們將在下一節中解釋 -
RedisOAuth2AuthorizationService註冊為authorizationServicebean,並設定了適當的儲存庫 - 類似地,
RedisOAuth2AuthorizationConsentService被註冊為authorizationConsentServicebean
3.5. 註冊客戶
當我們使用 Spring OAuth Security 的預設記憶體持久化功能時,我們可以使用 properties 定義已註冊的客戶端。這是 Spring Authorization Service 的內建功能,從 3.1.0 版本開始,它使用OAuth2AuthorizationServerProperties類別。
但在我們的例子中,預設不支援這一點,因為我們使用 Redis 實作 Spring 授權服務的核心服務,更具體地說,我們使用自訂的RegisteredClientRepository 。
我們可以採用不同的方法來解決這個問題,例如使用OAuth2AuthorizationServerProperties類別並自行進行映射和儲存到自訂儲存庫,直接使用硬編碼值等等。由於這只是一個教程,我們將採用一種不太複雜的方法,即使用硬編碼值並將RegisteredClient直接儲存在配置中的RedisRegisteredClientRepository中(如上一節所示)。
讓我們使用程式碼建立一個RegisteredClient :
public class RegisteredClients {

 public static RegisteredClient messagingClient() {

 return RegisteredClient.withId(UUID.randomUUID().toString())

 .clientId("articles-client")

 .clientSecret("{noop}secret")

 .clientAuthenticationMethod(ClientAuthenticationMethod.CLIENT_SECRET_BASIC)

 .authorizationGrantType(AuthorizationGrantType.AUTHORIZATION_CODE)

 .authorizationGrantType(AuthorizationGrantType.REFRESH_TOKEN)

 .authorizationGrantType(AuthorizationGrantType.CLIENT_CREDENTIALS)

 .authorizationGrantType(AuthorizationGrantType.DEVICE_CODE)

 .redirectUri("http://127.0.0.1:8080/login/oauth2/code/articles-client-oidc")

 .redirectUri("http://127.0.0.1:8080/authorized")

 .postLogoutRedirectUri("http://127.0.0.1:9000/login")

 .scope(OidcScopes.OPENID)

 .scope("articles.read")

 .build();

 }

 }
此配置應該很熟悉,因為它是基礎專案中基於屬性的註冊客戶端的副本。請注意,我們使用了建立實體時所用到的所有四種授權許可類型。
4. Redis授權服務演示
讓我們看看如何存取articles資源。首先,啟動所有三個模組。在本例中,我們使用 IntelliJ 來執行此操作:
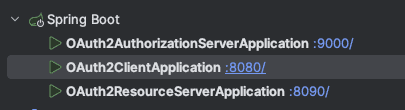
現在,讓我們導航到http://127.0.0.1:8080/articles 。此頁面將會重新導向至登入頁面:
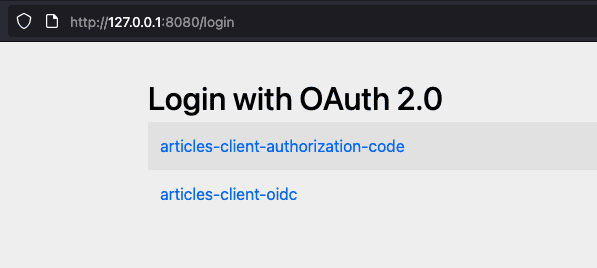
在此頁面上,使用者可以選擇透過點擊articles-client-authorization-code或articles-client-oidc進行身份驗證。在這兩種情況下,使用者都需要提供使用者名稱和密碼(“admin”,“password”,在UserDetailsService bean中設定)。
這樣,他們就向授權伺服器進行了身份驗證,並獲得了存取文章客戶端的權限。如果使用者選擇第一個選項進行身份驗證,則登入成功後,他們會被重新導向回此頁面,並且必須點擊第二個連結才能導航到文章頁面。如果使用者選擇了第二個選項,則所有操作都將自動完成:

在圖片中,我們可以看到登入成功後,使用者可以存取資源。我們也可以看到新增到瀏覽器中的 Cookie。
還有一點要注意的是,由於我們使用 Redis 實現了 Spring 授權服務的核心服務,我們現在可以看到 Redis 伺服器具有有關即時會話等的資訊:
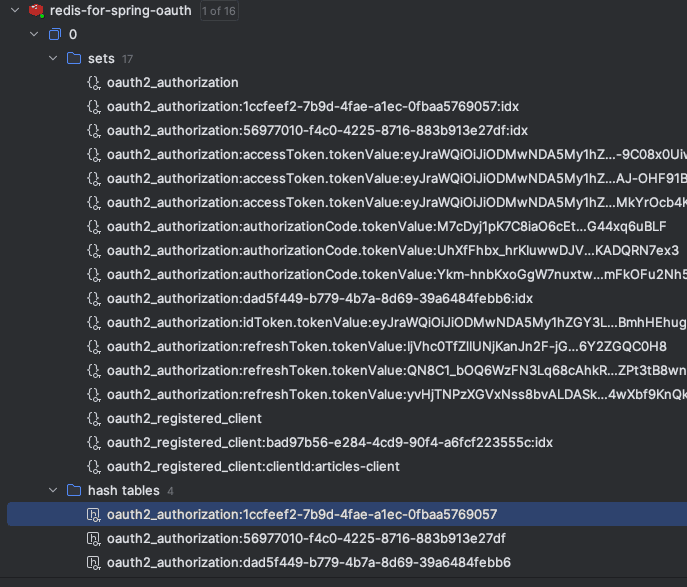
oauth2_registered_client物件是登入前 Redis 中唯一存在的物件。其餘資料都是登入成功後儲存的。
5. 結論
在本文中,我們討論了使用 Redis 的 Spring 授權服務的核心服務。我們回顧了從預設記憶體儲存切換到使用 Redis 需要修改的元件。最後,我們觀察了對授權使用者進行身份驗證以獲取資源存取權限的過程,以及授權伺服器如何在 Redis 中儲存令牌。
與往常一樣,範例中使用的所有原始程式碼都可以在 GitHub 上找到。