使用資源資料夾中的 YML 文件建立開放 API 文檔
1. 簡介
在本教程中,我們將使用 YML 檔案和架構引用為 REST 端點產生 Swagger UI。我們將遵循 Swagger 解析規則,將所有產生 API 所需的程式碼分開存放。
我們也將從頭開始了解使用 YML 檔案產生 Swagger UI 的實作。
2. 在 YML 檔案中使用 Swagger 邏輯
讓我們檢查將 Swagger 邏輯放在單獨的 Swagger(YML 或 JSON)檔案中的情況:
openapi: 3.0.1

 info:

 title: User API

 version: "1.0"

 description: API for User Management

 paths:

 /users/all:

 get:

 summary: Get all users

 description: Returns a list of users

 responses:

 "200":

description: Successful response這種方法的一個關鍵優勢是清晰的關注點分離,避免了文件細節擾亂實際應用程式程式碼。此外,這種方法通常更有利於協作,允許 QA 測試人員或產品經理等非開發人員直接參與或更新 API 文件。
另一個顯著的優點是可重複使用性—同一個文件檔案可以經常在多個微服務或團隊之間共用或調整。
此外,單獨維護文件可以實現專用版本控制,並透過獨立追蹤變更來支援更正式的 API 治理程序。
然而,這種方法也存在著自身的挑戰。也許最顯著的缺點是需要手動更新;如果 API 程式碼發生變化,則必須更新單獨的文件檔案。
最後,偵錯實際 API 行為與記錄規格之間的差異有時會更加困難,因為程式碼中的 API 方法與單獨文件中的描述之間沒有直接聯繫。
3. 入門
讓我們開始設定一個 Spring Boot專案。為此,我們可以導航到Spring Initializer並套用給定的配置:
- 專案:
Maven - 語言:
Java - Spring Boot 版本:
3.4.4(或任何穩定版本) - 集團:
com.baeldung - 神器:
swaggeryml - 描述:
Demo project for Swagger using YML - 包裝:
JAR - JDK:
17
我們還需要一個[spring-doc](https://mvnrepository.com/artifact/org.springdoc/springdoc-openapi-starter-webmvc-ui)依賴項,它能實現這一點:
<dependency>

 <groupId>org.springdoc</groupId>

 <artifactId>springdoc-openapi-starter-webmvc-ui</artifactId>

 <version>2.4.0</version>

</dependency>除此之外,我們還需要[spring-boot-starter-web](https://mvnrepository.com/artifact/org.springframework.boot/spring-boot-starter-web)依賴項:
<dependency>

 <groupId>org.springframework.boot</groupId>

 <artifactId>spring-boot-starter-web</artifactId>

</dependency>spring-boot-starter-web是引入 Spring MVC 本身以及嵌入式 Web 伺服器**(預設為 Tomcat)的關鍵依賴項。**它為我們的 Spring Boot 應用程式設定了所有必要的基礎架構,使其能夠作為 Web 應用程式運行,並能夠處理特定路徑( /swagger-ui.html, /v3/api-docs以及我們自己定義的端點)上的傳入 HTTP 請求。
4.新增**application.properties**
我們必須在applicaiton.properties中做一些額外的配置,以便檢測並選擇我們的 YML 檔案:
spring.application.name=demo

 springdoc.api-docs.enabled=true

 springdoc.api-docs.path=/v3/api-docs

 springdoc.api-docs.resolve-schema-properties=true

 springdoc.swagger-ui.url=/openapi.yml

 springdoc.swagger-ui.path=/swagger-ui.html
首先, spring.application.name=demo是我們的應用程式名稱。接下來是文件細節, springdoc.api-docs .enabled=true至關重要,因為它允許springdoc springdoc-openapi庫主動掃描我們的程式碼,尋找控制器和@Operation註解等內容,並動態生成 OpenAPI v3 規範。
此外, springdoc.api-docs.path=/v3/api-docs明確定義了此動態生成規範的特定可用端點。同樣, springdoc.swagger-ui.path=/swagger-ui.html正確設定了 URL,以便我們在瀏覽器中輕鬆存取互動式 Swagger UI 介面,例如http://localhost:8080/swagger-ui.html 。
然而,對於我們的具體目標來說, springdoc.swagger-ui.url=/openapi.yml才是真正關鍵的部分。它指示 Swagger UI 取得並顯示在我們指定的/openapi.yml路徑下找到的定義。
最後, springdoc.api-docs .resolve-schema-properties=true確保springdoc-openapi不僅產生$ref鏈接,而且還正確包含相應的組件定義,如components/schemas/Student 。
5.理解Swagger YML文件
現在,讓我們來看看 YML 檔案中的 OpenAPI 定義,該檔案將駐留在resources/static/components/schemas資料夾中。
5.1. 新增版本相關信息
讓我們加入文件遵循的 OpenAPI 規範的版本:
openapi: 3.1.0

 info:

 title: Student API

 description: Following documentation explain the API's supported by the [student server](http://localhost:8080).

 version: 1.1.9
OpenAPI YML 檔案以openapi關鍵字開頭,該關鍵字指定了所使用的 OpenAPI 規範的版本。其後的info部分提供了 API 文件的簡要概述。
5.2. 新增伺服器相關訊息
接下來是伺服器部分:
servers:

 - url: http://localhost:8080/v1

 description: Prod server

 variables:

 region:

 default: us-west

 enum:

 - us-west

 - us-east

 - url: http://localhost:8080/test

description: Test serverservers部分是我們定義各種伺服器環境的資訊的地方。
5.3. 在 YML 中加入 REST 端點
現在我們準備好定義 REST 端點:
paths:

 /students:

 get:

 tags:

 - Students

 summary: Returns all the students.

 description: Following path gives all the data related to students

 responses:

 "200":

 description: A JSON array of student objects

 content:

 application/json:

 schema:

 type: array

 items:

 $ref: './components/schemas/Student.yml'

 /students/{id}:

 get:

 tags:

 - Students

 summary: Gets a student by ID.

 description: >

 Gives the details of specific student based on **ID**

 operationId: getStudentById

 parameters:

 - name: id

 in: path

 description: Student ID

 required: true

 schema:

 type: integer

 format: int64

 responses:

 "200":

 description: Successful operation

 content:

 application/json:

 schema:

$ref: './components/schemas/Student.yml'從這裡開始,關鍵paths部分包含了我們應用程式公開的所有 API 端點的完整定義。例如,像/students這樣的特定路徑詳細說明了 GET 之類的操作,它指定了該路徑可用的 HTTP 方法。在這些操作中, tags用於對相關操作進行分組,以便更好地組織。摘要則提供了操作目的的簡潔易懂的概述。
至關重要的是, responses部分概述了該 HTTP 操作的所有可能回應,通常以 HTTP 狀態碼為鍵。為了詳細說明特定的回應,描述部分提供了其內容的詳細信息,而content物件定義了實際的有效負載格式,例如application/json 。
在content中, schema關鍵字引入了回應主體的結構,如果是數組,則items描述每個元素的架構。我們經常在這裡看到$ref ,表示該架構不是內聯定義的,而是從其他位置引用的,例如./components/schemas/Student.yml ,它指向該外部定義。
我們需要記住,YML 檔案中使用的所有關鍵字都是區分大小寫的。
5.4. 新增架構定義文件
使用引用進行模式定義並在 OpenAPI(Swagger)中組織它們以描述資料物件的結構通常是一種很好的做法。
這是我們使用的模式定義,它應該放在resources/static/components/schemas資料夾中:
type: object

 properties:

 id:

 type: integer

 format: int64

 name:

 type: string

 rollNo:

 type: string
5.5. 輸出
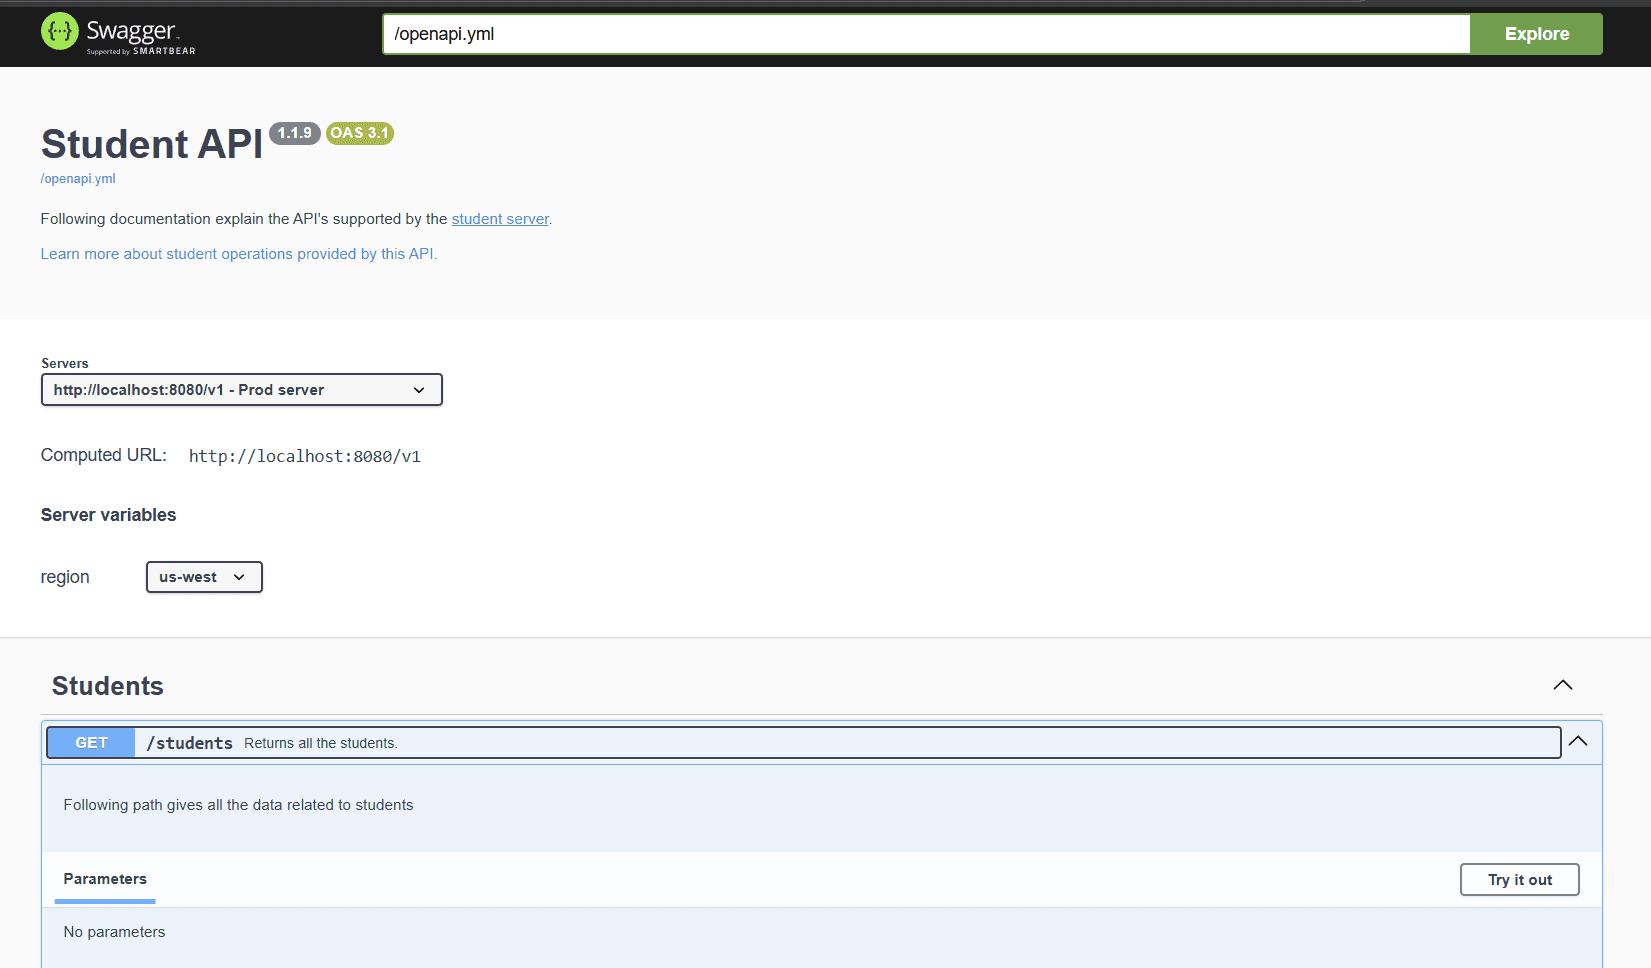
在執行應用程式時,我們可以看到它記錄了一個“ Student API ”,版本編號1.1.9 ,遵循 OpenAPI 規範3.1建置。它清晰地列出了生產伺服器 URL( http://localhost:8080/v1 )等詳細信息,甚至允許我們查看特定的端點,例如/students GET 請求,該請求旨在檢索所有學生資料。我們可以透過導航到Swagger URL來查看輸出:
6. 結論
在本文中,我們探討了透過在單獨的 YML 檔案中單獨維護來產生 Swagger UI 的方方面面。選擇正確的方法實際上取決於我們專案的具體情況。對於小型專案或快速原型設計,基於註解的方法可以提供快速且緊密的同步,從而使維護更加簡單。
但是,對於更大、更複雜的系統(如微服務),或者當協作和正式 API 治理是關鍵時,將我們的文件分成 YML 檔案可以提供更好的結構、可重複使用性和更清晰的程式碼庫。
與往常一樣,本文的程式碼可在 GitHub 上找到。