使用 Nginx 作為正向代理
- java
- Nginx
一、簡介
談到 Nginx,它是目前最流行的服務器之一。它快速、輕巧,並且負責託管 Internet 上一些最大的網站。 Nginx 通常用作負載均衡器、反向代理和 HTTP 緩存等用途。
在本教程中,我們將重點學習如何將其用作任何請求位置的轉發代理。
**2.**正向代理的動機
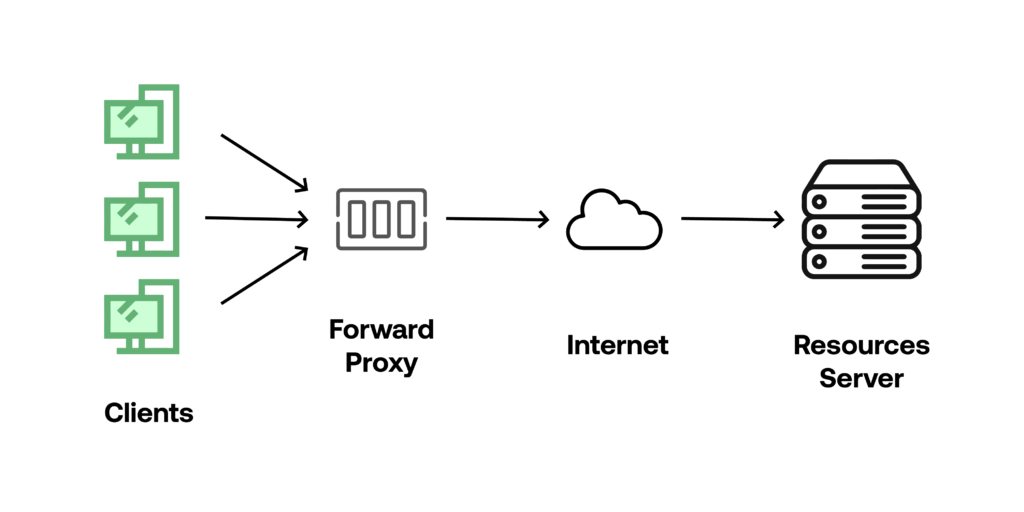
代理服務器是充當客戶端和所請求資源的主機之間的中間人的實體。這意味著流量通過網關(附加機器)到達目的地(主機服務器)。代理代表客戶端繼續請求,所以當主機服務器接受請求時,他們只看到代理的 IP。
使用轉發代理的唯一缺點是它們在應用程序級別上工作,因此我們必須為我們計劃為其路由流量的每個應用程序設置代理。
使用正向代理的一些用例是:
- 屏蔽 IP 和位置以訪問受位置限制的服務
- 適用於需要連接到 Internet 上特定資源的隔離內部網絡
- 用於緩存對特定服務器的請求,以獲取很少更改的內容以節省資源

值得注意的是,代理不加密流量,而 VPN 通過安全和加密的隧道重定向流量。
**3.**使用 Nginx 實現正向代理
為了實現轉發代理,我們將使用安裝了 Nginx 的 Linux 機器。在本教程中,我們將使用 VirtualBox 和已啟動並運行的 Linux 發行版服務器,以及安裝的 Nginx,但您可以使用對您更方便的任何東西,例如 Docker,甚至是舊 PC。多年來的角落。
首先,我們找到默認的Nginx配置文件並註釋掉server部分,以便將其保存為存檔副本。通常,我們可以在/etc/nginx/sites-enabled/default中找到它:
# Default server configuration
 #server {
 #listen 80 default_server;
 #listen [::]:80 default_server;

 #root /var/www/html;

 # Add index.php to the list if you are using PHP
 #index index.html index.htm index.nginx-debian.html;

 #server_name _;

 #location / {
 # First attempt to serve request as file, then
 # as directory, then fall back to displaying a 404.
 #try_files $uri $uri/ =404;
 #}
#}接下來,讓我們創建一個名為forward的新文件並添加所有需要的配置以將 Nginx 轉變為工作轉發代理:
server {

 listen 8888;

 location / {

 resolver 8.8.8.8;

 proxy_pass http://$http_host$uri$is_args$args;

 }

}使用第一個配置'listen 8888;' –我們基本上是在告訴服務器,來自該端口的所有請求都必須使用以下配置進行處理。 location參數負責特定的服務器細分塊配置,基本上告訴服務器如何處理對特定 URI 的請求。
變量$http_host包含原始請求中的主機,而$uri包含域或 IP 之後的路徑。最後兩個變量$is_args和$args檢查初始請求中的任何附加參數,並將它們自動添加到代理請求中。
更新完所有必要的配置後,我們需要重新啟動nginx.service才能使它們生效:
sudo systemctl restart nginx.service4. 使用正向代理
正如我們之前提到的,正向代理在應用程序級別工作,因此很自然地,根據客戶端,我們可以通過多種方式配置正向代理。對於這一步,我們將在 JavaScript 中創建一個簡單的客戶端並跟踪請求。
在開始之前,讓我們確保在我們的本地機器上安裝了最新的node.js和 npm。接下來,我們為客戶端創建目錄和文件。讓我們相應地調用目錄Proxy Test和文件proxytest.js 。
接下來,我們需要初始化 NPM 的package.json ,以便我們可以安裝所有需要的庫。我們通過在項目目錄內的終端上運行npm init命令來做到這一點:
npm init成功初始化存儲庫後,我們需要安裝請求庫,我們將使用該請求庫來使用代理配置構建自定義請求:
npm install request最後,讓我們打開一個 IDE 並將以下代碼粘貼到我們的proxytest.js文件中:
var request = require('request');

 request({
 'url':'http://www.google.com/',
 'method': "GET",
 'proxy':'http://192.168.100.40:8888'
 },function (error, response, body) {
 if (!error && response.statusCode == 200) {
 console.log(body);
 }
 })
現在,讓我們運行這個代碼片段:
node proxytest.js讓我們退後一步,看看每一行。第一行將庫導入到request對像中,稍後我們將使用它。
在request對像中,我們將目標服務器的 URL、HTTP 方法和代理指定為 URL 和端口密鑰對。在回調函數內部,如果請求成功,我們會在控制台中記錄響應正文。
接下來,我們來看看 Nginx 的調試日誌:
2022/02/20 13:46:13 [debug] 1790#1790: *1 http script copy: "http://"
 2022/02/20 13:46:13 [debug] 1790#1790: *1 http script var: "www.google.com"
 2022/02/20 13:46:13 [debug] 1790#1790: *1 http script var: "/"
 2022/02/20 13:46:13 [debug] 1790#1790: *1 http script var: ""
 2022/02/20 13:46:13 [debug] 1790#1790: *1 http init upstream, client timer: 0
 2022/02/20 13:46:13 [debug] 1790#1790: *1 epoll add event: fd:7 op:3 ev:80002005
 2022/02/20 13:46:13 [debug] 1790#1790: *1 http script copy: "Host"
 2022/02/20 13:46:13 [debug] 1790#1790: *1 http script var: "www.google.com"
 2022/02/20 13:46:13 [debug] 1790#1790: *1 http script copy: "Connection"
 2022/02/20 13:46:13 [debug] 1790#1790: *1 http script copy: "close"
 2022/02/20 13:46:13 [debug] 1790#1790: *1 http script copy: ""
 2022/02/20 13:46:13 [debug] 1790#1790: *1 http script copy: ""
 2022/02/20 13:46:13 [debug] 1790#1790: *1 http proxy header:
 "GET / HTTP/1.0
 Host: www.google.com
 Connection: close

 "
 2022/02/20 13:46:13 [debug] 1790#1790: *1 http cleanup add: 0000560CE3CF5E30
 2022/02/20 13:46:13 [debug] 1790#1790: *1 http finalize request: -4, "/?" a:1, c:2
 2022/02/20 13:46:13 [debug] 1790#1790: *1 http request count:2 blk:0
 2022/02/20 13:46:13 [debug] 1790#1790: *1 http run request: "/?"
 2022/02/20 13:46:13 [debug] 1790#1790: *1 http upstream check client, write event:1, "/"
 2022/02/20 13:46:14 [debug] 1790#1790: *1 http upstream resolve: "/?"
 2022/02/20 13:46:14 [debug] 1790#1790: *1 name was resolved to 142.250.184.100
 2022/02/20 13:46:14 [debug] 1790#1790: *1 name was resolved to 2a00:1450:4002:406::2004
 2022/02/20 13:46:14 [debug] 1790#1790: *1 get rr peer, try: 2
 2022/02/20 13:46:14 [debug] 1790#1790: *1 get rr peer, current: 0000560CE3CF5EB8 -1
 2022/02/20 13:46:14 [debug] 1790#1790: *1 stream socket 12
 2022/02/20 13:46:14 [debug] 1790#1790: *1 epoll add connection: fd:12 ev:80002005
 2022/02/20 13:46:14 [debug] 1790#1790: *1 connect to 142.250.184.100:80, fd:12 #3
如我們所見,我們的初始請求通過代理。緊接著,代理服務器向目標資源發起新請求,其中包含來自初始請求的所有數據。之後,它從資源中獲取響應並將其返回給我們的客戶端:
2022/02/20 13:46:14 [debug] 1790#1790: *1 http proxy status 200 "200 OK"
 2022/02/20 13:46:14 [debug] 1790#1790: *1 http proxy header: "Date: Sun, 20 Feb 2022 12:46:15 GMT"
 2022/02/20 13:46:14 [debug] 1790#1790: *1 http proxy header: "Expires: -1"
 2022/02/20 13:46:14 [debug] 1790#1790: *1 http proxy header: "Cache-Control: private, max-age=0"
 2022/02/20 13:46:14 [debug] 1790#1790: *1 http proxy header: "Content-Type: text/html; charset=ISO-8859-1"
 2022/02/20 13:46:14 [debug] 1790#1790: *1 http proxy header: "P3P: CP="This is not a P3P policy! See g.co/p3phelp for more info.""
 2022/02/20 13:46:14 [debug] 1790#1790: *1 http proxy header: "Server: gws"
 2022/02/20 13:46:14 [debug] 1790#1790: *1 http proxy header: "X-XSS-Protection: 0"
 2022/02/20 13:46:14 [debug] 1790#1790: *1 http proxy header: "X-Frame-Options: SAMEORIGIN"
 2022/02/20 13:46:14 [debug] 1790#1790: *1 http proxy header: "Set-Cookie: 1P_JAR=2022-02-20-12; expires=Tue, 22-Mar-2022 12:46:15 GMT; path=/; domain=.google.com; Secure"
 2022/02/20 13:46:14 [debug] 1790#1790: *1 http proxy header: "Set-Cookie: NID=511=IkyJTmMt6I2b3fHpGNUwdfCkv1q9cjzyeUaxC-cxMZWcbmSi4sVlRlwXJUTRA9ujqQnK2v6DNyhitL3zPRSf7RSIHDCv8aYcUD7jp3vX4sE7ZkiprAWmJo9FlnUJtV9H0IzOFyPck15Jfs0zb1VeOMOjKZk0BZ0XRQ3gNptMOl8; expires=Mon, 22-Aug-2022 12:46:15 GMT; path=/; domain=.google.com; HttpOnly"
 2022/02/20 13:46:14 [debug] 1790#1790: *1 http proxy header: "Accept-Ranges: none"
 2022/02/20 13:46:14 [debug] 1790#1790: *1 http proxy header: "Vary: Accept-Encoding"
 2022/02/20 13:46:14 [debug] 1790#1790: *1 http proxy header done
 2022/02/20 13:46:14 [debug] 1790#1790: *1 xslt filter header
 2022/02/20 13:46:14 [debug] 1790#1790: *1 HTTP/1.1 200 OK
 Server: nginx/1.18.0
 Date: Sun, 20 Feb 2022 12:46:14 GMT
 Content-Type: text/html; charset=ISO-8859-1
 Transfer-Encoding: chunked
 Connection: close
 Expires: -1
 Cache-Control: private, max-age=0
 P3P: CP="This is not a P3P policy! See g.co/p3phelp for more info."
 X-XSS-Protection: 0
 X-Frame-Options: SAMEORIGIN
 Set-Cookie: 1P_JAR=2022-02-20-12; expires=Tue, 22-Mar-2022 12:46:15 GMT; path=/; domain=.google.com; Secure
 Set-Cookie: NID=511=IkyJTmMt6I2b3fHpGNUwdfCkv1q9cjzyeUaxC-cxMZWcbmSi4sVlRlwXJUTRA9ujqQnK2v6DNyhitL3zPRSf7RSIHDCv8aYcUD7jp3vX4sE7ZkiprAWmJo9FlnUJtV9H0IzOFyPck15Jfs0zb1VeOMOjKZk0BZ0XRQ3gNptMOl8; expires=Mon, 22-Aug-2022 12:46:15 GMT; path=/; domain=.google.com; HttpOnly
 Accept-Ranges: none
 Vary: Accept-Encoding

 2022/02/20 13:46:14 [debug] 1790#1790: *1 write new buf t:1 f:0 0000560CE3CF7AD0, pos 0000560CE3CF7AD0, size: 760 file: 0, size: 0
 2022/02/20 13:46:14 [debug] 1790#1790: *1 http write filter: l:0 f:0 s:760
 2022/02/20 13:46:14 [debug] 1790#1790: *1 http cacheable: 0
 2022/02/20 13:46:14 [debug] 1790#1790: *1 http proxy filter init s:200 h:0 c:0 l:-1
 2022/02/20 13:46:14 [debug] 1790#1790: *1 http upstream process upstream
當請求成功發送到目的地時,我們會在日誌中看到響應“200 OK”,這意味著請求被接受並且響應成功返回。從我們的日誌中,我們還可以看到響應返回的所有 HTTP 標頭,逐行列出。目標服務器返回的任何 HTTP 標頭都會自動添加到代理返回對象。
5. 結論
在本教程中,我們學習瞭如何使用 Nginx 服務器設置簡單且輕量級的轉發代理。我們已經了解了轉發代理和 VPN 之間的重要區別。最後,我們還學習瞭如何將基於 JavaScript 的客戶端連接到我們新創建的轉發代理。