使用 AsyncAPI 和 Springwolf 記錄 Spring 事件驅動 API
1. 概述
記錄 API 是構建應用程序的重要組成部分。這是我們與客戶簽訂的共享合同。此外,它詳細記錄了我們的集成點如何工作。該文檔應該易於訪問、理解和實施。
在本教程中,我們將了解Springwolf用於記錄事件驅動的 Spring Boot 服務。 Springwolf 實現了AsyncAPI規範,這是針對事件驅動 API 的OpenAPI規範的改編。 Springwolf 與協議無關,涵蓋 Spring Kafka、Spring RabbitMQ 和 Spring CloudStream 實現。
使用 Spring Kafka 作為我們的事件驅動系統, Springwolf 從代碼中為我們生成一個 AsyncAPI 文檔。一些消費者是被自動檢測到的。其他信息由我們提供。
2. 設置Springwolf
為了開始使用 Springwolf,我們添加依賴項並配置它。
2.1.添加依賴項
假設我們有一個正在運行的帶有 Spring Kafka 的 Spring 應用程序,我們將springwolf-kafka作為pom.xml文件中的依賴項添加到我們的 Maven 項目中:
<dependency>
 <groupId>io.github.springwolf</groupId>
 <artifactId>springwolf-kafka</artifactId>
 <version>0.12.1</version>
</dependency>最新版本可以在Maven Central上找到,並且該項目的網站上提到了對除 Spring Kafka 之外的其他綁定的支持。
2.2. application.properties配置
在最基本的形式中,我們將以下 Springwolf 配置添加到application.properties中:
# Springwolf Configuration
 springwolf.docket.base-package=com.baeldung.boot.documentation.springwolf.adapter
 springwolf.docket.info.title=${spring.application.name}
 springwolf.docket.info.version=1.0.0
 springwolf.docket.info.description=Baeldung Tutorial Application to Demonstrate AsyncAPI Documentation using Springwolf

 # Springwolf Kafka Configuration
 springwolf.docket.servers.kafka.protocol=kafka
 springwolf.docket.servers.kafka.url=localhost:9092
第一個塊設置一般 Springwolf 配置。這包括base-package ,Springwolf 使用它來自動檢測偵聽器。此外,我們在 AsyncAPI 文檔中顯示的docket配置鍵下設置一般信息。
然後,我們設置springwolf-kafka具體配置。同樣,這齣現在 AsyncAPI 文檔中。
2.3.確認
現在,我們已準備好運行我們的應用程序。應用程序啟動後,AsyncAPI 文檔默認位於/springwolf/docs路徑:
http://localhost:8080/springwolf/docs3.AsyncAPI文檔
AsyncAPI 文檔遵循與 OpenAPI 文檔類似的結構。首先,我們只看關鍵部分。該規範可在 AsyncAPI 網站上找到。為簡潔起見,我們將僅查看屬性的子集。
在以下小節中,我們將逐步查看 JSON 格式的 AsyncAPI 文檔。我們從以下結構開始:
{
 "asyncapi": "2.6.0",
 "info": { ... },
 "servers": { ... },
 "channels": { ... },
 "components": { ... }
 }
3.1. info部分
文檔的info部分包含有關應用程序本身的信息。這至少包括以下字段: title 、 application version和description.
根據我們添加到配置中的信息,創建以下結構:
"info": {
 "title": "Baeldung Tutorial Springwolf Application",
 "version": "1.0.0",
 "description": "Baeldung Tutorial Application to Demonstrate AsyncAPI Documentation using Springwolf"
 }
3.2. servers部分
同樣, servers部分包含有關我們的 Kafka 代理的信息,並且基於上面的application.properties配置:
"servers": {
"kafka": {
"url": "localhost:9092",
"protocol": "kafka"
}
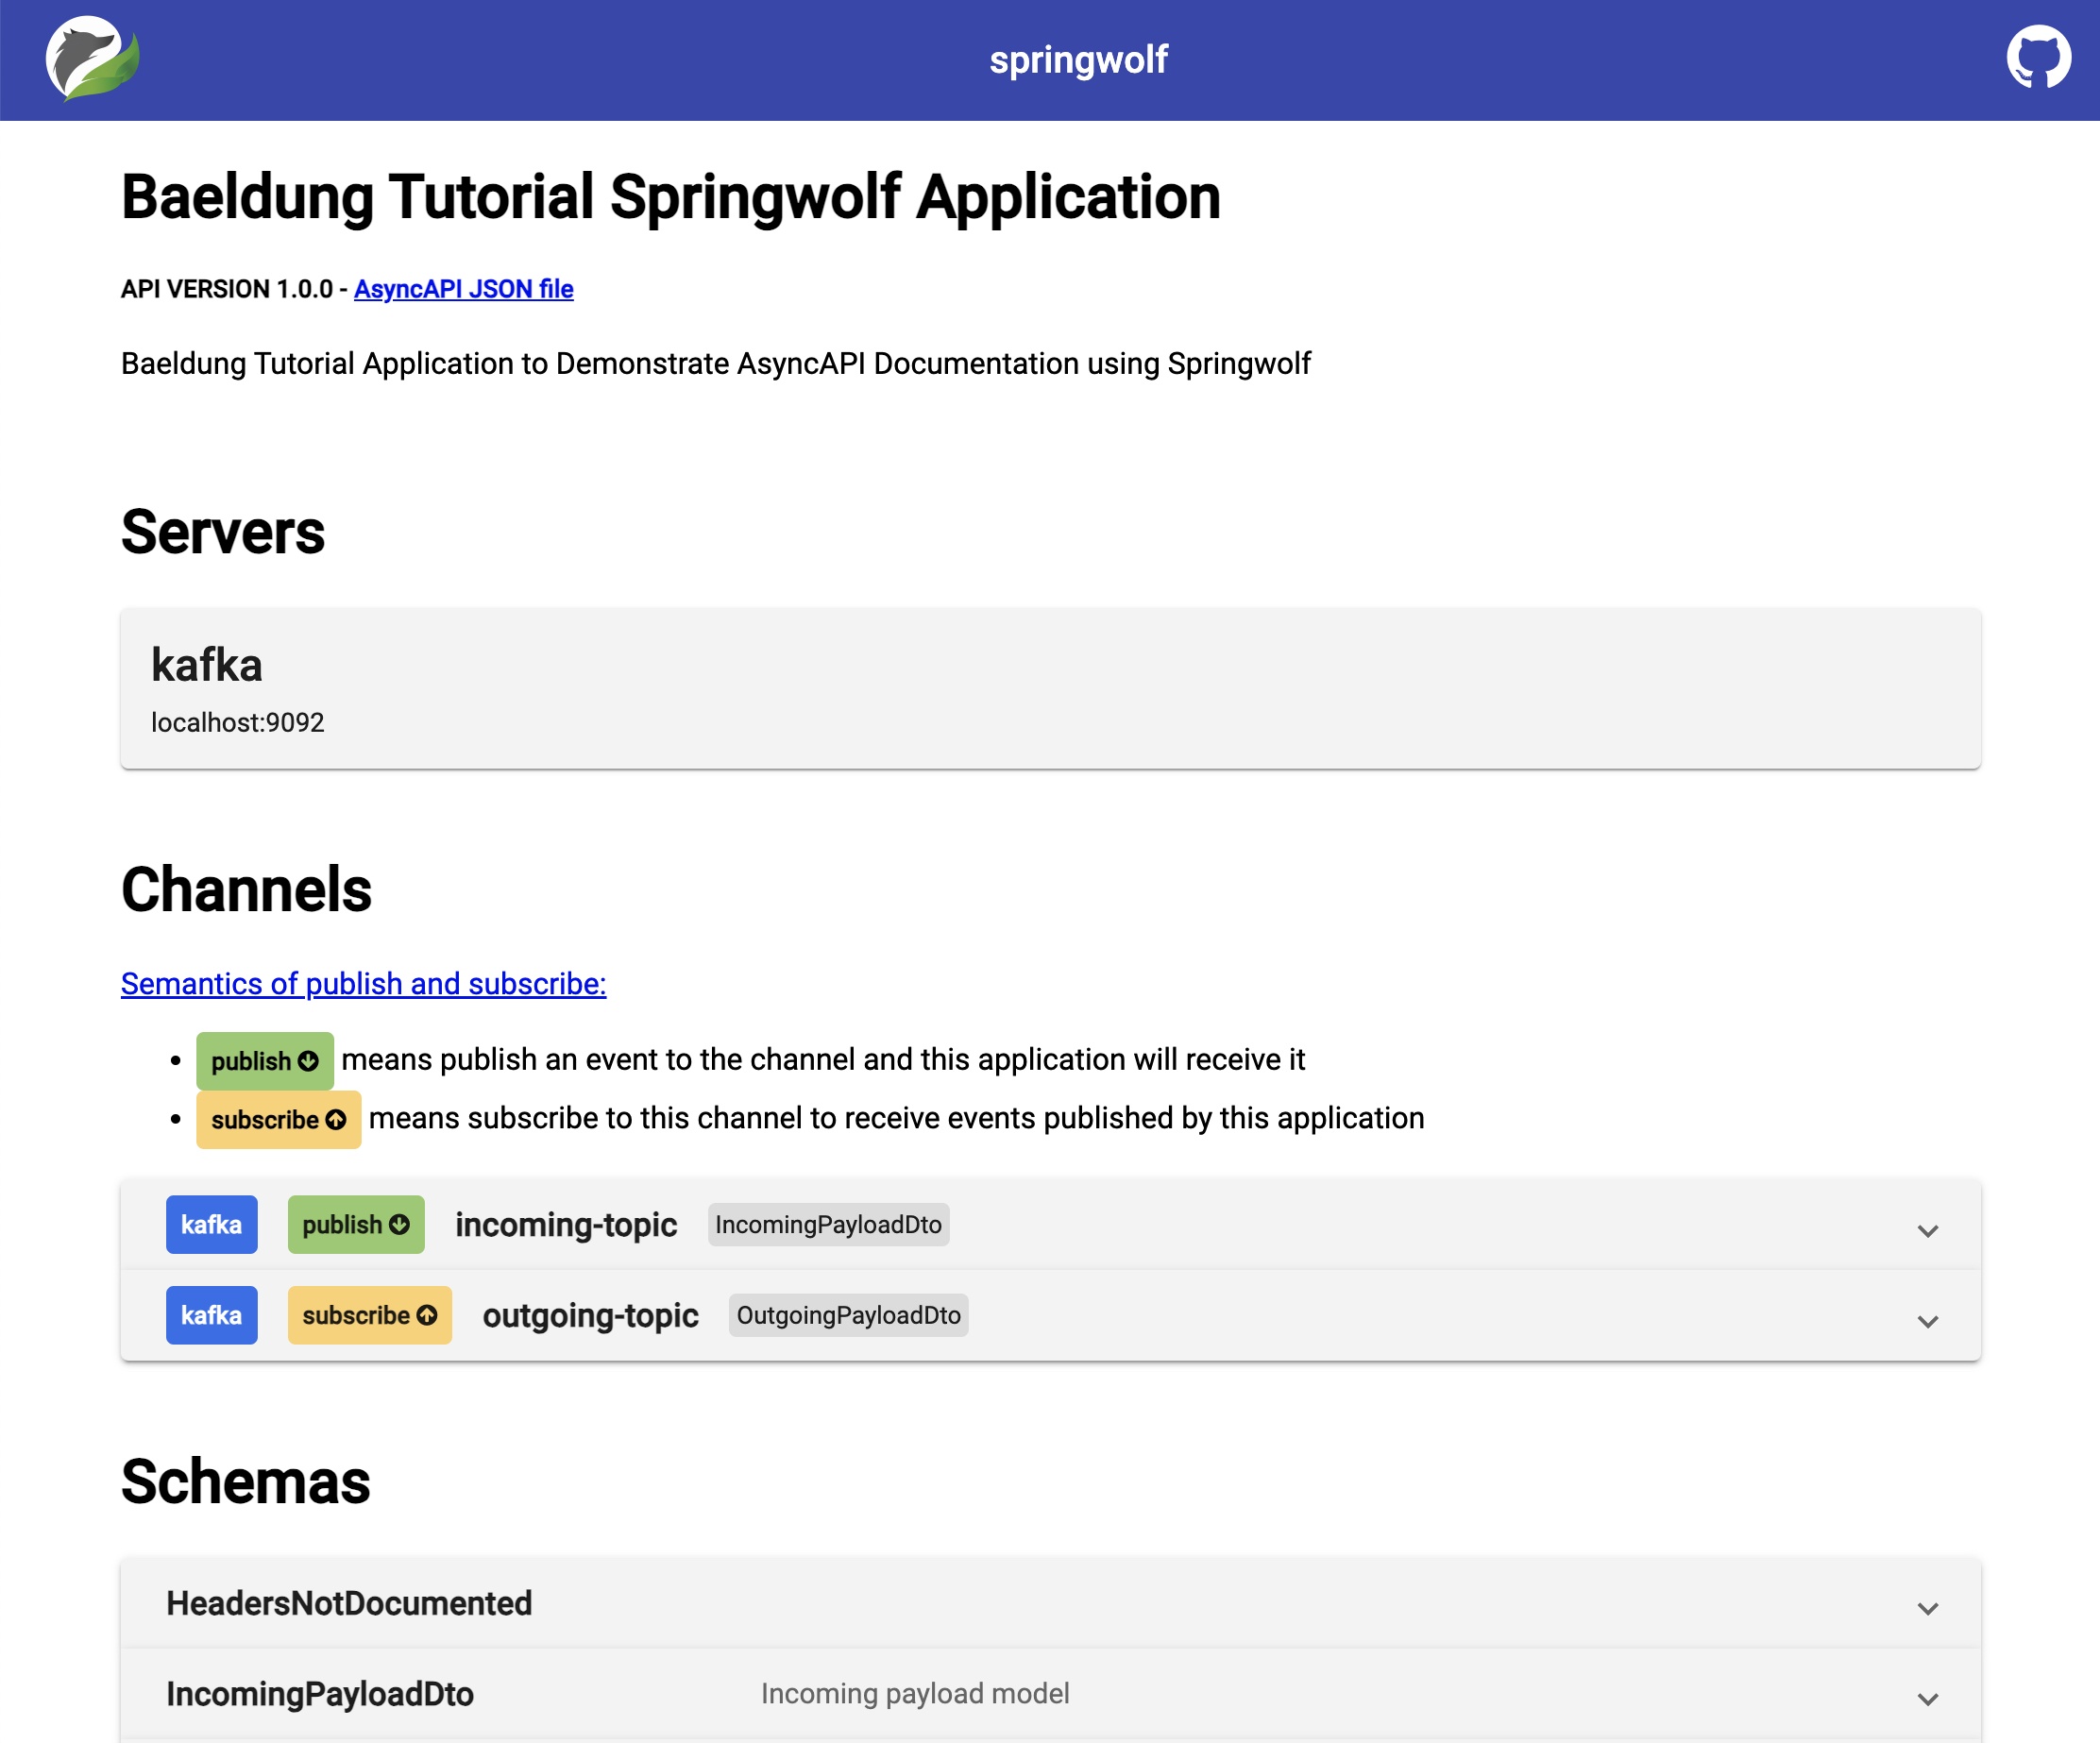
}3.3. channels部分
此時此部分為空,因為我們尚未在應用程序中配置任何消費者或生產者。在後面的部分中配置它們之後,我們將看到以下結構:
"channels": {
 "my-topic-name": {
 "publish": {
 "message": {
 "title": "IncomingPayloadDto",
 "payload": {
 "$ref": "#/components/schemas/IncomingPayloadDto"
 }
 }
 }
 }
}通用術語channels指的是 Kafka 術語中的topics 。
每個主題可以提供兩種操作: publish和/或subscribe 。值得注意的是,從應用程序的角度來看,語義可能看起來很混亂:
- 將消息
publish到此通道,以便我們的應用程序可以使用它們。 -
subscribe此頻道以接收來自我們應用程序的消息。
操作對象本身包含description和message信息。 message對象包含title和payload等信息。
為了避免在多個主題和操作中重複相同的負載信息, AsyncAPI 使用$ref表示法來指示 AsyncAPI 文檔的components部分中的引用。
3.4. components部分
同樣,此部分此時為空,但將具有以下結構:
"components": {
 "schemas": {
 "IncomingPayloadDto": {
 "type": "object",
 "properties": {
 ...
 "someString": {
 "type": "string"
 }
 },
 "example": {
 "someEnum": "FOO2",
 "someLong": 1,
 "someString": "string"
 }
 }
 }
 }
Components 部分包含$ref引用的所有詳細信息,包括#/components/schemas/IncomingPayloadDto 。除了數據type和有效負載的properties之外,模式還可以包含有效負載的example (JSON)。
4. 記錄消費者
Springwolf 自動檢測所有@KafkaListener註解,如下所示。此外,我們使用@AsyncListener註釋來手動提供更多詳細信息。
4.1.自動檢測@KafkaListener註解
通過在方法上使用 Spring-Kafka 的@KafkaListener註釋,Springwolf 自動在base-package中找到消費者:
@KafkaListener(topics = TOPIC_NAME)
 public void consume(IncomingPayloadDto payload) {
 // ...
 }
現在,AsyncAPI 文檔確實包含通道TOPIC_NAME以及publish操作和IncomingPayloadDto架構,如我們之前所見。
4.2.通過@AsyncListener註釋手動記錄消費者
將自動檢測和AsyncListener一起使用可能會導致重複。為了能夠手動添加更多信息,我們完全禁用@KafkaListener自動檢測並將以下行添加到application.properties文件中:
springwolf.plugin.kafka.scanner.kafka-listener.enabled=false接下來,我們將 Springwolf AsyncListener註解添加到同一方法中,並為 AsyncAPI 文檔提供附加信息:
@KafkaListener(topics = TOPIC_NAME)
@AsyncListener(
operation = @AsyncOperation(
channelName = TOPIC_NAME,
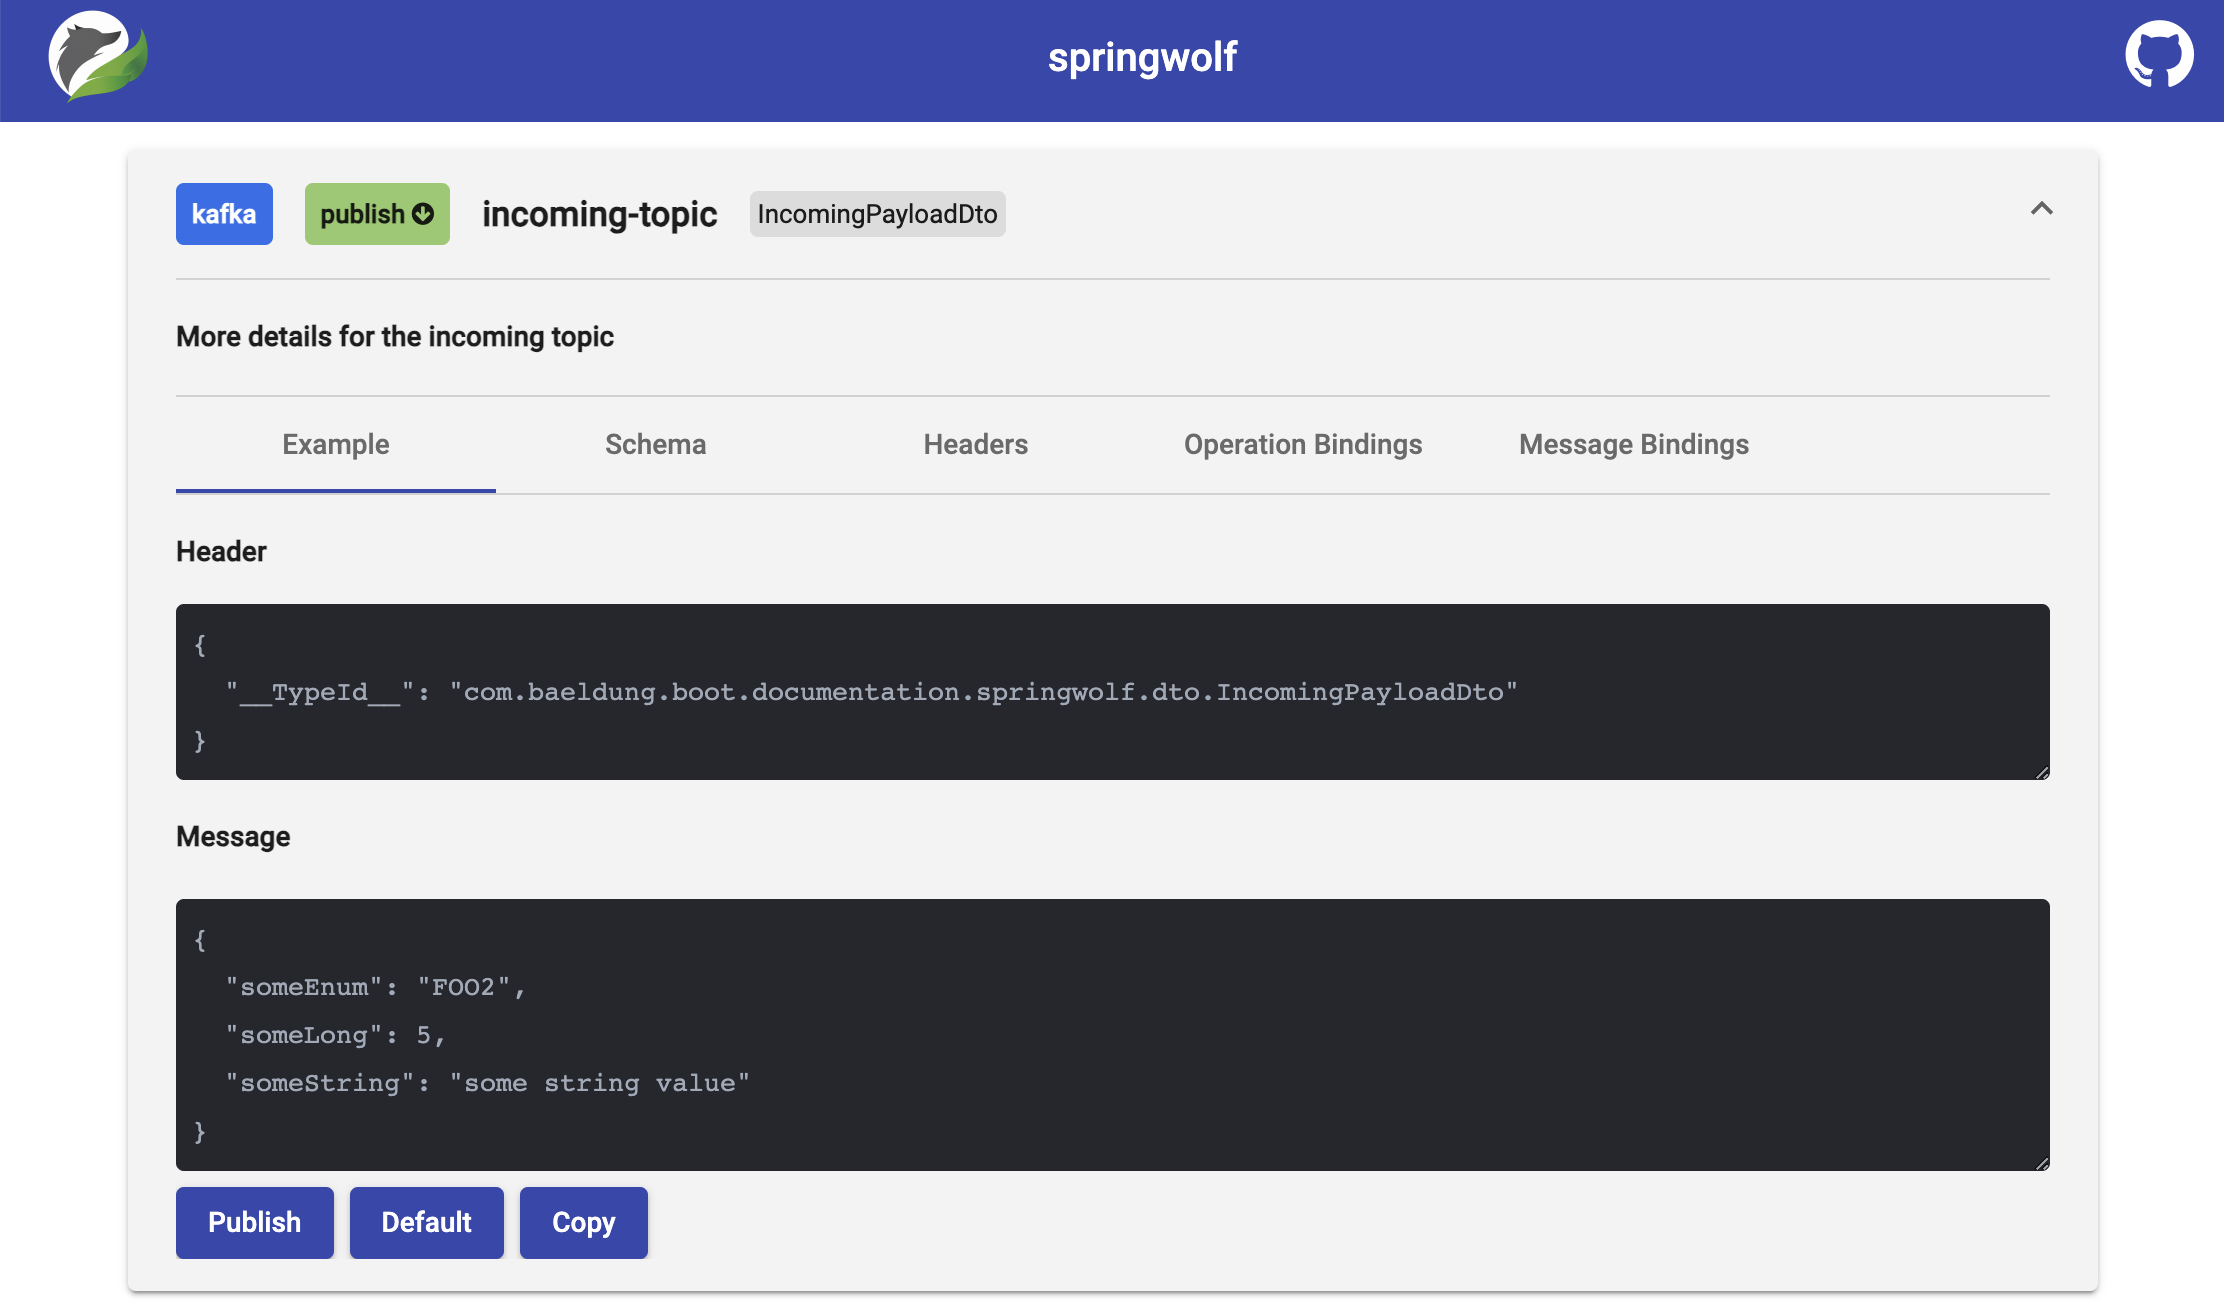
description = "More details for the incoming topic"
)
)
@KafkaAsyncOperationBinding
public void consume(IncomingPayloadDto payload) {
// ...
}此外,我們添加了KafkaAsyncOperationBinding註釋,以將通用@AsyncOperation註釋與servers部分中的 Kafka 代理連接起來。 Kafka 協議特定信息也是使用此註釋設置的。
更改後,AsyncAPI 文檔包含更新的文檔。
5. 記錄生產者
使用 Springwolf @AsyncPublisher註釋手動記錄生產者。
5.1.通過@AsyncPublisher註釋手動記錄生產者
與@AsyncListener註釋類似,我們將@AsyncPublisher註釋添加到publisher方法中,並添加@KafkaAsyncOperationBinding註釋:
@AsyncPublisher(
 operation = @AsyncOperation(
 channelName = TOPIC_NAME,
 description = "More details for the outgoing topic"
 )
 )
 @KafkaAsyncOperationBinding
 public void publish(OutgoingPayloadDto payload) {
 kafkaTemplate.send(TOPIC_NAME, payload);
 }
基於此,Springwolf 使用上面提供的信息為TOPIC_NAME頻道添加了對channels部分的subscribe操作。 payload type是從方法簽名中提取的,其方式與@AsyncListener的提取方式相同。
6. 加強文檔記錄
AsyncAPI 規範涵蓋的功能比我們上面介紹的還要多。接下來,我們記錄默認的 Spring Kafka 標頭__TypeId__並改進有效負載的文檔。
6.1.添加 Kafka 標頭
當運行本機 Spring Kafka 應用程序時,Spring Kafka 會自動添加標頭__TypeId__以協助消費者中有效負載的反序列化。
我們通過在@AsyncListener (或@AsyncPublisher )註釋的@AsyncOperation上設置headers字段,將__TypeId__標頭添加到文檔中:
@AsyncListener(
 operation = @AsyncOperation(
 ...,
 headers = @AsyncOperation.Headers(
 schemaName = "SpringKafkaDefaultHeadersIncomingPayloadDto",
 values = {
 // this header is generated by Spring by default
 @AsyncOperation.Headers.Header(
 name = DEFAULT_CLASSID_FIELD_NAME,
 description = "Spring Type Id Header",
 value = "com.baeldung.boot.documentation.springwolf.dto.IncomingPayloadDto"
 ),
 }
 )
 )
 )
現在,AsyncAPI 文檔包含一個新的字段headers作為message對象的一部分。
6.2.添加有效負載詳細信息
我們使用 Swagger @Schema註釋來提供有關有效負載的附加信息。在下面的代碼片段中,我們設置了description 、 example值以及該字段是否為required :
@Schema(description = "Outgoing payload model")
 public class OutgoingPayloadDto {
 @Schema(description = "Foo field", example = "bar", requiredMode = NOT_REQUIRED)
 private String foo;

 @Schema(description = "IncomingPayload field", requiredMode = REQUIRED)
 private IncomingPayloadDto incomingWrapped;
}基於此,我們在AsyncAPI文檔中看到了豐富的OutgoingPayloadDto模式:
"OutgoingPayloadDto": {
 "type": "object",
 "description": "Outgoing payload model",
 "properties": {
 "incomingWrapped": {
 "$ref": "#/components/schemas/IncomingPayloadDto"
 },
 "foo": {
 "type": "string",
 "description": "Foo field",
 "example": "bar"
 }
 },
 "required": [
 "incomingWrapped"
 ],
 "example": {
 "incomingWrapped": {
 "someEnum": "FOO2",
 "someLong": 5,
 "someString": "some string value"
 },
 "foo": "bar"
 }
 }
我們的應用程序的完整 AsyncAPI 文檔可在鏈接的示例項目中找到。
7. 使用Springwolf UI
Springwolf 有自己的 UI,但可以使用任何符合 AsyncAPI 的文檔渲染器。
7.1.添加springwolf-ui依賴項
要使用springwolf-ui ,我們將依賴項添加到pom.xml ,重建並重新啟動我們的應用程序:
<dependency>
 <groupId>io.github.springwolf</groupId>
 <artifactId>springwolf-ui</artifactId
 <version>0.8.0</version>
 </dependency>
7.2.查看AsyncAPI文檔
現在,我們通過訪問http://localhost:8080/springwolf/asyncapi-ui.html在瀏覽器中打開文檔。
與 AsyncAPI 文檔相比,該網頁具有類似的結構,並顯示有關application的信息、有關servers 、 channels,和schemas的詳細信息:
7.3.發布消息
Springwolf允許我們直接從瀏覽器發布消息。展開channel後,單擊Publish按鈕會直接將消息發送到 Kafka 上。消息綁定(包括Kafka Message Key)、標頭和消息可根據需要進行調整:
出於安全考慮,該功能默認處於禁用狀態。為了啟用發布,我們將以下行添加到application.properties文件中:
springwolf.plugin.kafka.publishing.enabled=true八、結論
在本文中,我們在現有的 Spring Boot Kafka 應用程序中設置了 Springwolf。
使用消費者自動檢測,自動生成符合 AsyncAPI 的文檔。我們通過手動配置進一步增強了文檔。
除了通過提供的 REST 端點下載 AsyncAPI 文檔之外,我們還使用springwolf-ui在瀏覽器中查看文檔。
與往常一樣,示例的源代碼可在 GitHub 上獲取。