使用Spring Boot整潔架構
1.概述
在開髮長期系統時,我們一個可變的環境。
通常,由於各種原因,我們的功能要求,框架,I / O設備,甚至我們的代碼設計都可能會更改。考慮到這一點,考慮到我們周圍的所有不確定因素,“整潔架構”是高可維護代碼的指南。
在本文中,我們將根據Robert C. Martin的Clean Architecture創建一個用戶註冊API的示例。我們將使用他的原始層-實體,用例,接口適配器和框架/驅動程序。
2.整潔架構概述
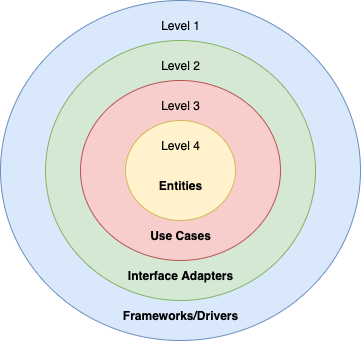
整潔的體系結構可編譯許多代碼設計和原理,例如SOLID ,穩定的抽像等。但是,核心思想是**根據業務價值將系統劃分為多個級別**。因此,最高級別具有業務規則,每一個較低級別的業務規則都離I / O設備越來越近。
同樣,我們可以將級別轉換為層。在這種情況下,情況恰恰相反。內層等於最高級別,依此類推:

考慮到這一點,我們可以根據業務需要設置多個級別。但是,始終要考慮依賴性規則–較高的級別絕不能依賴較低的級別**。
3.規則
讓我們開始為我們的用戶註冊API定義系統規則。一,業務規則:
- 用戶密碼必須超過五個字符
其次,我們有應用規則。它們可以是不同的格式,例如用例。我們將使用用例的短語:
- 系統接收用戶名和密碼,驗證用戶是否不存在,並保存新用戶以及創建時間
請注意,這裡沒有提到任何數據庫,UI或類似內容。因為我們的公司不在乎這些細節,所以我們的代碼也不在乎**。
4.Entity實體層
正如整洁架構所建議的那樣,讓我們從業務規則開始:
interface User {

 boolean passwordIsValid();


 String getName();


 String getPassword();

}並且,一個UserFactory :
interface UserFactory {

 User create(String name, String password);

}我們創建用戶工廠方法的原因有兩個。保留穩定的抽象原理並隔離用戶創建。
接下來,讓我們同時實現:
class CommonUser implements User {


 String name;

 String password;


 @Override

 public boolean passwordIsValid() {

 return password != null && password.length() > 5;

 }


 // Constructor and getters

 }
class CommonUserFactory implements UserFactory {
@Override
public User create(String name, String password) {
return new CommonUser(name, password);
}
}如果我們的業務很複雜,那麼我們應該盡可能清晰地構建域代碼。因此,此層是應用設計模式的好地方。特別是,應該考慮領域驅動的設計。
4.1單元測試
現在,讓我們測試我們的CommonUser :
@Test

 void given123Password_whenPasswordIsNotValid_thenIsFalse() {

 User user = new CommonUser("Baeldung", "123");


 assertThat(user.passwordIsValid()).isFalse();

}如我們所見,單元測試非常清楚。畢竟,缺少模擬是這一層的一個好信號。
通常,如果我們在這裡開始考慮模擬,也許我們正在將實體與用例混合在一起。
5.用例層
用例是**與系統自動化相關**的**規則**。在“乾淨的體系結構”中,我們將其稱為“交互器”。
5.1。 UserRegisterInteractor
首先,我們將構建我們的UserRegisterInteractor以便我們可以看到前進的方向。然後,我們將創建並討論所有使用的部分:
class UserRegisterInteractor implements UserInputBoundary {


 final UserRegisterDsGateway userDsGateway;

 final UserPresenter userPresenter;

 final UserFactory userFactory;


 // Constructor


 @Override

 public UserResponseModel create(UserRequestModel requestModel) {

 if (userDsGateway.existsByName(requestModel.getName())) {

 return userPresenter.prepareFailView("User already exists.");

 }

 User user = userFactory.create(requestModel.getName(), requestModel.getPassword());

 if (!user.passwordIsValid()) {

 return userPresenter.prepareFailView("User password must have more than 5 characters.");

 }

 LocalDateTime now = LocalDateTime.now();

 UserDsRequestModel userDsModel = new UserDsRequestModel(user.getName(), user.getPassword(), now);


 userDsGateway.save(userDsModel);


 UserResponseModel accountResponseModel = new UserResponseModel(user.getName(), now.toString());

 return userPresenter.prepareSuccessView(accountResponseModel);

 }

}如我們所見,我們正在執行所有用例步驟。同樣,該層負責控制實體的舞蹈。儘管如此,我們**並未對UI或數據庫的工作方式做任何假設。**但是,我們正在使用UserDsGateway和UserPresenter 。那麼,我們怎麼不認識他們呢?因為,連同UserInputBoundary ,這些都是我們的輸入和輸出邊界。
5.2。輸入和輸出邊界
邊界是定義組件如何交互的契約。**輸入邊界暴露出我們的用例到外層是:**
interface UserInputBoundary {

 UserResponseModel create(UserRequestModel requestModel);

}接下來,我們有了利用外層的輸出邊界。首先,讓我們定義數據源網關:
interface UserRegisterDsGateway {

 boolean existsByName(String name);


 void save(UserDsRequestModel requestModel);

 }
二,視圖展示者:
interface UserPresenter {

 UserResponseModel prepareSuccessView(UserResponseModel user);


 UserResponseModel prepareFailView(String error);

 }
請注意,我們使用的是**依賴倒置原則,使我們的業務擺脫了數據庫和UI等細節的困擾**。
5.3。解耦模式
在繼續之前,請注意**邊界是**如何**定義系統的自然劃分的契約**。但是我們還必須決定如何交付我們的應用程序:
- 整體式-可能使用某些封裝結構來組織
- 通過使用模塊
- 通過使用服務/微服務
考慮到這一點,我們可以**使用任何去耦模式達到干淨的架構目標。因此,我們應該準備根據當前和將來的業務需求在這些策略之間進行更改**。選擇了我們的解耦模式後,應根據我們的邊界進行代碼劃分。
5.4。請求和響應模型
到目前為止,我們已經使用接口跨層創建了操作。接下來,讓我們看看如何跨這些邊界傳輸數據。
注意我們所有的邊界如何僅處理String或Model對象:
class UserRequestModel {


 String login;

 String password;


 // Getters, setters, and constructors

}基本上,只有**簡單的數據結構才能跨越邊界**。而且,所有Models都只有字段和訪問器。另外,數據對象屬於內部。因此,我們可以保留依賴性規則。
但是為什麼我們有這麼多類似的物體?當我們得到重複的代碼時,它可以有兩種類型:
- 錯誤或偶然的重複–代碼相似是偶然的,因為每個對像都有不同的更改原因。如果我們嘗試刪除它,我們將冒違反單一責任原則的風險。
- 真正的重複–出於相同的原因,代碼會更改。因此,我們應該將其刪除
由於每個模型都有不同的責任,所以我們得到了所有這些對象。
5.5。測試UserRegisterInteractor
現在,讓我們創建單元測試:
@Test

 void givenBaeldungUserAnd12345Password_whenCreate_thenSaveItAndPrepareSuccessView() {

 given(userDsGateway.existsByIdentifier("identifier"))

 .willReturn(true);


 interactor.create(new UserRequestModel("baeldung", "123"));


 then(userDsGateway).should()

 .save(new UserDsRequestModel("baeldung", "12345", now()));

 then(userPresenter).should()

 .prepareSuccessView(new UserResponseModel("baeldung", now()));

 }
我們可以看到,大多數用例測試都是關於控制實體和邊界請求的。而且,我們的界面使我們可以輕鬆地模擬細節。
6.接口適配器
至此,我們完成了所有業務。現在,讓我們開始插入我們的細節。
我們的業務應該只處理最方便的數據格式,我們的外部代理(如數據庫或UI)也應該處理。但是,這種格式通常是不同的。因此,接口適配器層負責轉換數據。
6.1。使用JPA的UserRegisterDsGateway
首先,讓我們使用JPA映射user表:
@Entity

 @Table(name = "user")

 class UserDataMapper {


 @Id

 String name;


 String password;


 LocalDateTime creationTime;


 //Getters, setters, and constructors

 }
如我們所見, Mapper目標是將我們的對象映射到數據庫格式。
接下來,使用我們的實體進行JpaRepository :
@Repository

 interface JpaUserRepository extends JpaRepository<UserDataMapper, String> {

 }
假設我們將使用spring-boot,那麼這就是保存用戶的全部。
現在,是時候實現我們的UserRegisterDsGateway:
class JpaUser implements UserRegisterDsGateway {


 final JpaUserRepository repository;


 // Constructor


 @Override

 public boolean existsByName(String name) {

 return repository.existsById(name);

 }


 @Override

 public void save(UserDsRequestModel requestModel) {

 UserDataMapper accountDataMapper = new UserDataMapper(requestModel.getName(), requestModel.getPassword(), requestModel.getCreationTime());

 repository.save(accountDataMapper);

 }

}在大多數情況下,代碼可以說明一切。除了我們的方法外,請注意UserRegisterDsGateway's名稱。如果我們改為選擇UserDsGateway ,那麼其他User用例將很容易違反接口隔離原則。
6.2。 User註冊API
現在,讓我們創建我們的HTTP適配器:
@RestController

 class UserRegisterController {


 final UserInputBoundary userInput;


 // Constructor


 @PostMapping("/user")

 UserResponseModel create(@RequestBody UserRequestModel requestModel) {

 return userInput.create(requestModel);

 }

}如我們所見,這裡的唯一目標是接收請求並將響應發送給客戶端。
6.3 格式化響應
在響應之前,我們應該格式化響應:
class UserResponseFormatter implements UserPresenter {


 @Override

 public UserResponseModel prepareSuccessView(UserResponseModel response) {

 LocalDateTime responseTime = LocalDateTime.parse(response.getCreationTime());

 response.setCreationTime(responseTime.format(DateTimeFormatter.ofPattern("hh:mm:ss")));

 return response;

 }


 @Override

 public UserResponseModel prepareFailView(String error) {

 throw new ResponseStatusException(HttpStatus.CONFLICT, error);

 }

}我們的UserRegisterInteractor迫使我們創建一個演示者。但是,表示規則僅與適配器有關。此外,W henever東西是很難測試,我們應該把它分成一個可測試和謙虛的對象。因此, UserResponseFormatter可以輕鬆地使我們驗證演示規則:
@Test

 void givenDateAnd3HourTime_whenPrepareSuccessView_thenReturnOnly3HourTime() {

 UserResponseModel modelResponse = new UserResponseModel("baeldung", "2020-12-20T03:00:00.000");

 UserResponseModel formattedResponse = userResponseFormatter.prepareSuccessView(modelResponse);


 assertThat(formattedResponse.getCreationTime()).isEqualTo("03:00:00");

}如我們所見,我們在將所有邏輯發送到視圖之前已經對其進行了測試。因此,只有較不起眼的物體處於較難測試的部分。
7.驅動程序和框架
實際上,我們通常不在此處編寫代碼。這是因為該層表示與外部代理的最低連接級別。例如,H2驅動程序連接到數據庫或Web框架。在這種情況下,我們將使用spring-boot作為Web和依賴注入框架。因此,我們需要它的啟動點:
@SpringBootApplication

 public class CleanArchitectureApplication {

 public static void main(String[] args) {

 SpringApplication.run(CleanArchitectureApplication.class);

 }

}到目前為止,我們**在業務中**沒有使用任何**spring註釋**。除了特定於彈簧的適配器,如UserRegisterController 。這是因為**我們應該**將spring-boot視為其他任何細節。
8.可怕的主要階級
最後,最後一塊!
到目前為止,我們遵循穩定的抽象原理。同樣,我們通過反轉控制來保護我們的內層免受外部代理的攻擊。最後,我們將所有對象創建與使用分開。在這一點上,我們需要創建剩餘的依賴項並將它們注入到我們的項目中:
@Bean

 BeanFactoryPostProcessor beanFactoryPostProcessor(ApplicationContext beanRegistry) {

 return beanFactory -> {

 genericApplicationContext(

 (BeanDefinitionRegistry) ((AnnotationConfigServletWebServerApplicationContext) beanRegistry)

 .getBeanFactory());

 };

 }


 void genericApplicationContext(BeanDefinitionRegistry beanRegistry) {

 ClassPathBeanDefinitionScanner beanDefinitionScanner = new ClassPathBeanDefinitionScanner(beanRegistry);

 beanDefinitionScanner.addIncludeFilter(removeModelAndEntitiesFilter());

 beanDefinitionScanner.scan("com.baeldung.pattern.cleanarchitecture");

 }


 static TypeFilter removeModelAndEntitiesFilter() {

 return (MetadataReader mr, MetadataReaderFactory mrf) -> !mr.getClassMetadata()

 .getClassName()

 .endsWith("Model");

}在我們的例子中,我們使用spring-boot依賴注入來創建所有實例。因為我們沒有使用@Component ,所以我們正在掃描根包,而只忽略Model對象。
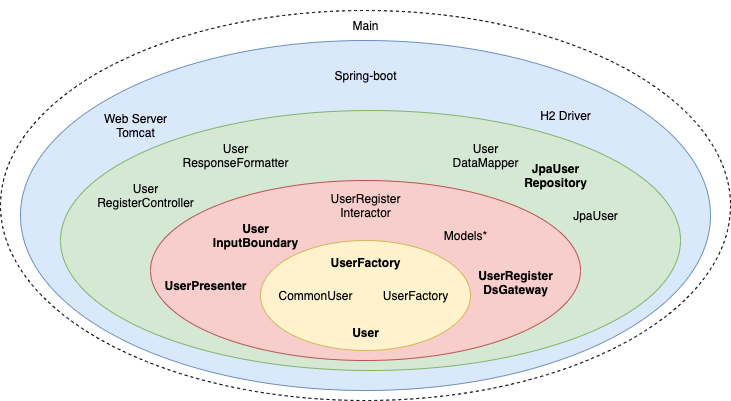
儘管此策略可能看起來更複雜,但它使我們的業務與DI框架脫鉤。另一方面,主要階級掌握了我們整個系統的力量。這就是為什麼乾淨的體系結構在一個包含所有其他層的特殊層中考慮它的原因:

9.結論
在本文中,我們了解了Bob叔叔的整潔架構是如何在許多設計模式和原則之上構建的。另外,我們使用Spring Boot創建了一個用例。
儘管如此,我們仍保留了一些原則。但是,他們全都朝著同一方向前進。我們可以通過引用它的創建者來概括它:“一個好的架構師必須最大化未做出的決定的數量。”並且我們通過使用邊界保護我們的業務代碼不受細節影響來做到這一點。