RESTHeart 簡介
1. 簡介
RESTHeart是一個基於 Java 的框架,它允許我們在MongoDB之上快速建立 HTTP API。它使我們能夠以最少的設定將 MongoDB 集合公開為 REST 和 GraphQL API,同時仍允許我們根據需要控制事物。
在本教程中,我們將快速了解 RESTHeart API 框架。
2.什麼是 RESTHeart?
RESTHeart 提供了一個基於 MongoDB 建構的開源 API 伺服器。它會自動將我們的集合公開為 REST 和 GraphQL 端點,使我們無需編寫任何程式碼即可建立 API 。
開箱即用,我們得到:
- 透過 HTTP 和 GraphQL 提供全面的 CRUD 支持
- 基於角色的存取控制和身份驗證
- 用於使用者和角色管理的內建管理 API
- 透過 Java 外掛程式或配置實作自訂行為的擴充點
這為建立基於 HTTP 的 API 提供了零代碼解決方案,從而實現快速實作。必要時,我們還可以整合自訂 Java 程式碼,以實現開箱即用無法實現的額外功能。
3. 運行 RESTHeart
如果我們想在本地運行 RESTHeart,我們需要安裝 Java 21 或更高版本。此外,我們還需要下載RESTHeart 發行版。下載並解壓縮後,我們可以透過執行restheart.jar立即啟動服務:
$ java -jar restheart.jar

 17:39:17.943 [main] INFO org.restheart.Bootstrapper - Starting RESTHeart instance default

 17:39:17.945 [main] INFO org.restheart.Bootstrapper - Version 8.4.0

 .....

 17:39:19.188 [main] INFO org.restheart.Bootstrapper - RESTHeart started
無需任何配置,這將嘗試使用可在 127.0.0.1:27017 上存取且不需要任何憑證的 MongoDB。
或者,提供可用於執行 RESTHeart 的 Docker 映像。這也使我們能夠運行包含 MongoDB 的 Docker Compose 設置,因此它可以作為單一堆疊啟動。為此,我們需要一個docker-compose.yml檔案:
$ cat docker-compose.yml

 services:

 mongodb:

 image: mongo:latest

 container_name: mongodb

 ports:

 - "27017:27017"

 networks:

 - mongo-restheart-network


 restheart:

 image: softinstigate/restheart:latest

 container_name: restheart

 ports:

 - "8080:8080"

 networks:

 - mongo-restheart-network

 environment:

 MONGO_URI: mongodb://mongodb:27017

 depends_on:

 - mongodb


 networks:

 mongo-restheart-network:

driver: bridge然後我們可以使用docker compose啟動服務,然後就可以開始了:
$ docker compose up -d

 [+] Running 3/3

 Network restheart_mongo-restheart-network Created

 Container mongodb Started

Container restheart Started一旦一切開始,我們就可以透過呼叫伺服器上的/ping端點來測試設定:
$ curl localhost:8080/ping

 {"message": "Greetings from RESTHeart!", "client_ip": "192.168.65.1", "host": "localhost:8080", "version": "8.4.0"}
至此,我們已經擁有了功能齊全的服務。
4. 身份驗證和用戶
對我們的 RESTHeart 服務發出的大多數 API 呼叫都需要身份驗證,RESTHeart 會自動處理。例如,如果我們對根資源發出未經驗證的請求,那麼我們將收到 HTTP 401 Unauthorized回應:
$ curl -v localhost:8080/

 > GET / HTTP/1.1

 >

 < HTTP/1.1 401 Unauthorized

 < WWW-Authenticate: Basic realm="RESTHeart Realm"
預設情況下,使用者記錄都在我們的 MongoDB 資料庫的users集合中進行管理。如果我們針對一個空資料庫啟動 RESTHeart,則會自動建立此集合,並在其中新增一個admin使用者:
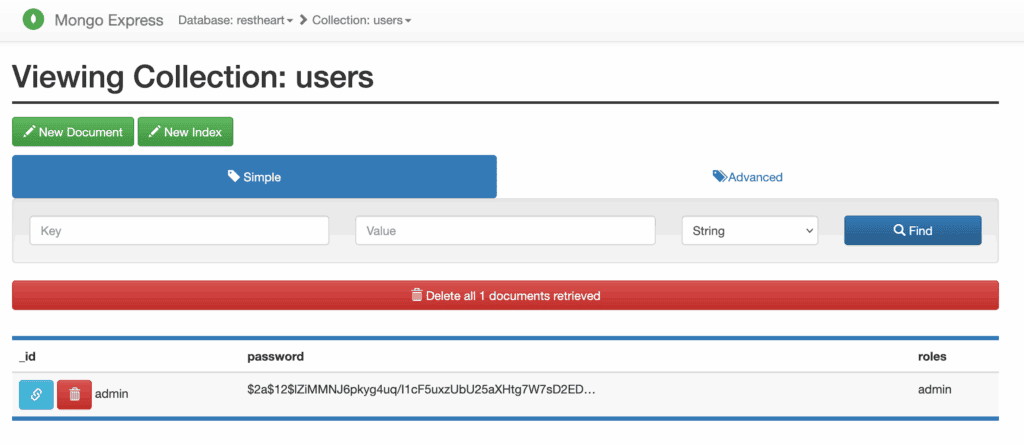
雖然密碼已安全散列且無法查看,但預設憑證由使用者名稱admin和密碼secret組成。我們現在可以使用以下憑證再次發出請求:
$ curl -v -u admin:secret localhost:8080/

 > GET / HTTP/1.1

 > Authorization: Basic YWRtaW46c2VjcmV0

 >

 < HTTP/1.1 200 OK

 < Content-Type: application/json

 <

 ["acl", "users"]
現在一切正常,我們得到了預期的回應。
5. 使用 RESTHeart 進行 CRUD 操作
RESTHeart 會自動從我們的資料庫中公開 MongoDB 集合,以便我們可以透過標準 REST 和 GraphQL API 以最少的努力讀取和操作它們。
5.1. REST API
RESTHeart 公開了一個 REST API,其中包含針對每個集合的一組標準 URL 模式:
-
GET /<collection>– 搜尋集合 -
GET /<collection>/<id>– 從集合中取得記錄 -
POST /<collection>– 在集合中建立新記錄 -
PUT /<collection>/<id>– 取代集合中的一筆記錄 -
PATCH /<collection>/<id>– 修補集合中的記錄 -
DELETE /<collection>/<id>– 從集合中刪除一筆記錄
我們也可以透過發送特殊請求來建立新的集合。為此,我們直接向集合的端點發出PUT請求:
$ curl -v -u admin:secret -X PUT localhost:8080/posts

 > PUT /posts HTTP/1.1

 >

 < HTTP/1.1 200 OK

 < Content-Type: application/json

 < Content-Length: 0

<一旦我們有一個集合,我們就使用POST請求在其中建立一個新記錄:
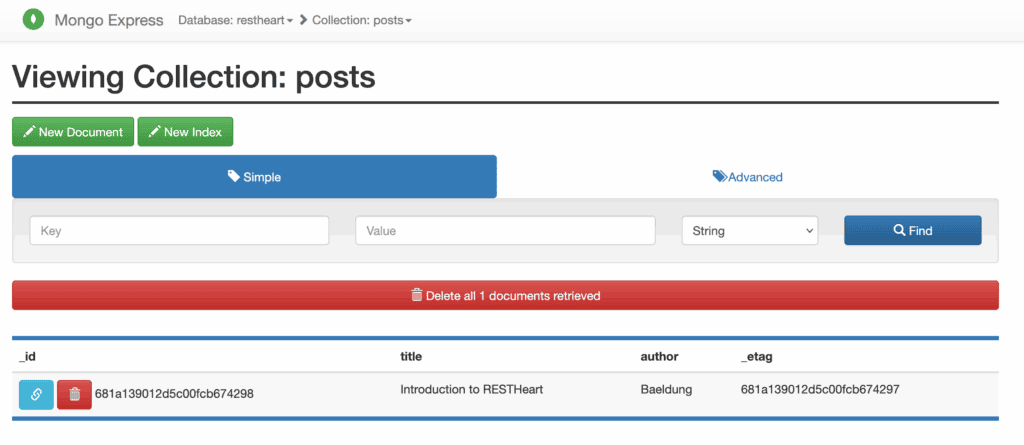
$ curl -v -u admin:secret -X POST localhost:8080/posts -d '{"title": "Introduction to RESTHeart", "author": "Baeldung"}' -H "Content-Type: application/json"

 > POST /posts HTTP/1.1

 > Content-Type: application/json

 > Content-Length: 60

 >

 < HTTP/1.1 201 Created

< Location: http://localhost:8080/posts/681a139012d5c00fcb674298這不會返回實際記錄,但它確實為我們提供了指向它的Location標頭。這也可以直接在資料庫中看到:
然後我們可以使用GET請求並指定 ID 來檢索該記錄:
$ curl -v -u admin:secret localhost:8080/posts/681a139012d5c00fcb674298

 > GET /posts/681a139012d5c00fcb674298 HTTP/1.1

 >

 < HTTP/1.1 200 OK

 < Content-Type: application/json

 < Content-Length: 152

 <

 {

 "_id": { "$oid": "681a139012d5c00fcb674298" },

 "title": "Introduction to RESTHeart",

 "author": "Baeldung",

 "_etag": { "$oid": "681a139012d5c00fcb674297" }

}我們也可以透過對整個集合使用GET請求來選擇整個集合:
$ curl -v -u admin:secret localhost:8080/posts

 > GET /posts HTTP/1.1

 >

 < HTTP/1.1 200 OK

 < Content-Type: application/json

 < Content-Length: 154

 <

 [

 {

 "_id": { "$oid": "681a139012d5c00fcb674298" },

 "title": "Introduction to RESTHeart",

 "author": "Baeldung",

 "_etag": { "$oid": "681a139012d5c00fcb674297" }

 }

]如預期的那樣,我們還可以使用PUT, PATCH,和DELETE呼叫來更新和刪除這些記錄:
$ curl -v -u admin:secret -X PUT localhost:8080/posts/681a139012d5c00fcb674298 -H "Content-Type: application/json" -d '{"title": "Intro to RESTHeart", "author": "Baeldung"}'

 > PUT /posts/681a139012d5c00fcb674298 HTTP/1.1

 > Content-Type: application/json

 > Content-Length: 53

 >

 < HTTP/1.1 200 OK

 < Content-Type: application/json

 < Content-Length: 0

 <
這些都不會傳回結果,但如果我們再次查詢,它會立即可用。
5.2. GraphQL API
除了 REST API 之外, RESTHeart 還允許我們透過 GraphQL API 公開我們的資料。與 REST API 不同,這需要一些初始配置才能使一切按預期工作。
所有 GraphQL API 均由gql-apps集合中的記錄定義。因此我們需要做的第一件事就是創建這個:
$ curl -v -u admin:secret -X PUT localhost:8080/gql-apps然後,我們需要在此集合中建立一個包含我們的 GraphQL API 定義的特殊記錄。要建立一個公開我們一直在使用的貼文的 API,配置將如下所示:
$ cat posts.schema

 {

 "_id": "restheart-posts",

 "descriptor": {

 "name": "restheart-posts",

 "description": "RESTHeart Tutorial",

 "enabled": true,

 "uri": "restheart-posts"

 },

 "schema": "type Post { title: String author: String } type Query { posts: [Post] }",

 "mappings": {

 "Post": {

 "name": "name",

 "author": "author"

 },

 "Query": {

 "posts": {

 "db": "restheart",

 "collection": "posts"

 }

 }

 }

}descriptor欄位給出了 RESTHeart 用於管理 API 的一些定義。這裡最重要的部分是uri字段,我們很快就會用到它。這裡的schema欄位是我們 API 的完整 GraphQL Schema 定義,以 GraphQL Schema 定義語言編寫。 mappings字段告訴 RESTHeart 如何在 GraphQL API 和 MongoDB 集合之間映射。在本例中,我們定義一個帶有name和author欄位的Post類型,以及一個帶有posts欄位的Query類型,該欄位對應到我們資料庫中的posts集合。
然後我們按照與之前相同的方式建立此記錄:
$ curl -v -u admin:secret -X POST localhost:8080/gql-apps -d "@posts.schema" -H "Content-Type: application/json"完成此操作後,我們的 GraphQL API 就可以使用了。我們已將uri字段設置為restheart-posts ,這意味著我們的 API 在/graphql/restheart-posts上公開:
$ curl -v -u admin:secret -X POST localhost:8080/graphql/restheart-posts -d "{ posts { title author } }" -H "Content-Type: application/graphql"

 > POST /graphql/restheart-posts HTTP/1.1

 > Content-Type: application/graphql

 > Content-Length: 26

 >

 * upload completely sent off: 26 bytes

 < HTTP/1.1 200 OK

 < Content-Type: application/graphql-response+json

 < Content-Length: 83

 <

 {

 "data": {

 "posts": [

 {

 "title": "Intro to RESTHeart",

 "author": "Baeldung"

 }

 ]

 }

 }
我們可以立即看到這是我們的 REST API 管理的相同資料。
6. 結論
在本文中,我們簡要介紹了 RESTHeart 以及它可以做什麼。使用這個框架可以實現更多功能,因此下次您需要建立 HTTP API 時,值得一看。