使用Postman訪問Keycloak endpoints
1.簡介
在本文中,我們將快速回顧OAuth 2.0,OpenID和Keycloak。之後,我們將學習Keycloak REST API以及如何在Postman中調用它們。
2. OAuth 2.0
OAuth 2.0是一種授權框架,可讓經過身份驗證的用戶通過令牌向第三方授予訪問權限。令牌通常限於生命週期有限的某些範圍。因此,它是替代用戶憑據的安全方法。
OAuth 2.0包含四個主要組件:
- 資源所有者–擁有受保護資源或數據的最終用戶或系統
- 資源服務器–該服務通常通過基於HTTP的API公開受保護的資源
- 客戶端–代表資源所有者調用受保護的資源
- 授權服務器–頒發OAuth 2.0令牌,並在對資源所有者進行身份驗證後將其傳遞給客戶端
OAuth 2.0是具有一些標準流程的協議,但是我們對授權服務器組件特別感興趣。
3. OpenID C0nnect
OpenID Connect 1.0 (OIDC)建立在OAuth 2.0的基礎上,用於向協議添加身份管理層。因此,它允許客戶端驗證最終用戶的身份並通過標準OAuth 2.0流訪問基本配置文件信息。 OIDC向OAuth 2.0引入了一些標準範圍,例如openid , profile和email 。
4. Keycloak作為授權服務器
JBoss已將Keycloak開發為基於Java的開源身份和訪問管理解決方案。除了同時支持OAuth 2.0和OIDC,它還提供身份代理,用戶聯合和SSO等功能。
我們可以將Keycloak用作帶有管理控制台的獨立服務器,也可以將其嵌入Spring應用程序中。一旦我們以以下兩種方式之一運行Keycloak,我們就可以嘗試端點。
5. Keycloak Endpoints
Keycloak為OAuth 2.0流提供了各種REST端點。
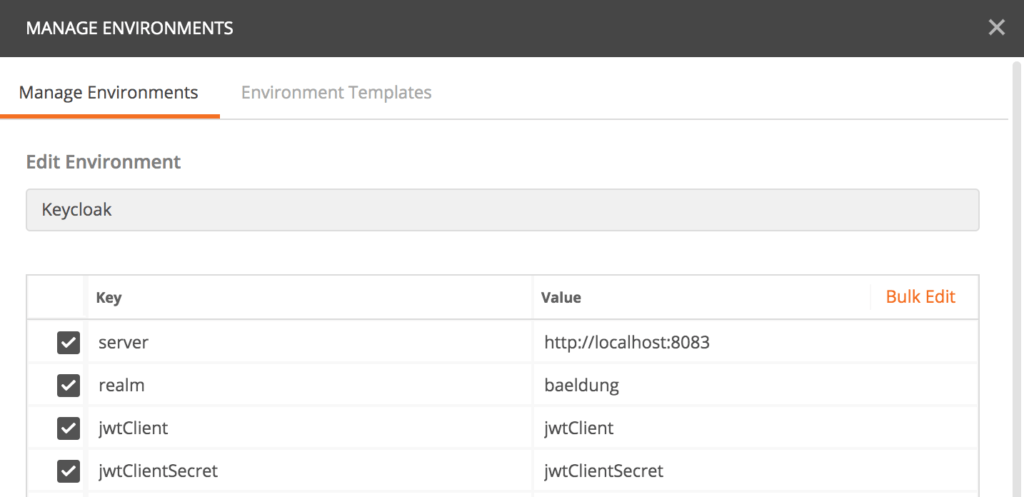
要將這些端點與Postman一起使用,讓我們開始創建一個名為“ Keycloak ”的環境。然後,我們為Keycloak授權服務器URL,領域,OAuth 2.0客戶端ID和客戶端密碼添加一些鍵/值條目:
然後,讓我們創建一個集合,在其中可以組織我們的Keycloak測試。現在,我們準備探索可用的端點。
5.1。 OpenID配置端點
配置端點就像根目錄。它返回所有其他可用的端點,支持的範圍和聲明以及簽名算法。
讓我們在郵遞員中創建一個請求: {{server}} / auth / realms / {{realm}} /。眾所周知/ openid-configuration。郵遞員在運行時從所選環境中設置{{server}}和{{realm}}的值:
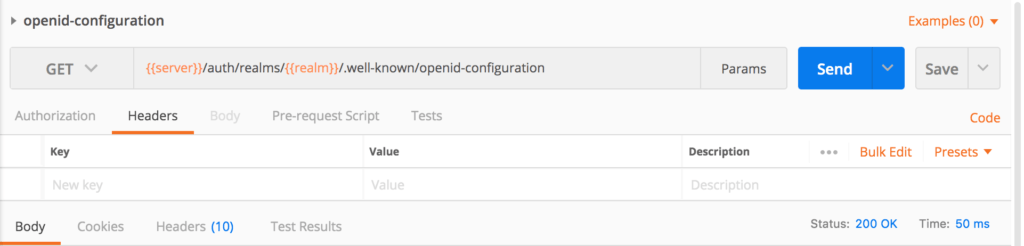
然後我們執行請求,如果一切順利,我們將收到響應:
{

 "issuer": "http://localhost:8083/auth/realms/baeldung",

 "authorization_endpoint": "http://localhost:8083/auth/realms/baeldung/protocol/openid-connect/auth",

 "token_endpoint": "http://localhost:8083/auth/realms/baeldung/protocol/openid-connect/token",

 "token_introspection_endpoint": "http://localhost:8083/auth/realms/baeldung/protocol/openid-connect/token/introspect",

 "userinfo_endpoint": "http://localhost:8083/auth/realms/baeldung/protocol/openid-connect/userinfo",

 "end_session_endpoint": "http://localhost:8083/auth/realms/baeldung/protocol/openid-connect/logout",

 "jwks_uri": "http://localhost:8083/auth/realms/baeldung/protocol/openid-connect/certs",

 "check_session_iframe": "http://localhost:8083/auth/realms/baeldung/protocol/openid-connect/login-status-iframe.html",

 "grant_types_supported": [...],

 ...

 "registration_endpoint": "http://localhost:8083/auth/realms/baeldung/clients-registrations/openid-connect",

 ...

 "introspection_endpoint": "http://localhost:8083/auth/realms/baeldung/protocol/openid-connect/token/introspect"

 }
如前所述,我們可以在響應中看到所有可用的端點,例如“ authorization_endpoint ”,“ token_endpoint ”等。
此外,響應中還有其他有用的屬性。例如,我們可以計算出從“支持所有類型的補助grant_types_supported ”或所有“支持範圍scopes_supported ”。
5.2。授權端點
讓我們繼續負責OAuth 2.0授權代碼流的授權端點的旅程。在OpenID配置響應中,它可以作為“authorization_endpoint”使用。
Endpoints是:
{{server}} / auth / realms / {{realm}} / protocol / openid-connect / auth?response_type = code&client_id = jwtClient
此外,此端點接受scope和redirect_uri作為可選參數。
我們不會在Postman中使用此端點。相反,我們通常會通過瀏覽器啟動授權代碼流。如果沒有活動的登錄cookie,則Keycloak會將用戶重定向到登錄頁面。最後,授權代碼將傳遞到重定向URL。
讓我們轉到下一步,看看如何獲取訪問令牌。
5.3。令牌端點
令牌端點允許我們檢索訪問令牌,刷新令牌或ID令牌。 OAuth 2.0支持不同的授予類型,例如authorization_code , refresh_token,或password.
令牌端點是: {{server}} / auth / realms / {{realm}} / protocol / openid-connect / token
但是,每種授權類型都需要一些專用的表單參數。
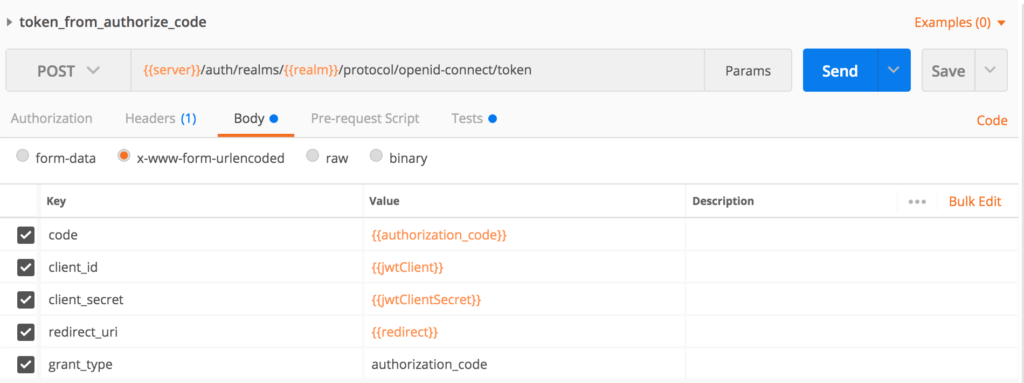
首先讓我們測試令牌端點,以獲取用於授權代碼的訪問令牌。我們必須在請求正文中傳遞以下表單參數: client_id , client_secret , grant_type , code和redirect_uri 。令牌端點還接受scope作為可選參數:
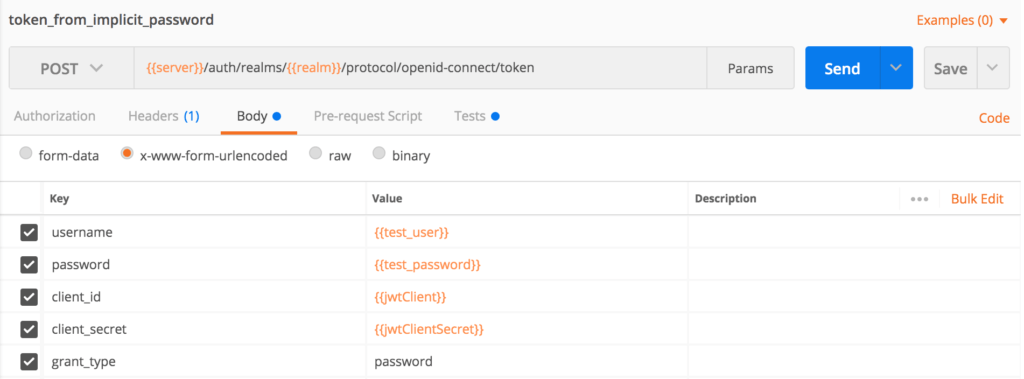
此外,如果我們要繞過授權碼流程,則選擇password授予類型.這裡我們需要用戶憑據,因此當我們的網站或應用程序上具有內置登錄頁面時,可以使用此流程。
讓我們創建一個郵遞員請求,並在正文中傳遞格式參數client_id , client_secret , grant_type , username和password :
在執行此請求之前,我們必須將username和password變量添加到Postman的環境鍵/值對中。
另一種有用的授予類型是refresh_token 。當我們從上次調用令牌端點時獲得有效的刷新令牌時,可以使用此方法。刷新令牌流需要參數client_id , client_secret , grant_type和refresh_token 。
我們需要響應access_token來測試其他端點。為了加快Postman的測試速度,我們可以在令牌端點請求的“ Tests部分中編寫腳本:
var jsonData = JSON.parse(responseBody);

 postman.setEnvironmentVariable("refresh_token", jsonData.refresh_token);

 postman.setEnvironmentVariable("access_token", jsonData.access_token);

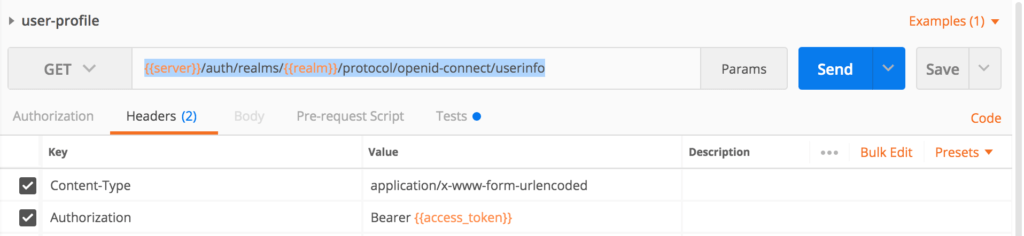
5.4。用戶信息Endpoints
當我們具有有效的訪問令牌時,我們可以從用戶信息端點檢索用戶配置文件數據。
用戶信息端點位於以下位置: {{server}} / auth / realms / {{realm}} / protocol / openid-connect / userinfo
讓我們為其創建一個郵遞員請求,並在Authorization標頭中傳遞訪問令牌:
然後我們執行請求。這是成功的響應:
{
"sub": "a5461470-33eb-4b2d-82d4-b0484e96ad7f",
"preferred_username": "[email protected]",
"DOB": "1984-07-01",
"organization": "baeldung"
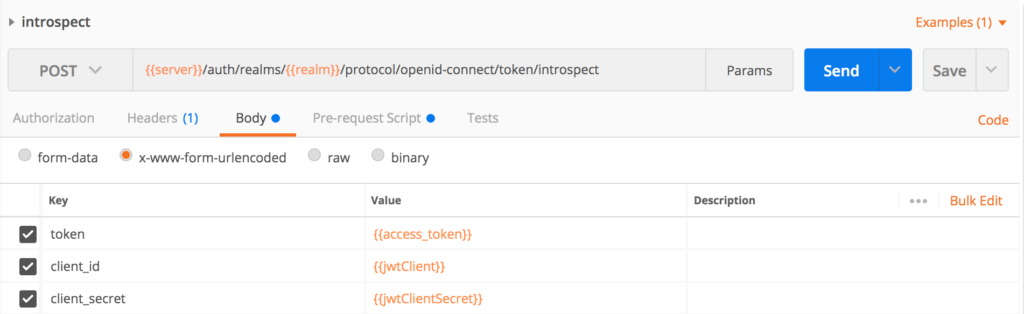
}5.5。令牌自省端點
如果資源服務器需要驗證訪問令牌是否處於活動狀態或需要更多有關它的元數據,尤其是對於不透明的訪問令牌,則令牌自省端點就是答案。在這種情況下,資源服務器將自省過程與安全配置集成在一起。
我們稱Keycloak的自省端點: {{server}} / auth / realms / {{realm}} / protocol / openid-connect / token / introspect
讓我們在Postman中創建一個自省請求,然後將client_id , client_secret和token作為表單參數傳遞:
如果access_token有效,則我們有響應:
{

 "exp": 1601824811,

 "iat": 1601824511,

 "jti": "d5a4831d-7236-4686-a17b-784cd8b5805d",

 "iss": "http://localhost:8083/auth/realms/baeldung",

 "sub": "a5461470-33eb-4b2d-82d4-b0484e96ad7f",

 "typ": "Bearer",

 "azp": "jwtClient",

 "session_state": "96030af2-1e48-4243-ba0b-dd4980c6e8fd",

 "preferred_username": "[email protected]",

 "email_verified": false,

 "acr": "1",

 "scope": "profile email read",

 "DOB": "1984-07-01",

 "organization": "baeldung",

 "client_id": "jwtClient",

 "username": "[email protected]",

 "active": true

 }
但是,如果我們使用無效的訪問令牌,則響應為:
{

 "active": false

 }
六,結論
在本文中,使用正在運行的Keycloak服務器,我們為授權,令牌,用戶信息和自省端點創建了郵遞員請求。