Spring Boot教學
Spring Boot是什麼?
Spring Boot簡介
Spring Boot主要目標
Spring Boot快速入門
新項目爲什麼需要Spring Boot?
Spring Boot引導過程
Spring Boot核心和限制
Spring Boot Tomcat部署
Spring Boot優點和缺點
Spring Boot構建系統
Spring Boot入門
Spring Boot代碼結構
Spring Boot安裝
Spring Boot Bean和依賴注入
Spring Boot應用程序開發入門
Spring Boot運行器(Runner)
Spring Boot JSP應用實例
Spring Boot應用程序屬性
Spring Boot將WAR文件部署到Tomcat
Spring Boot日誌
Spring Boot Hello World(Thymeleaf)示例
Spring Boot構建RESTful Web服務
Spring Boot非web應用程序實例
Spring Boot異常處理
Spring Boot @ConfigurationProperties實例
Spring Boot攔截器
Spring Boot SLF4J日誌實例
Spring Boot Servlet過濾器
Spring Boot Ajax實例
Spring Boot Tomcat端口號
Spring Boot文件上傳示例(Ajax和REST)
Spring Boot Rest模板
Spring Boot文件上傳示例
Spring Boot文件處理
Spring Boot服務組件
Spring Boot Thymeleaf示例
Spring Boot使用RESTful Web服務
Spring Boot CORS支持
Spring Boot國際化
Spring Boot調度
Spring Boot啓用HTTPS
Spring Boot Eureka服務器
Spring Boost Eureka服務註冊
Spring Boot Zuul代理服務器和路由
Spring Boot雲配置服務器
Spring Boot雲配置客戶端
Spring Boot Actuator
Spring Boot管理服務器
Spring Boot管理客戶端
Spring Boot啓用Swagger2
Spring Boot創建Docker鏡像
Spring Boot跟蹤微服務日誌
Spring Boot Flyway數據庫
Spring Boot發送電子郵件
Spring Boot Hystrix
Spring Boot Web Socket
Spring Boot批量服務
Spring Boot Apache Kafka
Spring Boot單元測試用例
Spring Boot Rest控制器單元測試
Spring Boot數據庫源(連接數據庫)
Spring Boot保護Web應用程序
Spring Boot文件處理
在本章中,將學習如何使用Web服務上載和下載文件。
上傳文件
對於上載文件,要將MultipartFile用作請求參數,此API應使用多部分表單數據值。 觀察下面給出的代碼 -
@RequestMapping(value = "/upload", method = RequestMethod.POST, consumes = MediaType.MULTIPART_FORM_DATA_VALUE)

public String fileUpload(@RequestParam("file") MultipartFile file) {
   return null;
}
下面給出了相同的完整代碼 -
package com.yiibai.demo.controller;

import java.io.File;
import java.io.FileOutputStream;
import java.io.IOException;

import org.springframework.http.MediaType;
import org.springframework.web.bind.annotation.RequestMapping;
import org.springframework.web.bind.annotation.RequestMethod;
import org.springframework.web.bind.annotation.RequestParam;
import org.springframework.web.bind.annotation.RestController;
import org.springframework.web.multipart.MultipartFile;

@RestController
public class FileUploadController {
   @RequestMapping(value = "/upload", method = RequestMethod.POST,
      consumes = MediaType.MULTIPART_FORM_DATA_VALUE)

   public String fileUpload(@RequestParam("file") MultipartFile file) throws IOException {
      File convertFile = new File("/var/tmp/"+file.getOriginalFilename());
      convertFile.createNewFile();
      FileOutputStream fout = new FileOutputStream(convertFile);
      fout.write(file.getBytes());
      fout.close();
      return "File is upload successfully";
   }
}
文件下載
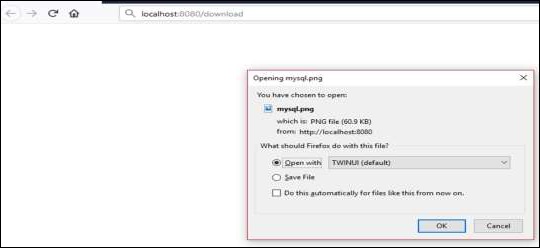
對於文件下載,應該使用InputStreamResource下載文件。需要在Response中設置HttpHeader Content-Disposition,並且需要指定應用程序的響應Media Type。
注 - 在以下示例中,文件應在運行應用程序的指定路徑上可用。
@RequestMapping(value = "/download", method = RequestMethod.GET)
public ResponseEntity<Object> downloadFile() throws IOException  {
   String filename = "/var/tmp/mysql.png";
   File file = new File(filename);
   InputStreamResource resource = new InputStreamResource(new FileInputStream(file));
   HttpHeaders headers = new HttpHeaders();

   headers.add("Content-Disposition", String.format("attachment; filename=\\"%s\\"", file.getName()));
   headers.add("Cache-Control", "no-cache, no-store, must-revalidate");
   headers.add("Pragma", "no-cache");
   headers.add("Expires", "0");

   ResponseEntity<Object>
   responseEntity = ResponseEntity.ok().headers(headers).contentLength(file.length()).contentType(
      MediaType.parseMediaType("application/txt")).body(resource);

   return responseEntity;
}
下面給出了相同的完整代碼 -
package com.yiibai.demo.controller;

import java.io.File;
import java.io.FileInputStream;
import java.io.IOException;

import org.springframework.core.io.InputStreamResource;
import org.springframework.http.HttpHeaders;
import org.springframework.http.MediaType;
import org.springframework.http.ResponseEntity;
import org.springframework.web.bind.annotation.RequestMapping;
import org.springframework.web.bind.annotation.RequestMethod;
import org.springframework.web.bind.annotation.RestController;

@RestController
public class FileDownloadController {
   @RequestMapping(value = "/download", method = RequestMethod.GET)
   public ResponseEntity<Object> downloadFile() throws IOException  {
      String filename = "/var/tmp/mysql.png";
      File file = new File(filename);
      InputStreamResource resource = new InputStreamResource(new FileInputStream(file));
      HttpHeaders headers = new HttpHeaders();

      headers.add("Content-Disposition", String.format("attachment; filename=\\"%s\\"", file.getName()));
      headers.add("Cache-Control", "no-cache, no-store, must-revalidate");
      headers.add("Pragma", "no-cache");
      headers.add("Expires", "0");

      ResponseEntity<Object>
      responseEntity = ResponseEntity.ok().headers(headers).contentLength(
         file.length()).contentType(MediaType.parseMediaType("application/txt")).body(resource);

      return responseEntity;
   }
}
主要的Spring Boot應用程序如下 -
package com.yiibai.demo;

import org.springframework.boot.SpringApplication;
import org.springframework.boot.autoconfigure.SpringBootApplication;

@SpringBootApplication
public class DemoApplication {
   public static void main(String[] args) {
      SpringApplication.run(DemoApplication.class, args);
   }
}
Maven構建文件 - pom.xml 的代碼如下 -
<?xml version = "1.0" encoding = "UTF-8"?>
<project xmlns = "http://maven.apache.org/POM/4.0.0"
   xmlns:xsi = "http://www.w3.org/2001/XMLSchema-instance"
   xsi:schemaLocation = "http://maven.apache.org/POM/4.0.0
   http://maven.apache.org/xsd/maven-4.0.0.xsd">

   <modelVersion>4.0.0</modelVersion>
   <groupId>com.yiibai</groupId>
   <artifactId>demo</artifactId>
   <version>0.0.1-SNAPSHOT</version>
   <packaging>jar</packaging>
   <name>demo</name>
   <description>Demo project for Spring Boot</description>

   <parent>
      <groupId>org.springframework.boot</groupId>
      <artifactId>spring-boot-starter-parent</artifactId>
      <version>1.5.8.RELEASE</version>
      <relativePath/>
   </parent>

   <properties>
      <project.build.sourceEncoding>UTF-8</project.build.sourceEncoding>
      <project.reporting.outputEncoding>UTF-8</project.reporting.outputEncoding>
      <java.version>1.8</java.version>
   </properties>

   <dependencies>
      <dependency>
         <groupId>org.springframework.boot</groupId>
         <artifactId>spring-boot-starter-web</artifactId>
      </dependency>

      <dependency>
         <groupId>org.springframework.boot</groupId>
         <artifactId>spring-boot-starter-test</artifactId>
         <scope>test</scope>
      </dependency>
   </dependencies>

   <build>
      <plugins>
         <plugin>
            <groupId>org.springframework.boot</groupId>
            <artifactId>spring-boot-maven-plugin</artifactId>
         </plugin>
      </plugins>
   </build>

</project>
Gradle構建文件 - build.gradle 的代碼如下 -
buildscript {
   ext {
      springBootVersion = '1.5.8.RELEASE'
   }
   repositories {
      mavenCentral()
   }
   dependencies {
      classpath("org.springframework.boot:spring-boot-gradle-plugin:${springBootVersion}")
   }
}

apply plugin: 'java'
apply plugin: 'eclipse'
apply plugin: 'org.springframework.boot'

group = 'com.yiibai'
version = '0.0.1-SNAPSHOT'
sourceCompatibility = 1.8

repositories {
   mavenCentral()
}
dependencies {
   compile('org.springframework.boot:spring-boot-starter-web')
   testCompile('org.springframework.boot:spring-boot-starter-test')
}
現在創建一個可執行的JAR文件,並使用下面給出的Maven或Gradle命令運行Spring Boot應用程序:
對於Maven,請使用下面給出的命令 -
mvn clean install在「BUILD SUCCESS」之後,在target目錄下找到JAR文件。
對於Gradle,可以使用下面顯示的命令 -
gradle clean build在「BUILD SUCCESSFUL」之後,在build/libs 目錄下找到JAR文件。
現在,使用以下命令運行JAR文件 -
java –jar <JARFILE>這將在Tomcat端口8080上啓動應用程序。
現在點擊 POSTMAN 應用程序中的以下URL,可以看到如下所示的輸出 -
文件上傳 - http://localhost:8080/upload
文件下載 - http://localhost:8080/download