Android基於位置服務
Android 的位置API,很容易讓創建位置感知的應用程序,而不需要把重點放在相關定位技術細節。這在谷歌服務的幫助下有利於應用程序添加位置感知,自動定位跟蹤,地理和活動識別成爲可能。
本教程介紹瞭如何使用位置服務在應用程序來獲取當前的位置,得到週期性位置更新,查找地址等
Location 對象
Location對象代表一個地理位置可包括緯度,經度,時間戳和其它信息,如重力,高度和速度。有以下重要的方法在使用Location對象位置的具體信息:
S.N.
方法和說明
1
float distanceTo(Location dest)
返回在這個位置,並在給定的位置之間大致距離(單位:米)
2
float getAccuracy()
得到這個位置的估計精度,以米爲單位
3
double getAltitude()
(如果可用)獲取的高度,如:海拔(單位:米)
4
float getBearing()
獲取軸承,以度爲單位
5
double getLatitude()
獲得緯度,單位爲度
6
double getLongitude()
得到經度,單位爲度
7
float getSpeed()
獲取速度(如果可用),在地上以米/秒
8
boolean hasAccuracy()
如果此位置有一個精確度
9
boolean hasAltitude()
True - 如果此位置有一個高度
10
boolean hasBearing()
True 如果該位置有一個支撐
11
boolean hasSpeed()
True如果這個位置有一個速度
12
void reset()
清除單元內容
13
void setAccuracy(float accuracy)
設置此位置的估計精度(米)
14
void setAltitude(double altitude)
設置海拔高度(米)
15
void setBearing(float bearing)
設置支承,以度爲單位
16
void setLatitude(double latitude)
設置的緯度,單位爲度
17
void setLongitude(double longitude)
設置的經度,單位爲度
18
void setSpeed(float speed)
設置速度,在地上以米/秒
19
String toString()
返回包含此對象的簡潔,可讀的描述字符串信息
當前位置
要獲得目前的位置,需要創建一個位置的 LocationClient 對象,將它連接到位置服務使用connect()方法,然後調用其 getLastLocation() 方法。此方法返回最近的位置Location對象的形式:其中包含緯度和經度座標和其他信息,如上面所述。要在活動中有基於位置的功能,將需要實現兩個接口:
GooglePlayServicesClient.ConnectionCallbacks
GooglePlayServicesClient.OnConnectionFailedListener
這些接口提供了以下重要的,需要在活動類實現回調方法:
S.N.
回調方法及說明
1
abstract void onConnected(Bundle connectionHint)
這個回調方法被調用時,位置服務是成功連接到客戶端的位置。將使用connect()方法來連接到客戶端的位置
2
abstract void onDisconnected()
當客戶端斷開這個回調方法被調用。將使用disconnect()方法從位置客戶端斷開連接
3
abstract void onConnectionFailed(ConnectionResult result)
這個回調方法被調用時,有客戶端連接到服務的錯誤
應該創在建客戶活動類onCreate()方法中調用獵取位置,然後將其連接在onStart(),讓位置服務維持目前的位置,而活動是完全可見。斷開客戶端onStop()方法,這樣應用程序是不可見的,位置服務不是維持在目前的位置。這在很大程度上有助於節省電池電量。
獲取更新位置
如果願意的位置更新,那麼除了上面提到的接口,需要實現LocationListener 接口,該接口提供了以下回調方法,需要在活動類實現:
S.N.
回調方法說明
1
abstract void onLocationChanged(Location location)
此回調方法用於從LocationClient接收通知時的位置發生了變化
位置服務質量
LocationRequest對象的位置從LocationClient更新服務質量(QoS),setter方法可以用它來處理QoS。
S.N.
方法 & 描述
1
setExpirationDuration(long millis)
設置此請求的時間,以毫秒爲單位
2
setExpirationTime(long millis)
自啓動設置請求過期時間,單位爲毫秒
3
setFastestInterval(long millis)
明確設置最快的時間間隔位置更新,以毫秒爲單位
4
setInterval(long millis)
設置爲主動位置更新,以毫秒爲單位所需的時間間隔
5
setNumUpdates(int numUpdates)
設置的位置更新次數
6
setPriority(int priority)
設置請求的優先級
例如,如果應用需要較準確位置,它應該創建一個位置請求 setPriority(int) 設置 PRIORITY_HIGH_ACCURACY和setInterval(long) 爲5秒。還可以使用更大的間隔和/或其他優先如PRIORITY_LOW_POWER 要求「城市」 的級別精度或PRIORITY_BALANCED_POWER_ACCURACY爲「塊」級別的精度。
活動應該考慮刪除在所有位置請求進入後臺時(例如 onPause()),或者至少交換請求到一個更大的間隔和降低質量以節省電力消耗。
顯示位置地址
Location對象可以使用 Geocoder.getFromLocation() 方法來獲得一個地址,對於一個給定的緯度和經度。這種方法是同步的,可能要花很長的時間來完成其工作,所以應該調用AsyncTask類的 doInBackground() 方法。
AsyncTask必須要使用的子類和子類會覆蓋 doInBackground(Params....)方法中執行任務UI線程上的後臺計算完成後,當 onPostExecute(Result) 方法被調用顯示結果。還有一個更重要的方法在AyncTask execute(Params... params),此方法使用指定的參數執行任務。
檢查下面的例子中,我們如何使用 AynchTask 在任何 Android 應用程序完成工作的主要任務,而不會干擾後臺。
示例
下面的示例演示如何在實際使用位置服務在應用程序來獲取當前位置、等效地址等等。這個例子中,需要實際配備最新的 Android OS 移動設備,否則仿真器可能無法正常工作。
安裝谷歌播放服務SDK
在繼續之前有位置在Android應用程序的支持,NEET設置谷歌播放服務SDK使用以下簡單的步驟:
步驟
描述
1
啓動SDK管理器
在Eclipse(使用ADT),選擇 Window > Android SDK Manager
在Windows中,雙擊SDK Manager.exe 請通過在Android SDK目錄的根目錄
在Mac或Linux打開一個終端並導航到工具/目錄下在Android SDK目錄下,然後執行Android SDK
2
搜索Google Play services從給定的軟件包列表服務選項下的Extra ,如果沒有安裝它,那麼進行安裝。在谷歌Play業務SDK是在保存在Android SDK環境*
3
複製庫項目在*
創建Android應用程序
步驟
描述
1
使用Eclipse IDE創建Android應用程序,並將其命名爲:LBSDemo,在創建這個項目時請確保目標SDK 編譯在Android SDK的最新版本或使用更高級別的API
2
添加 Google Play服務庫中的項目按照以下給出簡單的步驟
3
修改 src/MainActivity.java 文件,並添加所需的代碼如下所示採取獲取當前位置和它的等效轉交地址
4
修改佈局XML文件res/layout/activity_main.xml 添加所有GUI組件,其中包括三個按鈕和兩個文本視圖來顯示位置/地址
5
修改res/values/strings.xml定義所需的常量值
6
修改 AndroidManifest.xml 如下所示
7
運行該應用程序啓動Android模擬器和驗證應用程序所做的修改結果
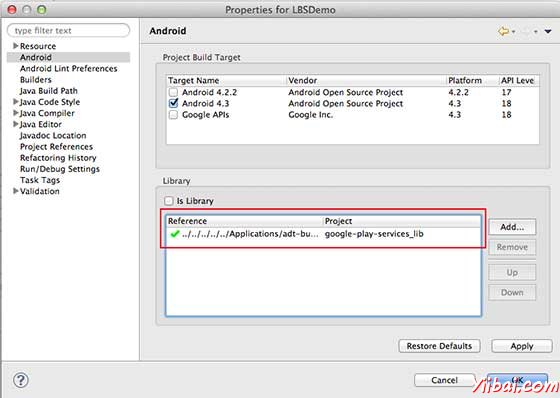
讓我們在項目中添加引用谷歌Play服務。右鍵單擊該項目,並選擇Build Path > Configure Build Path > Android >,然後單擊「Add 」按鈕,將顯示要添加的谷歌Play service_liboption,只要雙擊就可以了,這將增加所需的庫的引用,將有窗口如下所示:

以下是內容的修改主活動文件 src/com.yiibai.lbsdemo/MainActivity.java
package com.example.lbsdemo; import java.io.IOException; import java.util.List; import java.util.Locale; import com.google.android.gms.common.ConnectionResult; import com.google.android.gms.common.GooglePlayServicesClient; import com.google.android.gms.location.LocationClient; import android.content.Context; import android.location.Address; import android.location.Geocoder; import android.location.Location; import android.os.AsyncTask; import android.os.Bundle; import android.support.v4.app.FragmentActivity; import android.util.Log; import android.view.View; import android.widget.Button; import android.widget.TextView; import android.widget.Toast; public class MainActivity extends FragmentActivity implements GooglePlayServicesClient.ConnectionCallbacks, GooglePlayServicesClient.OnConnectionFailedListener { LocationClient mLocationClient; private TextView addressLabel; private TextView locationLabel; private Button getLocationBtn; private Button disconnectBtn; private Button connectBtn; @Override protected void onCreate(Bundle savedInstanceState) { super.onCreate(savedInstanceState); setContentView(R.layout.activity_main); locationLabel = (TextView) findViewById(R.id.locationLabel); addressLabel = (TextView) findViewById(R.id.addressLabel); getLocationBtn = (Button) findViewById(R.id.getLocation); getLocationBtn.setOnClickListener(new View.OnClickListener() { public void onClick(View view) { displayCurrentLocation(); } }); disconnectBtn = (Button) findViewById(R.id.disconnect); disconnectBtn.setOnClickListener(new View.OnClickListener() { public void onClick(View view) { mLocationClient.disconnect(); locationLabel.setText("Got disconnected...."); } }); connectBtn = (Button) findViewById(R.id.connect); connectBtn.setOnClickListener(new View.OnClickListener() { public void onClick(View view) { mLocationClient.connect(); locationLabel.setText("Got connected...."); } }); // Create the LocationRequest object mLocationClient = new LocationClient(this, this, this); } @Override protected void onStart() { super.onStart(); // Connect the client. mLocationClient.connect(); locationLabel.setText("Got connected...."); } @Override protected void onStop() { // Disconnect the client. mLocationClient.disconnect(); super.onStop(); locationLabel.setText("Got disconnected...."); } @Override public void onConnected(Bundle dataBundle) { // Display the connection status Toast.makeText(this, "Connected", Toast.LENGTH_SHORT).show(); } @Override public void onDisconnected() { // Display the connection status Toast.makeText(this, "Disconnected. Please re-connect.", Toast.LENGTH_SHORT).show(); } @Override public void onConnectionFailed(ConnectionResult connectionResult) { // Display the error code on failure Toast.makeText(this, "Connection Failure : " + connectionResult.getErrorCode(), Toast.LENGTH_SHORT).show(); } public void displayCurrentLocation() { // Get the current location's latitude & longitude Location currentLocation = mLocationClient.getLastLocation(); String msg = "Current Location: " + Double.toString(currentLocation.getLatitude()) + "," + Double.toString(currentLocation.getLongitude()); // Display the current location in the UI locationLabel.setText(msg); // To display the current address in the UI (new GetAddressTask(this)).execute(currentLocation); } /*
* Following is a subclass of AsyncTask which has been used to get
* address corresponding to the given latitude & longitude.
*/ private class GetAddressTask extends AsyncTask<Location, Void, String>{ Context mContext; public GetAddressTask(Context context) { super(); mContext = context; } /*
* When the task finishes, onPostExecute() displays the address.
*/ @Override protected void onPostExecute(String address) { // Display the current address in the UI addressLabel.setText(address); } @Override protected String doInBackground(Location... params) { Geocoder geocoder = new Geocoder(mContext, Locale.getDefault()); // Get the current location from the input parameter list Location loc = params[0]; // Create a list to contain the result address List<Address> addresses = null; try { addresses = geocoder.getFromLocation(loc.getLatitude(), loc.getLongitude(), 1); } catch (IOException e1) { Log.e("LocationSampleActivity", "IO Exception in getFromLocation()"); e1.printStackTrace(); return ("IO Exception trying to get address"); } catch (IllegalArgumentException e2) { // Error message to post in the log String errorString = "Illegal arguments " + Double.toString(loc.getLatitude()) + " , " + Double.toString(loc.getLongitude()) + " passed to address service"; Log.e("LocationSampleActivity", errorString); e2.printStackTrace(); return errorString; } // If the reverse geocode returned an address if (addresses != null && addresses.size() > 0) { // Get the first address Address address = addresses.get(0); /*
* Format the first line of address (if available),
* city, and country name.
*/ String addressText = String.format( "%s, %s, %s", // If there's a street address, add it address.getMaxAddressLineIndex() > 0 ? address.getAddressLine(0) : "", // Locality is usually a city address.getLocality(), // The country of the address address.getCountryName()); // Return the text return addressText; } else { return "No address found"; } } }// AsyncTask class }
Following will be the content of res/layout/activity_main.xml file:
<LinearLayout xmlns:android="http://schemas.android.com/apk/res/android" android:layout_width="fill_parent" android:layout_height="fill_parent" android:orientation="vertical" > <Button android:id="@+id/getLocation" android:layout_width="fill_parent" android:layout_height="wrap_content" android:text="@string/get_location"/> <Button android:id="@+id/disconnect" android:layout_width="fill_parent" android:layout_height="wrap_content" android:text="@string/disconnect"/> <Button android:id="@+id/connect" android:layout_width="fill_parent" android:layout_height="wrap_content" android:text="@string/connect"/> <TextView android:id="@+id/locationLabel" android:layout_width="wrap_content" android:layout_height="wrap_content"/> <TextView android:id="@+id/addressLabel" android:layout_width="wrap_content" android:layout_height="wrap_content"/>
下面文件 res/values/strings.xml 內容中定義兩個新的常量:
以下是 AndroidManifest.xml 文件中默認的內容:
<manifest xmlns:android="http://schemas.android.com/apk/res/android" package="com.yiibai.lbsdemo" android:versionCode="1" android:versionName="1.0" > <uses-sdk android:minSdkVersion="8" android:targetSdkVersion="17" /> <uses-permission android:name="android.permission.ACCESS_COARSE_LOCATION"/> <application android:allowBackup="true" android:icon="@drawable/ic_launcher" android:label="@string/app_name" android:theme="@style/AppTheme" > <activity android:name="com.yiibai.lbsdemo.MainActivity" android:label="@string/app_name" >
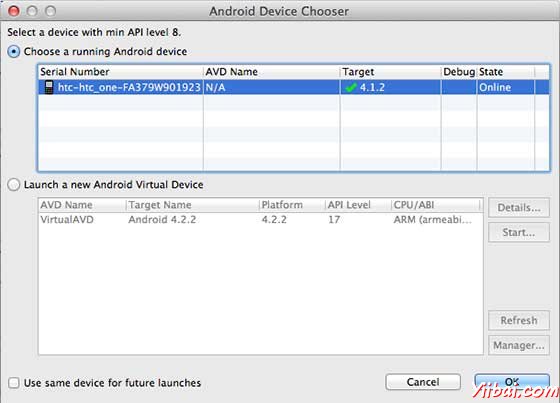
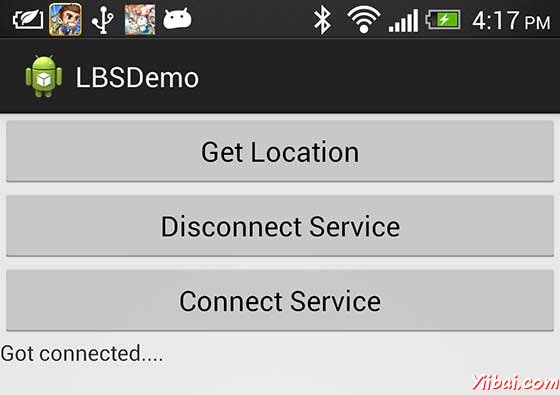
我們嘗試運行LBSDemo應用程序。 Eclipse AVD安裝的應用程序,並啓動它,如果一切設置和應用都沒有問題,它會顯示以下模擬器窗口:

選擇移動設備作爲一個選項,然後檢查移動設備,這將顯示以下畫面:

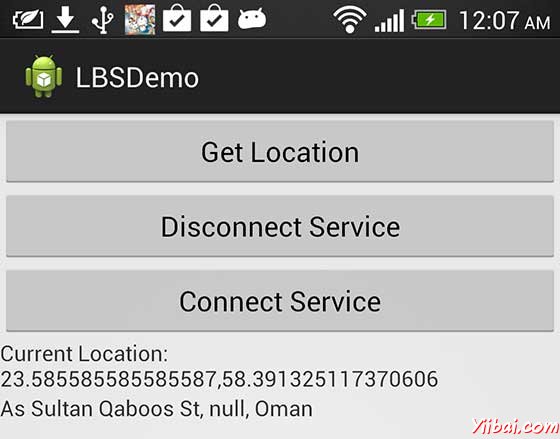
現在看到的位置選擇位置「按鈕,將顯示位置信息如下:

可以嘗試斷開位置,客戶端使用服務,然後斷開連接使用連接服務按鈕,還可以修改位置更新,如上所述,可查閱 Android官方文檔。